Saturday, March 16, 2019

You're Super Sweet Card with Doodles Paper Playground

Hello Crafty Friends -  I am here with a fun shaker card featuring the Sweet Treats Sparkle Blends

This card is full of sweet treat inside and out. I created a mini bag full of candy treats.

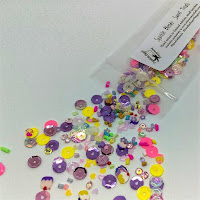
A pastel blend of sprinkle shaped beads,
artificial Fimo sprinkles, hearts, stars, 
cup sequins, iridescent crystals and 
cupcake & ice cream cone shaped Fimo shapes
is a fun addition to any birthday card or project!

Here's my card with the Sparkle Blends at the bottom of the mini treat bag. 

Showing the Sparkle Blends

So, let's get started on the card.

First, I stamped and colored the images from Skull and Cross Buns Retro Sweeties Stamp set. 
Then, die cut a window in my mini treat bag using a small square die. 
I added a piece of chipboard inside of the bag so not to cut through the bag.

Next, I adhered clear plastic to the die cut square. 
I used a piece of packaging, slid it into the bag and glue it in place.


Then, I adhered some of the little Retro Candy stamped images to the inside of the mini bag. Next, I fill the bag with the Sparkle Blends: Sweet Treat and I added a bit of Recollections Brand Glitz glitter. Seal up the mini treat bag.


Then, I matted white cardstock onto medium purple cardstock for my card front. I adhered the mini treat bag to the card front and embellished with the rest of the colored images. I stamped sentiment onto white cardstock and colored the word SWEET with some Distress Markers and matted it onto black cardstock. Then, I adhered the sentiment on foam adhesive.

 Now the card is complete! 

This is a fun and colorful card perfect for your sweetie, a child and a friend.

Supplies Used:
Distress Markers: Ripe Persimmon, Tumbled Glass,
Mustard Seed, Seedless Preserves & Mowed Lawn
Skull & Cross Bun Retro Sweeties Stamp Set
Whisker Graphics Mini Treat Bags: White & Yellow Dots
Recollections Brand Cardstock: White, Black, & Purple
Recollections Brand Glitter: Glitz
Sakura Gelly Roll Pen: White
Spectrum Noir Markers: CT1, TB1, HB1, DR1, 
OR1, RB1, LG3, PP2, PP6 & TB3


Thank you for stopping by the blog today! 

Be sure to tag us Doodles Paper Playground on social media 
if you create a project with our Sparkle Blends.
 All of our Sparkle Blends can be purchased on the 

Friday, March 15, 2019

Spring Cottage with Simply Crafty SVG

Hello Crafty Friends - I am here with a fun Spring project.

I turned the Love Shack SVG from Simply Crafty SVG into a cut Spring Cottage. Now, this little house is a gift box. So, you can place a small gift inside for a loved one or you can fill it with some sweets and place it on your coffee table or desk.

I created the little house as per the directions provided with the download from Simply Crafty SVG.
I love that Sandy provide both easy to follow PDF and Video for all the SVG projects on the site.

I simply changed my colors to Springtime colors and added a few extra embellishments like die cut grass, flowers, butterflies, bird, tiny cat & tree. I also added a few stamped images like the potted plants on the front porch and the bird fountain on the back of the house. I also added some curtain from pattern paper.


The sides of the Cottage


The back 

Some close up details of the roof, windows & Butterfly


I hope you create a Springtime Cottage of your own.

Be sure to join us over on the Facebook Group Simply Crafty SVGs Creators Group
If you create any of the Wonderful Project designed by Sandy from Simply Crafty SVG share them with us in the group and social media.

Tuesday, March 12, 2019

Never Give Up Card with White Rose Crafts LLC

Hello Crafty Friends - I am Guest Designing for White Rose Crafts LLC this month. It's an honor to be working with Kay and her team. 

Today, I am here with a quick and easy card 
using this month's kit called Blue Skies.

This kit is beautiful - it has shades of blue, rich gold, butterflies,
 uplifting quotes and a fantastic stamp by Kaisercrafts.

So let's get started on the card.

I started by trimming the floral paper to 4" x 5-1/4". I pulled a piece of Navy cardstock from my stash and trimmed that to 4-1/1"" x 5-1/2". Next, I die cut a circle from the rich gold specialty cardstock from the kit. Then, I trimmed the sentiment I wanted to use from one of the pattern papers from the kit.

Once, I had my papers, sentiment and other supplies gathered I created the card.

I matted the floral pattern paper onto the navy cardstock. Then, I used low profile foam adhesive on the back of the gold circle and adhered it the lower right of the card front.

Next, I turned my attention to the chipboard butterfly. I used Distress Oxide Ink in Squeezed Lemonade directly onto the butterfly. I lightly dried it between layers of ink with my heat tool. Next, I sprayed the New Distress Oxide Spray in Mermaid Lagoon. 


Once it was dry I flipped it over and added low profile foam adhesive onto the back of the butterfly. Then, place it onto the gold cardstock circle.

Next, I added the sentiment on top of the butterfly again with low profile foam adhesive. I was now ready to add some finishing touches.

I add a few sequins from the Sunny Skies Sparkle Blend that comes in the kit. I also added from the Sparkle Blend the little gold coils to the antenna. I adhered the card front to a top folding card base.  

Now the card is complete!

You can create a similar card with the contents
 of the March's Blue Skies Kit available now.

Supplies Used:
Ingio Skies Pattern Papers, Gold cardstock & Sequins

Thank you for stopping by the blog today!

If you would like to join in the fun for the White Rose Crafts March Sketch Challenge, and other fun activites and conversations make sure you join the 
White Rose Crafts Gallery group on Facebook!

Monday, March 11, 2019

Happy Easter Tag with Rinea Foil Paper

 Hello Crafty Friends -I am here with a fun Easter tag.

With some die cutting and a bit of stamping you can create some tags for those Easter Baskets, you are creating for your family.
Recollection Brand 110lb White Cardstock
EK Success Mini Flower Punch
Offray Ribbon - Gold Metallic
Ranger Liquid Pearls - Gold Pearl
Assorted Fibers 
Adhesive: Tape Runner & foam 

So let's get started
First, stamp and color the Easter eggs. I used 3 in total. As well as the word Happy - trim and set a side. Next, die cut the tag once from white cardstock (so I could have a place to write a quick note) and once from Rinea Starstruck Lavender Foil Paper

Then, die cut the word Easter 2x once from white cardstock and once from Rinea Glossy Gold Foil Paper. Next, Punch a few flowers (as many as you like) - This just gives the eggs a place to sit so they don't look like they are floating.

Next, adhere the two tags together. Repeat the process with the word Easter.


Now that the tag is ready to decorate - adhere the three Easter Egg to the tag. Place them towards the bottom of the tag. Popping up the center egg.

Next, adhere the flowers beneath the eggs. Layering them to create a lovely little nest for them.


Then, adhere the word Easter toward the top of the tag. Adhere the stamped word Happy to the tag - tucking slightly into the word Easter.

Next, cut your fibers and ribbon. Attach them to the tag. I add the fibers through the hole. Then, tied the ribbon around the fibers and made a bow.


Finally, add a bit of Liquid Pearls to the center of the flowers.


Your Tag is now complete. You can make as many as needed. The image can be changed to a more masculine design as well as the colors - Rinea carries a great variety of Foil Paper in an assortment of colors.

Thank you so much for stopping by the blog today. 

Saturday, March 9, 2019

Your My Lucky charm Card with Doodles Paper Playground

Hello Crafty Friends -- I am here with another fun featuring the Good Luck Charm Sparkle Blend from Doodles Paper Playground. 

I love this blend with its little shamrocks, lucky horseshoes and two tone hearts! 


A bold blend consisting of mostly bright greens, 
this blend is packed with shamrock confetti, 
offset nicely with a scattering of metallic gold and 
sliver sequins and confetti, and just a touch of white. 
A few large horseshoes finish off this fun, festive blend.


Here is the shaker card I created using this fantastic blend. 


Thank you for stopping by the blog today! 

Be sure to tag us Doodles Paper Playground on social media 
if you create a project with our Sparkle Blends.
 All of our Sparkle Blends can be purchased on the 

Tuesday, March 5, 2019

Retro Glam Tags with The Robin's Nest

Hello Crafty Friends - Annie here with some tags -
 that would compliment any Gift, card, scrapbook layout, travelers notebook or canvas.

They are easy to put together.


Both tags are basically put together in the same way. except for the Ephemera card and embellishments.  I die cut the tag from the Glitter Chipboard. I also die cut the reinforcer in a coordinating color from cardstock. I adhered the reinforcer to the tag. I then adhered the ephemera card using low profile foam tape.

For the feminine tag, I did ink the edge with a bit of Distress Oxide ink in Carved Pumpkin to bring out the orange tone a bit more.

I then, add the embellishment of the Dew Drops, flowers and fibers.

Quick and easy!

Feminine Tag


Pink Glitter Chipboard

Orange Crush Cards

Butterflies Dew Drops

Fall Gems Diamond Dew Drops

Black/White/Silver Dew Drops

Other Supplies used:
Hero Art Infinity Tag Dies
Prima Mini Mulberry Flowers
Distress Oxide Ink - Carved Pumpkin
Assorted Fibers
Jot Brand Low Profile Foam Adhesive
Aleene's Tacky Glue


Masculine Tag


Teal Glitter Chipboard


 Rusty Rose Cards

Fall Gems Diamond Dew Drops

Precious Boy Diamond Dew Drops

Other Supplies used:
Hero Art Infinity Tag Dies
Assorted Fibers
Jot Brand Low Profile Foam Adhesive
Aleene's Tacky Glue

Have a Great Crafty Day!!
Stop by and shop for your favorite Dew Drops and More
 at Robin's Nest Store

Saturday, March 2, 2019

Spring Card with Doodles Paper Playground

Hello Crafty Friends - I am here with a cute spring card for you featuring Spring Fling and
 Flower Power Sparkle Blends.

With Easter just around the corner, 
pastels are all the rage in the crafting world, 
and this blend delivers! 
With a beautiful base of pastel pink, lavender, green,
 light gold & blue, metallic cup sequins 
and a generous amount of tiny pastel heart confetti, 
but we also added a touch of whimsy with pastel 
colored butterflies and 
beautiful faceted crystals. 

For a floral fanatic, this blend is perfect! 
We skipped the usual cupped sequins in favor of nothing but 
flowers in this bright, happy blend!
 Flower styles range from simple daisies to 
tropical fimo slices and holographic blooms.

I also use March's Sketch from White Rose Crafts LLC. which is part of this month challenge in the Facebook Group Gallery


Here is my card 

Supplies Used:
Simple Stories Pattern Paper
Recollections Brand Cardstock: White, Light Yellow & Kraft
Arteza Real Brush Watercolor Markers:
Royal Blue, Bright Blue, Lemon Yellow, Orange,
Neon Pink, Seaweed Green, Light Green & Chocolate

Thank you for stopping by the blog today! 

Be sure to tag us Doodles Paper Playground on social media 
if you create a project with our Sparkle Blends.
 All of our Sparkle Blends can be purchased on the