Tuesday, July 16, 2019

New High Tea Stamp Release with SumMore Fun

Hello Crafty Friends - I am here with a New Stamp Release for SumMore Fun

All week long the Design Team and Guest Design Team will be showing their beautiful creations using the New Release Stamp called High Tea. This set will be available on Friday, July 19th!

The High Tea stamp set is perfect for anyone who loves to give cards of encouragement. 

Sabrina has created a Mini Card Kit for this release. The Sundri's High Tea Cardmaker's Pack contains 1 Stamp Set, 12 Sheets of 100lb Patterned coordinating cardstock, & 1 Sticker Sheet.

I created this card using the High Tea Cardmaker's Pack.

I truly enjoyed creating with this set. It's beautifully done!

Again, you can see the entire set on Friday, July 19th!


Thank you so very much for stopping by the blog today!


New to SumMore Fun?
Click the store link below for your purchase!
Check out the SumMore Fun Store


You can find me at these links on Social Media:

Monday, July 15, 2019

Season's Greeting with White Rose Crafts LLC

Hello Crafty Friends - I am here with a Holiday card for our special promotion Christmas in July!
Image may contain: text

We're featuring different Christmas cards created by the White Rose Crafts LLC Design Team.

I created this fun Christmas in Florida card. 
I do not get a white Christmas - Sometimes we get a cold Christmas but, 
most of the time we're in shorts.


For this card, I used the Kaiser Crafts Summer Splash Stamp Set 
from the July Mediterranean Dreams

I added a few other stamps from Stampendous and Inkadinkado to finish off my scene. Along with some Nuvo Drops for the Christmas lights.


I did some embossing with Glitter Gold Embossing powder. The background was created with some Distress inks and a Cloud Stencil for the sky.

I hope you can give your Mediterranean Dreams Kit stamps another look and create a Christmas card with them. The little cottages can easily become little Winter Cabins.

Materials Used From the Mediterranean Dreams Kit:

Other Materials Used:
Stampendous Stamps: Fran's Seaside Chair Set (Sand with grass)
Inkadinkado Stamps: Coastal Set (Sun, Palm Trees & Lighthouse)
Stampendous Embossing Powder: Jeweled Glitter Gold
Recollections Brand Heavy Weight Cardstock:
 Pink & Light Green
Spectrum Noir Markers: MG1, MG2, GT1, GT2,TB1, TB2, & HB1
Sakura Gelly Roll Pen: Metallic Gold
EK Success Journaling Pen: Black


Thank you for stopping by the blog today - I hope you found some inspiration!

Be sure to tag us White Rose Crafts LLC on social media 
if you create a project with products or kits purchased on the 

Sunday, July 14, 2019

Hello Card with Dies R Us

Hello Crafty Friends - I am here with a featuring some Hexagons and Leaves dies.


Let's get started

First, I trimmed the Kraft cardstock to 8" x 9". Then, I scored the cardstock from top to bottom at 4"I then creased the card base. 
  

Next, I taped the card base to a clipboard and using the stencil I applied some of the Glitter Paste. I then gently peeled off the tape and place the card base onto my craft table and I did some splatters with the Heidi Swapp Bronzer Colorshine. I then set it aside to dry. 
   

Next, I die cut from heavyweight White cardstock the following: 2 of the tall leaves, 1 small hexagon, 2 hexagon frames (I created those by nesting the hexagons and running them through the die cutting machine together), 4 hello words. I also die cut 1 hello word from the Metallic Copper cardstock.

Then, I took one of the Leaves and some Distress Oxide Ink and colored the leaf. I simply smudged the ink onto my craft mat and added a bit of water. Next, I ran the leaf through the watered down ink. I heat set it with my heat tool. Then, I added a bit of Heidi Swapp Chartreuse Colorshine. I use the nozzle wand and add the color where I want it.  
  

Now, the card base is dry and it's time to build the card.

I start by running the Hexagon frames and the hellos through my Xyron 3" Sticker Maker. Then, place the frames - the large one first, then the smaller one just overlapping and towards the top. Next, I adhered the leaves. I add a bit of Xyron Mega Runner at the bottom of the leaves and a bit of foam adhesive in the center of the leaves (I simply trimmed a small sliver of foam adhesive).
  

Next, I adhered the small hexagon with foam adhesive onto the card. Making sure that the leaves are just tucked under the hexagon. Then, I stacked the 4 white hellos together. Next, the Copper hello on top of the 4 stacked hellos to created a nice firm chipboard piece. I then place it onto the small hexagon.
  

The card is almost done. For a finishing touch, I added a few drops of Nuvo Crystal Drops in Copper Penny. Next to the leaves and the sentiment and around the card.

Now, the card is complete!


Materials Used:

Elizabeth Craft Designs - Dies - Pair Of Leaves 2


Elizabeth Craft Designs - Dies - Stitched Hexagons

Lawn Fawn - Yay, Kites! Dies

Distress Oxide Ink Pad - Bundled Sage

Nuvo Crystal Drops - Metallic Copper Penny

Heidi Swapp Multi-Design Stencil
Heidi Swapp Bronzer Colorshine Spray
Heidi Swapp Chartreuse Colorshine Spray
Xyron Adhesive - Mega Runner 
Xyron 3" Sticker Maker
Artist Loft: Plastic Pallet Knife and tray
Recollections Brand Cardstock: White, Kraft & Metallic Copper
Glitter Paste: I made my own by mixing the following: Artist Loft Gloss Gel Medium,
Daler & Rowney Acrylic Gesso, Accent Jewel Crown Acrylic Paint: Barque Pearl, 
Artist Loft Glitter: White Shimmer

Thank you for stopping by today. I hope you found some inspiration!

Don't forget to come and join in the fun at the Dies R Us Challenge Blog. There's a new challenge theme offered on the 1st and 15th of each month and one lucky randomly drawn winner will receive a gift voucher prize to the Dies R Us Store. For your convenience, all the important Dies R Us links are provided below.

Saturday, July 13, 2019

Wishing You Tons of Fun with Doodles Paper Playground

Hello Crafty Friends - I am here with a cute shaker card featuring Doodles Paper Playground's Sparkle Blends: Dragon Glass, Birthstone Collection: June - Pearl and

Sparkle Blend: Dragon Glass
Image may contain: 1 person


Sparkle Blend:Birthstone Collection: June - Pearl
No photo description available.

Sparkle Blend: Birthstone Collection: March Aquamarine
No photo description available.


Here is the card I created.

Materials Used:
Doodles Paper Playground Sparkle Blend: Dragon Glass
Doodles Paper Playground Sparkle Blend: Birthstone Collection: June - Pearl 
  Doodles Paper Playground Sparkle Blend: Birthstone Collection: March Aquamarine
My Favorite Things BB Adorable Elephants
Ms. Sparkle & Co. Birthday Stamp Set (Hats and Balloons)
Jillibean Soup Shaker Heart Pack
Inks: Memento - Tuxedo Black
Versafine - Onyx
Tim Holtz Distress Oxide Ink: Black Soot
Tim Holtz Distress Oxide Ink: Hickory Smoke
Tim Holtz Distress Oxide Ink: Mermaid Lagoon
Ranger Archival Ink: Aquamarine
Sakura Gelly Roll Pens: Black, White & Metallic Silver
Memento Pen: Tuxedo Black
Copic Markers: C1, C2, C3, B00 & BO1
Spectrum Noir Markers: IG4 & FS6
Pattern Paper: Studio Calico 7 Paper: White with Black Dots
Ms. Sparkle & Co Paper: Black with White Dots
Recollections Cardstock: White & Teal Blue

Thank you for stopping by the blog today. I hope you found some inspiration!

Be sure to tag us Doodles Paper Playground on social media -
if you create a project with our Sparkle Blends.

There is also a new Facebook group where you can share
creations you have made with Sparkle Blends!
Come check it out, share some inspiration!
Sparkle Blends Fan Club

All of our Sparkle Blends can be purchased only at the
White Rose Crafts LLC Website

Thursday, July 11, 2019

Pool Party

Hello Crafty Friends - I am here with a 3D Pool Box - Perfect to give to a hostess/host a gift in or for the birthday girl/boy.


Materials Used:
Xyron 150 Sticker Maker
Xyron 3" Sticker Maker
Zig Wink of Stella - Clear
Aleene's Tacky Glue
Recollections Brand Cardstock: White, Black, and Dark Blue
Darice Brand: Wiggle Eyes

So, let's get started - creating our above ground pool box!

I start by downloading the SVG from Simply Crafty SVGs and then uploading it into my Brother Scan n Cut program. Sandy of Simply Crafty SVGs provides a PDF, and Video tutorial with all her cut files.

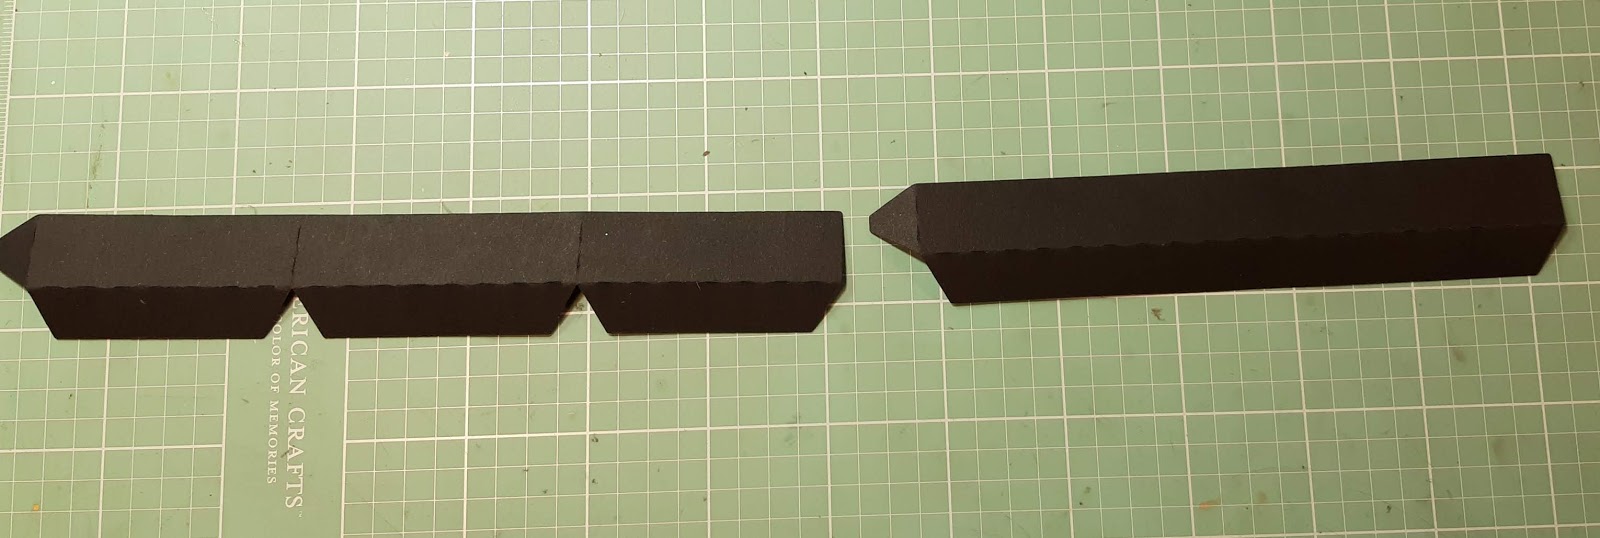
I cut all the file pieces from black cardstock and Rinea Foil paper. Then, I adhered the Rinea Foil Paper until the coordinating pieces.


Pool Base/Box Bottom
Next, I adhered the base of the pool. I glue a 3-panel section to a straight panel alternating them. Then, I glue the opening closed. I now have the base of the pool. Next, I turn it upside down and put some glue on all the tabs and then place the bottom piece to the pool. I then turn it right side up and use my fingers to press the tabs down to make sure I have good adhesion. I set it aside.


Pool Top/Box Lid
I repeat the process I did for the pool base and adhere the 3-section panel to a straight panel. Until I form the octagon shape. 


This time I place glue on the tabs on the inside; I then place the panel and press into place.  The tab will be showing now - but they will be covered a bit later.
  

Now, I add some glue the lip of the lid. I adhered the panels to the lid. **Note: Yes you will have gaps - but they will be covered in a bit. 
  

Next, I adhered the edge of the pool to the lid. I start by placing the edge into place. I then gently pull up a tab and put some glue on it. Then, I press firmly until the glue to make sure I have good adhesion.
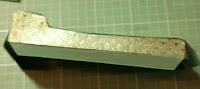


Pool Poles
Now for the Poles - They will cover all the gaps on both the lid and bottom. There are 8 in total - 4 short and 4 tall. I run them through my Xyron 150 sticker maker. Then, I adhere them over the gap.


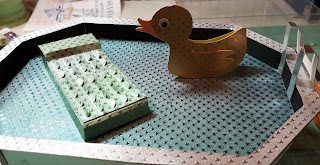
Now, it's time to add some water to our pool. I take the octagonal Rinea Turquoise Foil Paper and adhere it to the lid. I insert it into the top - press gently. 
  

It's now time to create the floaties and title for the pool.

Let's start with the lounger floatie.

I start by glue the left tab to pillow section of the float. I then move down to the feet section of the float glue the tad as I go. I repeat the process on the right side. 


Next, I turn it over and glue to the tabs and place the bottom to the float. **Note: there's on opening on the bottom t help you press the tabs for good adhesion. It won't be seen. I set it aside.
  

Now, let's work on the Duck float. 
I adhered the wings and beak onto the duck. The duck file comes with eyes but I chose not to use them instead, I used wiggle eyes.

I only add glue to the head of the duck and then I fold over the duck and press firmly. Next, I add glue to the tab and adhere it to the inside of the duck creating a little platform so to speak - for gluing it to the pool later. I set it aside.
  

The Ball and Title.
I adhere the Rinea Foil paper pieces onto the white cardstock ball shape. Set aside.
 

I adhered the blue cardstock title to the white cardstock silhouette of the title. I set it aside.


Now, to work on the ladder.
On the underside of the ladder, you will see some score lines. Gently bend the ladder on the score lines to form a curve. 
 

Next, add some adhesive to the tabs of the ladder and press them on the inside of the pool. Then flip the ladder down and if needed you can put some glue on the back of the ladder so that it doesn't pop-up **Note: this happens - because of pulling it off the cutting mat the paper tends to curl.
  

It's time to add the floaties, ball and the title to the pool. Add some adhesive to the bottom of the floaties and press into place in the water. 
 

I run the title and ball through my Xyron 3" Sticker Maker. Then, I placed it on the side of the pool. Layering the title over the ball. 
  

I added a bit of Zig Wink of Stella to the title for a bit of shimmer.

Now, the pool is complete! 
You can fill it with goodies and give it that special someone.

My son's best friend had a pool party last week. I made one of these and gave it to the mom filled with chocolate, a pain reliever and a gift card for a massage. 


Thank you for stopping by the blog today - I hope you found some inspiration!

Be sure to stop by the store and pick up some of the wonderful Rinea Products.