Monday, October 21, 2019

Halloween ghostly Pumpkin With Xyron

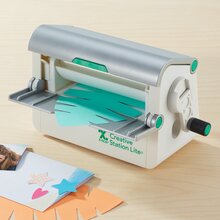
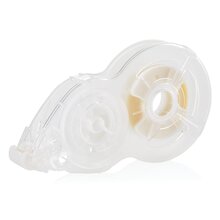
Hello Crafty Friends - I am here with a fun 3D Project using Xyron's Creative Station Lite and Xyron Teresa Collins Mega Runner with 1/4" adhesive.

I used the Ghostly Pumpkin cut file from Simply Crafty SVGs for my project today.

Here's my Project. 


I added some Glow in the Dark Ghosts and Bats.

Let's get started!

I am going to break it down into sections. It will be easier to follow this way.
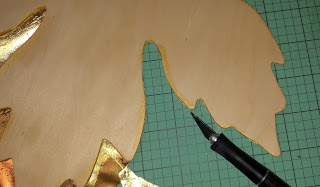
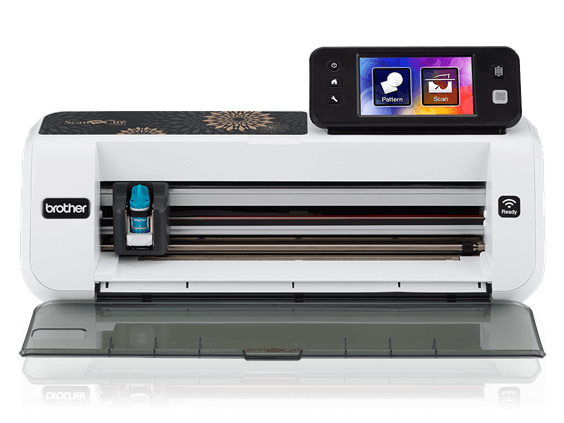
I start by downloading the Ghostly Pumpkin cut file and then uploading it into my Brother Canvas Workspace Software. **(if you have another electronic die cutting machine you can use that. If you don't you can use the PDF as a reference)

I then cut all the pieces I need to create the Ghostly Pumpkin. Then, I get some Distress Oxide Inks to ink the edges of the papers.

I ink the Black pieces with Hickory Smoke Distress Oxide ink and the Purple pieces with Black Soot Distress Oxide ink.

Next, I run the outer panels of the pumpkin, the windows, door ghosts, bats, spiders, and small decorative panels through Xyron's Creative Station Lite. This will make decorating the pumpkin quick and easy.

Pumpkin Base Assembly
The base pieces are numbered 1-8. I put some Mega Runner adhesive on the tabs and start adhering the panels together. Take your time with this it's your foundation. You want to move slow to make sure your pumpkin forms nicely.


When all the panels are adhered your pumpkin base is done.

The Stem Assembly
Now, the stem is small and can be a bit tricky. but if you take your time you can do it. I added Mega Runner adhesive to all the tabs. 

Next, I adhered the two pieces together. 
The stem will have a tilt to it. Then, I adhered the ends together. 
  

Next, I pushed down on all the small tabs of the top of the stem. I slowly line up the top flap and press in place. Then, I insert the stem into the pumpkin and press the tabs onto the inside of the pumpkin. **(you can decide which way you want your stem to be. Tilt to the left, right or back)


Outer Panels
I cut the panels apart. The Xyron Creative Station Lite strip is long and I want to work with each panel individually. I gently shape each panel to match the form of the pumpkin base. **(You can emboss your panels using an embossing folder. I chose not too. I chose to ink my edges). 
 

Next, I peel one end of the panel and place it onto the pumpkin base. I then slowly remove the backing of the Xyron Creative Station Lite strip and press the panel into place. The Xyron Creative Station Lite makes this part so easy. No messy glue to worry about just peel and go.
  

Door and Windows
I remove the plastic cover from the door and windows. I gently start placing them onto the pumpkin. Again, the Xyron Creative Station Lite makes this part so easy. No messy glue to worry about just peel and go. I start with the door frame then move onto the windows.
 

I decided I wanted to add a bit of vellum to my windows. You don't have to do this if you prefer not to. I just cut small rectangles of vellum and using the Xyron Teresa Collins Mega Runner with 1/4" adhesive I just ran a bit of the adhesive on the edges of the vellum and press into place. I just did this on the inside of the pumpkin.
  

Decorating the Ghostly Pumpkin
I started with the ornate gate for the door.  I simply used the Xyron Teresa Collins Mega Runner with 1/4" adhesive on the small side of the gate and then pressed the gate into place next to the door. One gate door on either side of the door opening. 
 

Next, I placed the ghosts in the door and window, along with some spiders, bats, and skulls
I cut some glow in the dark ghosts and bats from pattern paper. I thought it would give a fun effect. **(if you can't find this glow in the dark pattern paper. You can always heat emboss your ghost with some glow in the dark embossing powder or use some glow in the dark paint).


Platform Assembly
I added some Xyron Teresa Collins Mega Runner with 1/4" adhesive. to all the tabs(small triangles) of the platform.  Then, I press the side up onto the tabs. Making sure the tabs are inside. 


Next, I put some Xyron Teresa Collins Mega Runner with 1/4" adhesive on the edge of the black octagon panel and press it onto the platform to close the base.
  

I flipped the platform over and adhered the purple octagon onto the platform base. Then, I added the pattern paper panels to the platform base edge. Again, quick and easy because of the Xyron Creative Station Lite 


Sign Assembly
This is a simple one. I added adhesive using Xyron Teresa Collins Mega Runner with 1/4" adhesive on the edge of the backside of the word part of the sign. I press it onto the gray cardstock piece and the sign is ready for some string to hang it.
  

I used a bit of Eyelash yarn for some whimsy. I simply strung the yarn through the top part of the sign and wrapped it around the stem and tied a knot on the back. I added a bit of adhesive on the back of the sign to secure it in place. I also added a bit of Nuvo Glitter Drops in white blizzard for a bit of sparkle.
 

Now, the Ghostly Pumpkin is complete!

With the lights off - showing the glow in the dark ghost and bat


Materials Used:
Xyron Creative Station Lite
Teresa Collins Mega Runner
Xyron .25" Mega Runner Adhesive Refill

CM350_frontopen


img
img
img
img

Rose Gold Yarn Bee Gilt Eyelash Yarn

Thank you for stopping by the blog today. I hope you found some inspiration!

Saturday, October 19, 2019

For the Best Teacher Shaker Card with Doodles Paper Playground

Hello Crafty Friends - I am here with a fun shaker card using one of the New Release Sparkle Blends. This fun blend is called Apple for Teacher

This bright, primary-colored blend is perfect for back to school, 
the first day of school, teacher gifts & even grade-school graduations.
 A bold combination of patterned and solid sequins, 
including lots of square shapes to evoke the memory of blocks. 
A generous sprinkling of apple-shaped Fimo slices, 
both whole & sliced apple designs, complete this blend to perfection.

This is my card. I just love the little apples in the blend.

Materials Used:
Doodles Paper Playground Sparkle Blend: Apple for Teacher
Stamp Annie Thing: Apple Girl Stamp
Ranger - Fine Detail White Embossing Powder
Spectrum Noir Markers
Heat Tool
Sakura Gelly Roll Pen: White
Recollections Brand Cardstock: White, Yellow & Black

Be sure to tag us Doodles Paper Playground on social media -
if you create a project with our Sparkle Blends. 

There is also a new Facebook group where you can share 
creations you have made with Sparkle Blends!
Come check it out, share some inspiration!

All of our Sparkle Blends can be purchased only at the 

Friday, October 18, 2019

Doodles Paper Playground October Release Blog Hop


Hello Sparkle Blends Fans! 

Get ready, because it’s time to celebrate! That’s right, its time for our October Release Blog Hop!

We have 6 brand new blends for you this month, and our design team has been hard at work creating inspiration projects to share them with you! We went a bit more subtle with our two new blends for the Autumn and holiday season; plus we have 2 more Blends to add to our Birthstone Collection, as well as a couple of fun, bold Blends just for pets, as well as the teacher and students in our lives. Check out Opal, and Citrine (October and November Birthstones), Apple for Teacher, Penguin Party, Pawsome Pets, and Pumpkin Spice.

Our latest Sparkle Blends are live for purchase, right now, at White Rose Crafts & you can find detailed descriptions and direct links in our October Release Blog Post! As always, our limited edition blends are only available while supplies last & will not be restocked, so make sure you grab your favorites before they're gone for good.

The Designing Divas have once again created some amazing projects this month, so make sure you leave them some comment love for a chance to win one of the prizes listed below! Do you have a favorite blend from this release? 

Here's the card I created using Sparkle Blend: Birthstone Opal

Make sure you circle back to the Doodles Paper Playground Blog when you’re finished hopping, and leave a comment with your favorite October Blend for a chance to win a full size pack as a Door Prize! (Please Note: Door Prize giveaway open to Contiguous US Residents Only, due to high shipping costs). 


HOP ALONG WITH US!

Alison Heikilla with guests, Rhiannon & Phoenix
Annie Collins <--- are="" div="" here="" you="">
GIVEAWAY DETAILS: 
Open Internationally. You must leave comments on each leg of the Blog Hop by 10/20/19 to be eligible to win one of the following prizes. Winners will be notified in a post here on the blog, no later than 10/25/19.
No photo description available.
We are giving away SIX Prize Packs this month, each one featuring one of our new blends, at least one coordinating stamp set, either coordinating dies or a second stamp set, at least 2 ink cubes & 6 sheets of coordinating 6x6 patterned paper! 

For our GRAND PRIZE, one of these 6 winners will be randomly selected to receive Mini Packs of the Full October 2019 Release in their prize pack! 
Each of these packs has an approximate value of at least $15.00! (Grand Prize Value is approximately $24.00!)

Rules: 
You must be at least 18 years old to enter. Open internationally. 
To Enter, leave comments on each leg of the blog hop no later than 11:59pm EST on Sunday, October 20th, 2019 to be eligible to win one of our 6 prize packs. 
Winners will be notified within a blog post on the Doodles Paper Playground Blog no later than 11:59pm EST on Friday, October 25th, 2019. 
Winners will have 5 days to email DoodlesPaperPlayground@gmail.com with their address info to claim their prizes. Any unclaimed prizes will be redrawn and shipped to a runner up.

Saturday, October 12, 2019

Yappy Birthday Shaker Card with Doodles Paper Playground

Hello Crafty Friends - I am here with a fun birthday shaker card. Featuring the New Release from Doodles Paper Playground Sparkle Blends: Pawsome Pets and The Mama Elephant Playful Puppy Stamp Set

No photo description available.
This fun, multi-colored blend of pinks, blues, greens,
purples & yellows in a variety of shapes, sizes and
finishes will add flash and interest to any pet lover’s projects.
An assortment of kitty, puppy and paw print shaped 
Fimo slices completes the theme.


Here's my card.

Materials Used:
Mama Elephant Playful Puppy Stamp Set
Paw Print and Bones Frame
DMC Metallic Silver Floss
MFT Sentiment Strip Die
MFT Balloon Dies
Recollection Brand cardstock: Gray, Medium Teal Blue, 
Yellow and Light Purple
Neenah Solar White 80lb Cardstock
Spectrum Noir Alcohol Markers
Memento Tuxedo Black Ink
Versafine Onyx Black Ink
Foam Adhesive

Thank you for stopping by the blog today. I hope you found some inspiration!

Be sure to tag us Doodles Paper Playground on social media; 
if you create a project with our Sparkle Blends. 

There is also a new Facebook group where you can share creations 
you have made with Sparkle Blends! Come check it out, share some inspiration!

All of our Sparkle Blends can be purchased only at the 

Friday, October 11, 2019

Thankful with Rinea

Hello Crafty Friends - I am here with a Fall/Thanksgiving project today.

It's a fun and simple project.

Materials Used: 
Wooden Leaf 
Tim Holtz Alcohol Inks
Tim Holtz Alcohol Blender Solution
Ranger Perfect Pearls in Gold
Folk Art Metallic Gold Acrylic Paint 
Thickers Chipboard Letter Marques
Jolees Leatherettes Leaves
Green Jute Cord
Craft Knife
Aleene's Tacky Glue

Let's get started

I added some of the alcohol inks to the Rinea Glossy/Glossy Gold 12x12 Foil Paper along with a bit of the blender solution to get a nice blend of the inks. I also added a tiny bit of gold Perfect Pearls dust will the ink was still wet. I set the Rinea Glossy/Glossy Gold 12x12 Foil Paper aside to dry.

Then, I added a bit of gold paint to the edges of the leaf.  

Next, I added some adhesive to the leaf and 
adhered the inked Rinea Glossy/Glossy Gold 12x12 Foil Paper to the leaf.
 

I trimmed the extra inked Rinea Glossy/Glossy Gold 12x12 Foil Paper away from the leaf using a craft knife. I used a small nail file to clean up my edges.


Next, I adhered the Thicker letters to the front and center of the leaf. Then I added two leatherette leaves to the top of the leaf by the hanger along with some jute cord for hanging and a bow.


Thank you for stopping by the blog today. I hope you found some inspiration!