Hello Crafty Friends - I am here with some fun, quick and easy ornaments.
I have 3 ornaments for you to try.
You can even create these with the kids by simply using bigger beads, string and a plastic craft needle.
Please bear with me and this really long post. I wanted you to have plenty of photos.
You can even create these with the kids by simply using bigger beads, string and a plastic craft needle.
Please bear with me and this really long post. I wanted you to have plenty of photos.
Ornament Trio

Materials Used:
Darice Brand: Jingle Bells: Gold and Silver
Darice Brand: Sequins Green, Gold, and Silver
Darice Brand: Faceted Clear Beads: Red, Light Brown, and Yellow
Darice Brand: Faceted Opaque Beads: Blue, and Silver
Darice Brand: Opaque and Clear Flower Beads: Purple and Yellow
Darice Brand: Fancy Gold Bead Cap
Craft Trims Holiday Time: Red and Green Ric Rac
Craft Trims: Grossgrain White Ribbon
DMC Brand: Floss Light Blue, White with Silver and Gold
DMC Brand: Thread White
26 Gauge Wire: Gold
Plastic Straw
Lawn Fawn Dies: Stitched Scalloped Border
Tools: Needle, Scissors, Needlenose Craft Pliers,
Paper Trimmer and Paper Piercer
Tassel Maker: Cardboard/Chipboard 2" x 31/4"
The pattern for Ornament #1

Ornament #1 Round Red Ornament

Let's get started!
I gathered my supplies. I printed and cut the ornament pattern.
Rinea Starstruck Ruby/Ruby Foil paper and other supplies.

For extra stability, I adhered the cardstock ornament pattern onto the back of the
Rinea Starstruck Ruby/Ruby Foil paper.

Next, I used a paper piercer to punch small holes in the ornament. One hole in the center and one on each of the petals.


Then, I cut about 5 inches of wire. I curl and loop one end. Next, I add one red bead and sequins to the wire. I then thread the wire through the center hole of the ornament.


Next, I add a 2 -1/2" piece of straw to the wire (this is for extra support). I then start to insert the wire through each of the petals to form a ball.
 .
. 
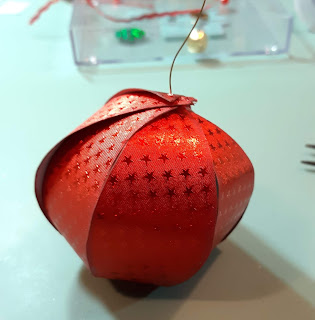
Then, I add the other green sequin, followed by the gold sequin and finally the red bead. I trim off any extra wire. leaving just enough to create the loop in the wire.
This will be the bottom loop for the bell.


To attach the bell - I used some of the leftover wire and simply threaded the wire through the bell and then the bottom loop. Curling to secure in place.


I added some decorative trim to the top loop and then knotted the ends. Trimmed off any extra.


Now your ornament is complete!

Ornament #2 Round Blue and Silver Tassel Ornament

Let's get started!
I gather my supplies. I trimmed 6 - 1/2" x 6" strips of Rinea Foil paper in the colors of your choice.
I used Starstruck Turquoise and Silver along with Glossy Turquoise and Silver Foil paper.
I start by creating the tassel for the ornament.

To create the tassel you will need some chipboard/cardboard that measures 2"x31/4" I like to cut a small slit on the short side to hold the floss while I wrap it. You wrap the floss several times around the chipboard. The more you wrap the thicker your tassel will be. Once you have the desired thickness you trim off the floss.


Next, you cut a piece of thread or floss to about 12" long. Then, you slip in under the floss wrapped around the cardboard. Next, you bring it toward the top (short side of the chipboard) and tie a knot. I like to double knot it.

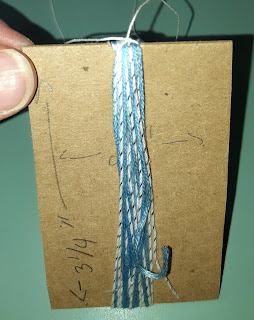
Then, slip off the floss bundle from the chipboard. Next, with another piece of floss about 4" long you tie it around the top of your tassel as shown. Now you can trim the bottom of the tassel.


Using a needle thread the floss strings at the top of the tassel through the beads and the sequin. If you have trouble doing it this way you can simply cut another piece of floss, thread through the needle tie a knot at one end and sew thru the top of the tassel and follow with the beads and sequin. Set the tassel aside for a bit.


Now, gather the foil paper strips. Stack them. Poke holes at each end and center of the strips. Stacking them makes this easier and lines them up.


Now, thread the tassel through the center of the stack. Note this will be the bottom of your ornament.


Next, fan out the stack of strips. Insert 1-1/2" straw to the center of the ornament-Optional. Then, start threading the floss through the strips. Making sure to do the same strip ends. I started with the bottom turquoise strip left end followed by the right creating a loop. Repeat with all the strips.


Once you have all the strip through the floss you will have a ball shape.
Next, add the other silver sequin followed by the beads.


You can tie a knot close to the silver bead.
I chose to thread the floss through the bead again from the bottom to secure it.


Next for the hanger - I chose to add a white ribbon.
However, you can just cut off the needle and tie a knot to the floss.
To add ribbon I simply thread through the center of the ribbon and tied a double knot and trimmed off the extra floss. Then, I tied a knot at the ends of the ribbon.


Now as a finishing touch I added a bit of foil paper to the tassel. This is completely optional.
Trim a 1" x 2" piece of Glossy Silver Foil paper. Fold up the bottom (long side) to the center. Next, fold down the top. Then, fold over one end of the strip. as shown below.


Next, add adhesive. I used strong double-sided adhesive. Wrap the foil paper over the string shown in the photo below.


Now your ornament is complete!

Ornament #3 Angel Ornament
Let's get started!
I gather my supplies.
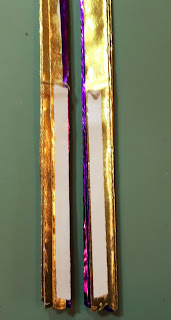
I trimmed 2 - 4" x 6" strips of Rinea Foil paper in the colors of your choice.
I used Glossy Violet/Gold Foil paper.

I die cut each end of the foil paper. I used the small and medium Lawn Fawn Stitched Scalloped border dies - however, you can use a border punch or decorative scissors. If you do not have any of these you can leave the paper as is. I am using the small border as my top and the medium as the bottom.


Then, I use a needle to thread about 12" gold floss. I tie a knot at the end and add the two flower beads. Follow by the light brown bead, then the gold cap.

Next, I start on the long side and simply accordion fold the foil paper. I do this to both pieces.


Then, I measure about 2" from the top of the accordion-folded the foil paper and fold down on the Violet side. Next, I add some strong adhesive to each accordion-folded the foil paper from the fold down only. Then, bring the beads over and place the string in between the accordion-folded the foil paper. Remove the backing from the adhesive and press the two accordion-folded the foil paper together making sure that about 2" of the string is sandwiched in between.
This will be the body of your angel.


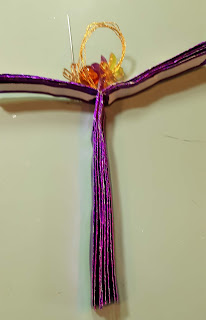
Now, tie a knot at the top of the gold cap as close as possible. Trim off the needle and tie another knot to create your hanger.


Next, to create the wings - on the Violet side of the foil paper add some adhesive. Then, using some more gold floss thread a jingle bell and a bead to create the angel's arms and hands


Then, separate the thread into two sections (about 3 strands each) and place them on either side of the angel's body. Remove the adhesive backing and press the wings down onto the body. Next, fan out the body and wings of the angel.


Now, the angel ornament is complete!

Thank you for hanging in with me through this very long post.
I hope you found some inspiration today!
Please tag us on social media if you create any project using any of our wonderful Foil Papers!
Don't forget to stop by the shop Rinea.com