Tuesday, September 29, 2020


We are super sponsors, we have a large group of coffee themed stamps available in clear and digital version. National Coffee Day all the Coffee Themed stamps are 25% OFF using the code NCD2020.The discount code is available until October 2nd.

I hope you are stopping by from the Joy Clair Designs Blog because we have one Gift Card Prize of $15 dollars of Joy Clair Designs Store, valid for stamps only, will be riffle between all the visitors that leave a comment on Joy Clair Designs Blog, only Joy Clair Blog.


Here are the fun cards I created for Joy Clair Designs using the First Coffee Stamp Set.


Thank you for stopping by the blog today. I hope you found some inspiration!

Sunday, September 27, 2020

Awww Nuts Card with Dare 2be Artzy

Hello Crafty Friends - I am here with a fun pull-up card featuring 
the New Release Squirrel Stamp Set and coordinating Die set from Dare 2be Artzy.


Here's the Video tutorial

Supplies Used: 
2be Artzy: Squirrel Stamp Set 
https://dare2bartzy.com/collections/dies-with-stamps/products/squirrel 

Dare 2be Artzy: Squirrel Die Set https://dare2bartzy.com/products/squirrel-die?_pos=1&_sid=d2ecda9dc&_ss=r 

 Supplies Used: 
Lawn Fawn: Let's Toast Pull-Up Add-on Die Set
 Copic Markers: E17, E18, E 23, E33, E35, E43, Y23, Y32, R30 
Art Glitter Glue 
Maker's Movement Foam Adhesive 
Imagine Crafts: Tear It Tape 
Doodles Paper Playground: Sparkle Blend - Sunflower
Doodles Paper Playground: Sparkle Blend - Autumn Harvest
Maker's Movement: Piercing Tool 
Maker's Movement/Crossover Edge Die Cutting Machine
Bone Folder

Thank you for stopping by the blog today. I hope you found some inspiration!!

Saturday, September 26, 2020

Tea Bag Dispenser with Rinea

Hello Crafty Friends - I am here with a cute Tea Bag dispenser perfect for that special some in your life that loves Tea.  Perhaps it's you that loves tea. 

Materials used:
SumMore Fun Stamp: Sundri's High Tea
Papertrey Ink Stamp: Rosies Posies
MFT Brand Die: Fishtale Sentiment
Copic Marker: E33 & R23
Tsukineko Memento Ink: Tuxedo black
Tsukineko Versafine Ink: Onyx Black
Imagine Crafts: Tear it Tape
Art Glitter Glue
Crafter's: Foam Adhesive
Recollections Brand 65lb cardstock:  White
Brother:Scan N Cut Electric Machine

Lets get started!

I gathered the supplies and cut all the pieces with my Brother:Scan N Cut Electric Machine.
I cut the base of the Tea Dispenser from white cardstock. I cut the panels for the Dispenser from Rinea Foiled Paper: Merlot/Merlot Starstruck.
 I also trimmed 2 strip from the Rinea Foiled Paper: Violet/Violet Starstruck to accent the base.

Next, I stamped the roses and leaves onto 
the Rinea Foiled Paper: Merlot/Merlot Starstruck panels for the dispenser 
with Rinea Ghost Ink 2.0. Allowed the ink to sit for about a minute and then rub it off  to reveal the beautiful silver layer. I set them aside while I create the bottom of the dispenser.
  
I adhere the tab of the bottom piece to the other; creating a long base piece. (if you have ever made a pop-up box card it's the same concept). While the bottom is flat, I adhered the Rinea Foiled Paper: Merlot/Merlot Starstruck panels onto the bottom. Making sure to center the panels so that I had a bit of the white cardstock showing.
  
Next, I adhere the other tab of the bottom portion of the dispenser to create the box shape.
 
Then, I flip the box upside down and put some glue onto the tabs.  I then bring the flap down and press the tabs into place. The, flip the box right side up and apply some pressure inside the box to make sure the tabs are secure. You can leave the bottom of the dispenser here and just place a square piece of cardstock to cover the tabs. However, the SVG file comes with a little base that give it a cute finished look.
 
 
For the *base for the dispenser (has 3 squares and 2 strips with the multi-tabs)
I adhered the 2 strips with the multi-tabs together. By applying a bit of glue to the small tabs on the end of the strips. This will create a square frame. Place the larger tabs towards the bottom and put some glue on the inside of the frame on the tabs. Then, insert one of squares into the frame. Press in place with your fingers. Next,  apply some glue onto the smaller tabs and adhere one of the squares to the frame. Flip over the frame aka flat box and adhere the last square to give the base a clean finish.
 
   
Then, I adhered strips of Rinea Foiled Paper: Violet/Violet Starstruck to the base. I then adhered the base onto the bottom of the dispenser. Making sure to center it.  The bottom of the dispenser if done. I set it aside to create the lid.
  
 
Next, I gather the lid pieces ( 1 white cardstock lid, 1 white cardstock knob, 1 white cardstock inner panel, 1Rinea Foiled Paper: Merlot/Merlot Starstruck lid top panel, 
Rinea Foiled Paper: Merlot/Merlot Starstruck knob side panels.) I adhere the
 Rinea Foiled Paper: Merlot/Merlot Starstruck panels onto the white cardstock pieces.
 
Then, put a bit of glue onto the small tab and press it into place. repeat this on all the tabs. Then, put a bit of glue onto the bigger tab and press it into place. repeat this on all the tabs. This will create the knob for the lid.
 
 
Next, insert the tabs of the knob into the center opening of the lid panel. Then, put a bit of glue on the tab and press in place. The knob is now attached to lid.  Next, put some glue on the tabs of the lid and press in place. Once the lid is formed. Adhere the inner panel to the inside of the lid. The lid is now finished. Place it onto the bottom of the dispenser. 
 
  
Next, I adhered the tea label together. I adhered the  Rinea Foiled Paper: Merlot/Merlot Starstruck  label onto the Rinea Foiled Paper: Violet/Violet Starstruck label. Then I adhered the labels onto the white cardstock label base. I put some foam adhesive onto the label and press it 
onto the Tea Dispenser


Now the Tea Bag Dispenser is complete! 
Fill it with your favorite tea. 
If planning on gift giving the dispenser then fill it with their favorite or 
a gift card to their favorite tea shop.

Thank you for stopping by the blog today. I hope you found some inspiration!

Don't forget to stop by the Rinea Shop to pick up some of our wonderful Foiled Paper.

Sunday, September 20, 2020

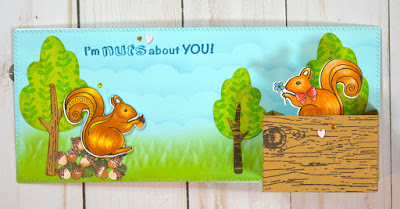
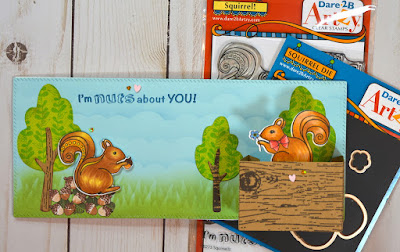
I"m Nut About You Slimline Card with Dare 2b Artzy

Hello Crafty Friends - I am so honored to be  Guest Designing for Dare 2b Artzy this month. 

I created this Fall/Squirrel slimline card featuring the New Release 
Squirrel Stamp Set with coordinating Die set.


Here's the video tutorial of how I created this card.

https://youtu.be/tKnNXLL1hU0

Materials Used:

I did not use this but it's available:

Other Items Used:
Inks:
Memento: Tuxedo Black
Memento: Expresso Truffle
Memento Dew Drop: Summer Sky
Memento Dew Drop: Dessert Sand
Versa Magic Dew Drop: Jumbo Java
Versa Magic Dew Drop: Tea Leaves
Versa Magic Dew Drop: Ocean Depth
Copic Markers: R30, E30, E23, E35, Y32, Y02, B93, & B95
Heidi Swapp: Woodgrain Stamp 
Heffy Doodle Dies: Forest Builders 
Create & Inkspire Stencil: Meadow (clouds& grass) 
Colorbok Brand: Pattern Paper 
Sakura Gelly Roll Pens: White and Gold 
Art Glitter Glue 
Imagine Crafts: Tear It Tape 
Jot Brand: Foam Adhesive
 Recollections Brand 110# Cardstock: White (card base)
 Recollections Brand 65# Cardstock: Kraft & Light Blue 
Accent Brand Ultra Smooth 80# Cardstock: Bright White (for coloring)

Thank you for stopping by the blog today. I hope you found some inspiration!

Friday, September 18, 2020

Tea Time with Simply Crafty SVGs

Hello Crafty Friends - I am here with a Teapot and cup box set with Simply Crafty SVGs.

This SVG file is called Square Teapot and Teacup. I love that all of the SVG files from

This  Square Teapot and Teacup set is perfect for the tea lover in your life or perhaps yourself. 
You can fill the Teapot with an assortment of teas and the Teacup can be filled with a few cookies/biscuits.

Here are my Teapot and Teacup Set.


A close-up of the Teapot.


A close-up of the Teacup and Saucer.

Materials Used:
Rinea Foiled Paper: Violet/Violet Starstruck
Rinea: Ghost Ink 2.0
PaperTrey Ink: Rose stamp
Recollections Brand 110# Cardstock: White
Art Glitter Glue
DMC Floss: White with Silver


Thank for stopping by the blog today. I hope you found some inspiration!