Monday, January 28, 2019


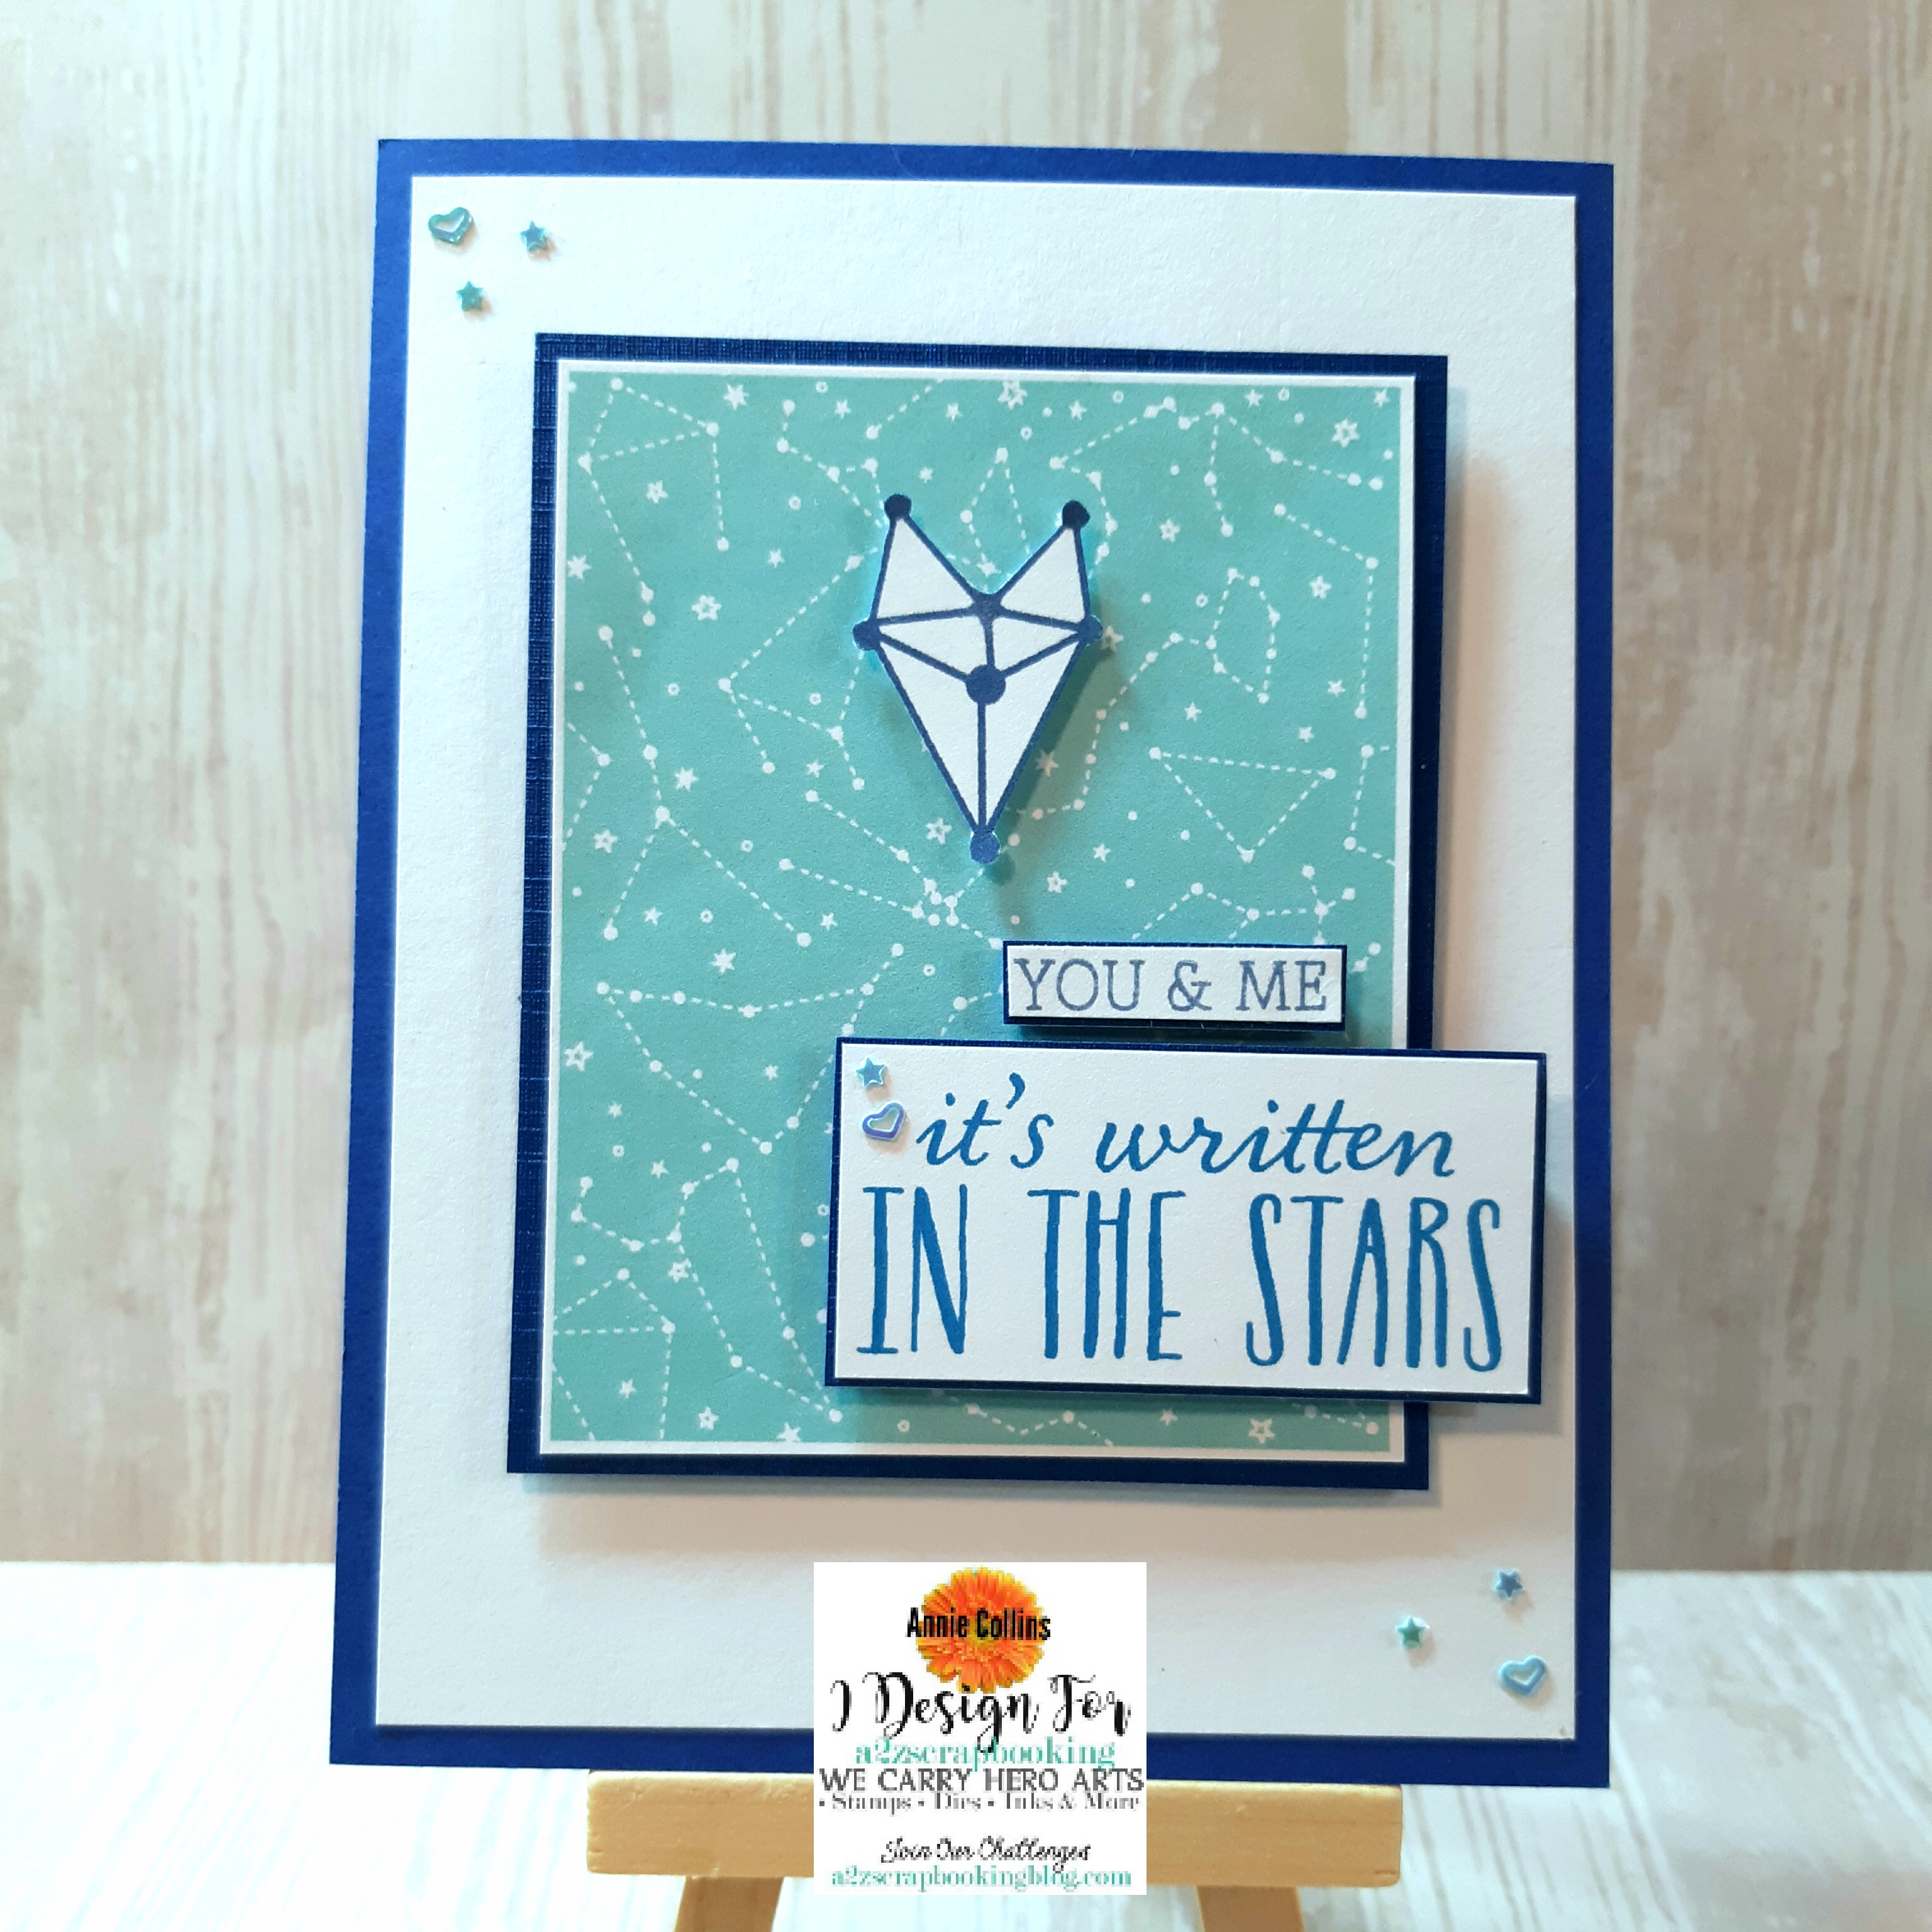
Hello Crafty Friends - I am here with a quick card.
Today, I am using Hero Arts Constellation Printable PT101 Digital these printables are perfect for quick and easy cards. I like to have them on hand - printed and cut.

image 0

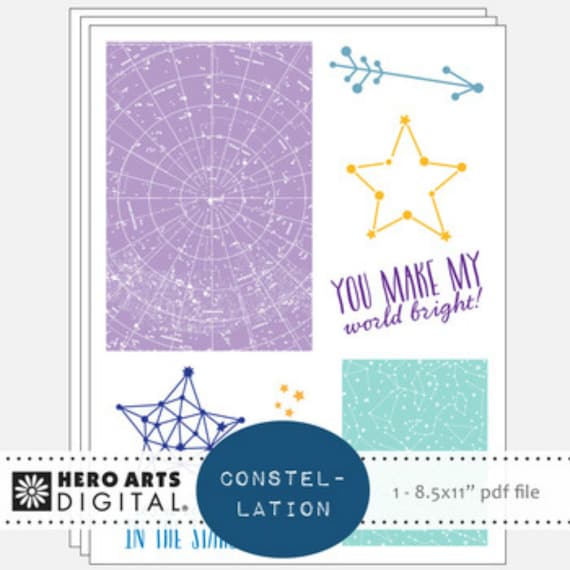
I used the aqua colored constellation, the multi-linked star, and the sentiment. I cut off a point from the star to create a constellation shape heart. I used dark blue cardstock for my card front, layering white cardstock an1/8" smaller. Then, matted the aqua colored star print onto dark blue shimmer cardstock. I did the same for the sentiment. 

The sentiment you & me is from Hero Arts DC175 Love Stamp & Cut Set. 

For finishing touches, I added some tiny stars and heart sequins.
20190126_215831


Hero Arts Monthly Challenge


anything goes
Please join us in this month’s “Anything Goes” challenge for your chance at a free digital stamp set AND, if you used Hero Arts or Sugartree Stamps, a $20 gift card to our etsy store. Our current monthly challenge can always be found in the menu bar, and runs from the 1st to last day of the month.  Please join us on TwitterInstagram and Facebook so you don’t miss any fun promotions or new challenge announcements! 


 Supplies Used:
Versafine Onyx Black Ink
Recollections Brand Cardstock: White & Dark Blue 
Grafix Craft Sensations Dark Blue Shimmer Cardstock
Sequins: Elle Tru
Adhesive: 3M Scotch tape runner and foam

Sunday, January 27, 2019

My Silly Mini Valentines

Hello Crafty Friends - I am here with some quick and easy mini Valentine's Day cards. 
They are perfect for a small gift, a box of chocolate or even a lunch note for that special someone.


So, let's get started. 

I stamped with Versafine Onyx Black ink onto Strathmore Bristol Smooth cardstock
 and colored the images with Arteza Real Brush Markers. 
*Note: Please use whatever coloring medium you have or feel comfortable with.
I then fussy cut the images. Set them aside.


Next, I cut 7 pieces of cardstock measuring 3"x6" - 
I then, score on the long side at 3" to create mini 3"x3" cards. 

Then, I die cut 7 hearts from a variety of pattern paper. 
*Note: this is a good way to use up those scraps.


Now, that we have everything cut and ready - let's assemble the cards. 
I start by stamping a sentiment in the right-hand corner of card front. 
Next, I adhere the image onto the die cut heart and pop
up the heart using foam adhesive to the center of the card front. 
I repeat this for all the cards. 


Supplies Used:
Stamp:

Die:

Ink:
Versafine Onyx Black 

Markers:
Arteza Real Brush Watercolor 

Cardstock:
Strathmore Bristol Smooth
Recollections Brand - White and Yellow

Pattern Paper:
Various brands

Adhesive:
3M Foam & Tacky Glue

Thank you for stopping by today!

Don't forget to come join in the fun at the Dies R Us Challenge Blog.
There's a new challenge theme offered on the 1st and 15th of each month and
one lucky randomly drawn winner will receive a gift voucher prize
to the Dies R Us Store. For your convenience,
all the important Dies R Us links are provided below.

You Are Amazing with Doodles Paper Playground

Hello Crafty Friends - Annie here with a card featuring Copper Penny Sparkle Blend.

This bold and beautiful blend of metallic oranges, 
glittery brown & deep green, transparent cream,
 and greenish gold is the perfect winter metallic hue. 


I just add a few of the sequins from the Copper Penny Sparkle Blend as a finishing touch for this card. I figured I've been making lots of shakers lately I wanted to show how the blends can be used as a finishing touch or as a shaker mix. That's why I love Amber's Sparkle Blends they are perfect for all your projects.

The floral is a digital freebie from 


Thank you for stopping by the blog today! 

Be sure to tag us Doodles Paper Playground on social media if you create a project with our Sparkle Blends. All of our Sparkle Blends can be purchased on the White Rose Crafts LLC Website.

Saturday, January 26, 2019

Boho-Style Earrings with Rinea

Hello Craft Friends -  I am here with a fun project using the Princess Variety Pack.
 I created these Boho-inspired earrings.  Instead of using string to fill the loops I used thin strips of Rinea Foil paper. 


Supplies Used:
Princes Variety Pack
Jewelry Wire
Jewelry Wire Snips
Jewelry Round Pliers
Fish-hook earring wires
Ruler
Adhesive


Let's get started!

First, measure and cut a piece of Jewelry wire to about 5"


Next, using a small bottle or container to help you shape the loop. form your wire into a U shape.


Next, take one end of the wire and start wrapping it around the other. The jewelry wire is soft enough to shape and wrap. 


Continue to wrap the wire until it's completely done. 


Now, snip off a bit of the wire from the other side - using the wire snips. Use the Round Nose pliers to create a hook shape. This is how you will attach the earring base to the fish hook wires later.


Next, gather your thin strips of Rinea Foil Paper. I used Starstruck Blush Pink and Starstruck Silver. I pulled out several from the pack but all you need is a thin 12" strip of paper for the weaving.

Then, insert one end of the Starstruck Blush Pink Foil paper strip into the loop. Add a bit of adhesive to it and wrap it on the wire.  


Now, trim a strip of Starstruck Silver foil paper into about 4"  Fold in half, insert the loop into the foil strip. Add a bit of adhesive to the foil paper center place the wire in the adhesive. Next, a bit more adhesive to the two open ends of the silver foil paper. Making sure that none of the adhesive gets in the middle of the silver foil paper strip - we will be weaving the Starstruck Blush Paper through it. Now, add a bit of adhesive to the wire and press the Starstruck foil paper into it.  


Now, weaving the Starstruck Blush Pink paper through the Starstruck Silver paper and then over the wire. Then, under the wire and through the silver paper. Repeat the process until the loop is completely covered.


Now, when you get to the top - trim the paper leaving a small tail - about 1/8". Making sure it's long enough to end up on the back of the earring. Add adhesive to the end and wrap it around the top just under the wrapped wire. Press firmly.


 Now, using the round nose pliers - take the fish hook and place it on the open end of the loop. Use the pliers to close the loop. 


Repeat the steps above for the second earring.

Now your earrings are finished!


Thank you for stopping by!

Thursday, January 24, 2019

Doodle Paper Playground First Birthday Bash Blog Hop

Image may contain: 1 person


Hello Doodle Fans!

I am excited to be participating in a very special Birthday Bash Blog Hop starting today, Thursday, January 24, 2019 and ending at 11:59pm Sunday, January 27, 2019! 

The Designing Divas and I, along with several members of the talented White Rose Crafts Design Team, will be creating extra special Birthday Themed Shaker Cards for the hop today!

For a limited time, you have the opportunity to receive an exclusive, 
1st Birthday Freebie Sparkle Blend -- Only available while supplies last, with a purchase at 
White Rose Crafts!

Don't worry, though -- Amber has reserved 6 of these freebie blends to giveaway on Monday after the hop ends.  5 of those First Birthday Blends will go to 5 lucky winners, as door prizes, who leave comments on each of the Blog stops.  The more comments you leave, the more entries you get!

For our Grand Prize this month, One lucky winner will receive the full February Release (before it's revealed), plus a Full-size Birthday Freebie Blend! That's 7 Full-size Sparkle Blends! To be eligible you must leave comments on all legs of the blog hop.

This is my Special Birthday Theme Shaker Card!


Rules: Must be at least 18 to enter. 
All entries must be received no later than 11:59pm Eastern Time on Sunday, January 27, 2019. 
To enter, you must leave comments on each leg of the blog hop. There will be one Grand Prize winner and 5 Door Prize winners drawn from all eligible commentors on Monday, January 28, 2019. Winner will be announced on the blog, and on the Doodles Paper Playground Facebook page. 
Winner will have 48 hours to email their addresses to doodlespaperplayground@gmail.com to claim their prize. Prizes not claimed within 48 hours will be redrawn. 
This giveaway is not sponsored, endorsed or affiliated with Facebook or any of its entities. 
All prizes furnished by Doodles Paper Playground or White Rose Crafts.

As an added bonus, White Rose Crafts will be offering Free Shipping all weekend to correspond with the Blog Hop, so if you've had your eye on any of the limited edition Sparkle Blends from our previous releases, now is the time to buy before they sell out and are gone for good!  

Monday, January 21, 2019

Valentine's Day card featuring Conversation Hearts Sparkle Blend with Doodle Paper Playground

Hello Crafty Friends - I am here with a clean and simple masculine Valentine's day card.

I know that my son doesn't always love getting all the pink and red valentine's day cards every year. So, this year I decided to create a more masculine card. I used non-traditional colors yet I kept the color palette light. I went with a Teal and Purple color scheme.

I also used the Conversation Hearts Sparkle Blend to add a bit of finishing touch and highlight the image on the card with one of the fun tiny clay hearts in the mix.

This unexpected Valentine’s Day mix has tons of interest,
from its contemporary bright palette to the assorted size 
and style heart confetti and sequins in bold yellow, orange, green, 
purple and blue tones. You’ll find sparkly, shiny, transparent, iridescent, 
and holographic elements in this updated take on Cupid’s favorite holiday.


Thank you for stopping by the blog today! 

Be sure to tag us Doodles Paper Playground on social media if you create a project with our Sparkle Blends. All of our Sparkle Blends can be purchased on the White Rose Crafts LLC Website.

Sunday, January 20, 2019

Valentine's Day Shaker card with Dies R Us

Hello Friends - I am here with a fun shaker Valentine's Day card.

I kept it simple because of the shaker. I want you to look at the stamps for more than what they are intended for - I used a birthday stamp to create Valentine's day card.  


Let's get started - First, I stamped the bear form Lawn Fawn Party Animals twice and the heart 3 time. Next, colored them with Arteza brush markers. Set them aside to dry. Then, I die cut the frame from medium pink cardstock.

 I then adhered acetate/packaging to the back of the frame using a bit of thin score tape. Next, I added foam adhesive to the back of the frame. I set it aside to work on my front panel.


I cut a white card panel 4-1.4" x 5-1/2" - Next, using some Distress Oxide inks and a stencil brush I brushed on some ink on the cardstock in a square using the frame a reference. I only wanted to color the inside of the frame. Now you can measure and mask it off if you feel more comfortable.


Next, I placed a pile of sequins in the center of the purple square and removed the adhesive backing from the frame and placed it over the sequins. Making sure that all the sides have adhered completely. 


Then, I fussy cut my little bears and hearts. Used a Memento Black Marker for the edges. I adhered the bear on top of the shaker frame using thin foam tape in the center. Just overlapping them. Next, I adhered the 3 hearts just above the bears - popping up the center heart using thin foam tape.

Then, I stamped the sentiment "Happy Valentine's Day" from Lawn Fawn My Silly Valentine stamp set onto a thin strip of white cardstock. Next, adhere it to the bottom of the frame to the right just hanging off the from. I added a bit of foam tape to the end of the strip for support. Then, adhere the card front to a card base.


Now your Valentine's Day shaker card is complete to give to your special love one!


Supplies Used:


Other:
Arteza Brush Markers
Darice Sequins
Darice Thin Foam Adhesive
Strathmore Bristol Smooth Cardstock
Recollections Brand:
Heavy Weight Cardstock White & Medium Pink

Thank you so much for stopping by today!

Don't forget to come join in the fun at the Dies R Us Challenge Blog. There's a new challenge theme offered on the 1st and 15th of each month and one lucky randomly drawn winner will receive a gift voucher prize to the Dies R Us Store. For your convenience, all the important Dies R Us links are provided below.