Friday, August 31, 2018

So Sweet Box Card with Beth Duff Designs

Today, I wanted to share a fun pop-up box card using the newly released So Sweet Stamp set from Beth Duff Designs.


I created a video showing how I made this card - see below.

Now, here are some of the colors I used and some measurements. I briefly mention them in the video by just in case you missed it.

Markers: Spectrum Nior - Lemons and Lemonade - CT1, CT1 & CT3. Sign - CG1 & CG2. Stand - EB2, EB3 & EB4, Flag Banner - DR1, OR1, CT1, LG1, TB1 & HB1.

Copic - Girl's Top - B93, BG72, BG09. Hair - Y28, E15, E18. Skin - E11 & E93.
Artist Loft - E15

Tim Holtz Distress Stains: Tumbled Glass and Metallic Brushed Pewter.

Now for some quick measurements for the card base (back of the box) 3"w x 31/2"L. From the brown cardstock side panels 1"w x 31/2"L scored at 1/8" on both end long side and the tiny hinge pieces 1/2" squared scored at 1/8" on both end to create what looks like a mini staple.

I hope you enjoy the video tutorial. Be sure to stop by the Beth's Store to purchase some of the new stamps and more. www.duffsdesign.com    


Monday, August 27, 2018

Winged Happiness with A2Z Scrapbooking

Hello Friends - I am here with another quick and simple card. For today's card I used the Hero Arts Winged Friends Digital Download DK033  - from A2Z Scrapbooking shop. This digital download has both Dragonflies and Butterflies. It's simply beautiful and so easy to work with.


I kept my card simple - I printed out the same dragonfly twice - altering only the size on one of the dragonfly so I ended up with a larger and small version.

Adobe_20180821_234102.png

I started by printing out my Dragonflies from the  Hero Arts Winged Friends Digital Download DK033  I then colored them with my Spectrum Nior Markers. I then added a few dots down the center of the dragonflies; as well as filled in the eyes with a Gelly Roll pen in Silver. Add bit of Zig Wink of Stella in clear trimmed them out and set them aside.

Next I cut a piece cream cardstock to 4"x 51/4'. I then did some die cutting  - using a scalloped boarder die to cut one side of the cream cardstock. I also used a larger version of that scalloped boarder die on the Rinea Foil paper in Turquoise Glossy. I also cut the word Happy five times - 4 from black cardstock and 1 from Rinea Foil paper in Jade Starstruck. Finally, 1 small stitched rectangle.

Now, to create the card - I started by stacking the die cut Happy word gluing between layers. Set it aside with a heavy acrylic block on top. Next,  I layered the cream cardstock on top of the strip of turquoise Rinea Foil paper. I then layered that onto my black card base. Next, I added the dragonflies making sure to angle them. Using the sentiment from the Hero Arts Happy Stamp & Cut DC150 set I stamped it on the small rectangle with black ink and then heat embossed it with clear embossing powder. I then adhered the Happy die cut word to the top of the card, next I put some foam adhesive on the back of the stamped sentiment and place it over the happy die cut. To finish up the card I add a few tiny confetti dots.
Adobe_20180821_234102


So, stop on over to the shop and pick up this fun digital download - along with any other of the fabulous items in the store - I can't wait to see what you create with it.

The a2z scrapbooking store carries a wide variety of Hero Arts products! Get discounted new releases, sales, grab bags & more. Proceeds from our store benefit Celiac & Behcets disease foundations. Use my discount code Annie15 to get 15% off your purchase of $25 or more. If you’re looking for a Hero Arts product you don’t see in store, use the Request Custom Order button from with-in the shop.

Have a fantastic crafting day!
Annie
Please join us in this month’s “Anything Goes” challenge.   As you know, we’ve changed our rules a bit and participants are no longer required to use Hero Arts products to enter our challenges. Each month we feature a ‘Digi of the Month’ which will be the prize offered to our randomly-chosen challenge winner from our Hero Arts store. Our current monthly challenge can always be found in the menu bar, and runs from the 1st to last day of the month.


Image may contain: flower and text


  • Hero Arts Winged Friends Digital Download DK033 
  • Hero Arts Happy Stamp & Cut Set
  • Tsukineko Versafine Onyx Black Ink
  • Spectrum Nior Markers (GT -1,2&3/CT1&2/CG1,2 &3/LG1,2,3 &5)
  • Ranger Clear Embossing powder
  • Rinea Foil Paper in Turquoise Glossy and Jade Starstuck
  • Recollections Heavy Weight Cardstock in Black and Cream
  • Lawn Fawn Scalloped Boarder Dies
  • MFT Stitched Rectangle Die
  • Kuretake Zig Wink of Stella - Clear Shimmer Pen
  • Sakura Gelly Roll Metallic Silver
  • Tonic Studios Deluxe Liquid Adhesive
  • 3M Foam & Tape runner Adhesive
  • Lucy's Cards - Tiny Confetti

Sunday, August 26, 2018

Oh So Pretty Notes with Rinea Foiled Paper

Hello Friends - I am  here with a quick and easy tutorial today. I wanted to share a pretty note pad I created for my daughter. I think you will love to create one for a loved one, a friend or yourself.
Materials Needed:
Rinea Princess Foiled Paper Variety Pack - Crafter's Pack - I used the following: Starstruck Blush Pink, Starstruck Lavender Light Purple, Glossy Blush Pink/Gold & Glossy Lavender Light Purple/Gold
Jade/Jade Starstruck Foiled Paper
Joy Clair - Bee-Kind| Bible Journaling Clear Stamps
12" x 12" Heavy Weight Cardstock - I used Recollections -Black & White
Small Memo Pad - Purchased mine at the Dollar Tree Pack of 3
Tsukineko Inks: Memento - Tuxedo Black & Versafine - Onyx Black
Coloring Medium for stamps-I used Spectrum Noir Markers in the following colors: CT1 & CT2 - Bee's Body & BT1 &BT2 - Bee's Wings
Assorted Dies or Punches
Gelly Roll Gel Pens - Black, White and Glitter Gold
Zig Wink of Stella - Bee's Wings and tail. As well as Sentiment.
Velcro Fastener - I purchased mine at the Dollar Tree Pack of 12
Tools: Score Board, Bone Folder, Die Cutting Machine (I used my Cuddle-bug) Trimmer & Scissors
Adhesive - I used Tonic Studio Nuvo Deluxe Liquid Adhesive, Scotch Foam adhesive
Embellishments if desired - I used Small Jewels

So, Let's begin the project. - I like to break it down into a few steps.
1. Stamp the images you would like to use onto the heavy weight White cardstock. Using the Memento Tuxedo Black ink (if using alcohol markers, if using watercolor pens then use the Versafine Onyx Black Ink). Then, Color with coloring medium. Next, add any details you would like to you images - I added a bit of white gel pen on the body and some black & gold dots on the wings. Then, I stamped the sentiment.
2. Next, Trim the 12" x 12" Black heavy weight card stock into 3-1/2" x 11-3/4". Save the remaining card stock for your die cutting. Now, choose your dies and punches - die cut the sentiment as well as other desired shaped to decorate note pad with dies of choice, I chose to used a hive background, stitch scalloped frame, hexagon, assorted flowers and leaf sprig. For the sentiment & frame - I used the heavy weight card stock in black and white. For the hive background I used Glossy Lavender Light Purple/Gold - gold side up. For the flowers I used Starstruck Blush Pink, Starstruck Lavender Light Purple, Glossy Blush Pink/Gold from the Rinea Princess Foiled Paper Variety Pack - Crafter's Pack. For the leaves I used  Jade/Jade Starstruck Foiled Paper. Cutting everything all at once is a time saver. Set. all the pretty cut aside.
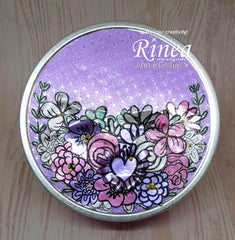
3. Next, adhere the frame on top of the background trim any extra. Now, let's assemble the flowers. I simply stack the three sizes just offsetting the petals so the flowers look fuller. Set aside to dry. 
4. While the topper is drying let's score the cover for our note pad. Using a scoring board or a trimmer channel - using the bone folder - score at 1", 1-1/4", 6-1/4" & 6-12". Next, crease the score lines - using the bone folder.
5. Adhere the pad into the cover. Place adhesive of choice on the back of the note pad and the creased section of the cover as shown the photos below. Press firmly. Next, push on the crease so the top of the note pad really sticks to the cover. I use the bone folder to press it. Plus, it give it a nice crisp look.
   
6.Now, Adhere the topper (hive background) to the front of the cover. Then, place sentiment on foam adhesive and center onto front cover. Next, arrange the flowers, bees and their buzzing trails as you like around the sentiment. Don't forget about the small tab on the bottom. I used the punched sections from the background and a flower. Now, for the closer - I peel off one Velcro tab and center it onto the other - stacking them. See photo below. The Velcro has strong adhesive this is why I only expose one side first - I then center the Velcro stack onto the lower tab - press in place - then remove the remain plastic backing and press the lower tab closed.   Ok - You are almost done - time to add a few extra finishing touches. I added some jewels to the centers of the flowers.  
You now have a very Pretty Note Pad - prefect for a gift. You can modify this tutorial using more masculine colors and stamps. 
Thank you for spending some time with me today here at the Rinea Blog. Be sure to share with us if you create a Pretty Note Pad of your own. 
Have a Great Crafty Day!!

Saturday, August 25, 2018

Beth Duff Design August Hop!

Hello and thank you for joining us for the Beth Duff Designs August blog hop! We are happy to have you hopping along with us! Our team and guest designers have created some amazing projects to share with you. Hop along to get some BDD inspiration.

I created this quick and easy card using the So Sweet Stamp Set


So Sweet

This is the card that I created. 


I using Distress Oxide Inks in Squeezed Lemonade, Fossilized Amber, Peeled Paint and Cracked Pistachio to create my background; I brushed them on as well as did droplets on to Cream heavy weight cardstock. Then, with Tsukineko Versafine Black Onyx Ink I stamped the Lemon, Lemon slices and the glass all over to create my own paper. Next, I stamped the sentiment onto die cut square of Cream heavy weight cardstock. Then, I back that sentiment panel onto black pattern paper. I pop it up on foam adhesive. I adhered the stamped background panel onto Black heavy weight cardstock card base. Then, centering the sentiment placed it on the card. I finish off the card with a few Tonic Studios Nuvo Drops and a Bit of Kuretake Zig Wink of Stella Clear glitter pen one Lemon and Lemonade.

Thank you for stopping by today. Be sure to stop by all the Design Team member and Guest Design Team blog and leave them so love!!


BDD - Start here
Annie - You are here!

Friday, August 17, 2018

You Make My World Bright - with A2Z Scrapbooking & Hero Arts

 Today, I want to focus on highlighting someone special to you. That person that you feel puts the stars in your world. Hero Arts has created the prefect printable for to create a project for you to let that person or people know exactly how you feel. With the Hero Arts Constellation Printable PT101  PDF - it's so easy to make your projects.


I created this card - I kept it very simple. I only used the Purple Constellation map(top left) and the Yellow Star (top right). Added a few embellishments - a finished card for my special love one that makes my world bright!
You Make my World Bright Card 1
I used Distress Stains (yes they are still awesome) and Distress Oxide to add a bit of color the sentiment. I cut the Star from the pdf as well as the center - because I wanted more of the map to show. I layered the Map onto yellow shimmer cardstock, then put foam adhesive on the back and place it onto black cardstock card base. Next, I placed the Star in the center of the card. Then, I fishtailed my sentiment as well as a 2" piece of the yellow shimmer card stock. Next, I layered them together. Next I added foam adhesive to the back of them and placed the sentiment to the card. As a finishing touch I added a some tiny stars and a few dots of Liquid Pearls.
I hope you give the Hero Arts Constellation Printable PT101  PDF a try. So many possibilities for projects.
You Make My World Bright Card 2
I can't wait to see what you create with it! Have a fantastic crafting day!
Annie

The a2z scrapbooking store carries a wide variety of Hero Arts products! Get discounted new releases, sales, grab bags & more. Proceeds from our store benefit Celiac & Behcets disease foundations. Use my discount code Annie15 to get 15% off your purchase of $25 or more. If you’re looking for a Hero Arts product you don’t see in store, use the Request Custom Order button from with-in the shop.


  • Hero Arts Constellation Printable PT101  PDF
  • Tim Holtz Distress Oxide Ink -  Squeezed Lemonade
  • Tim Holtz Distress Stain -  Tarnished Brass
  • Ranger Liquid Pearls - Daffodil
  • Recollections Brand Heavy Weight cardstock -  Black, Yellow & White
  • Craft Sensations Grafix Brand Shimmer Pearl Finish cardstock - Yellow
  • Tonic Studios Nuvo Deluxe Adhesive
  • Scotch 3M Foam Adhesive
  • Lucy's Card - Little Things - Tiny Stars

Saturday, August 11, 2018

Treasure Tin with Rinea Foiled Paper

Hello Friends - I am here with a quick and easy DIY gift tin. This little tin is prefect for all those small treasures - earrings, rings or small photos of friends & family. Whatever, your special treasure is this tin is a great place to store it.
This simple and sweet tin features the Princess Foiled Paper Variety Pack and this month's special collaboration with Joy Clair Stamps. I was given the privilege to work with Joy Clair's Doodle Flowers stamps.
Materials Needed:
Princess Foiled Paper Variety Pack - Crafter's Pack -6" x 12"
Starstruck Jade foiled paper
Joy Clair - Doodle Flowers Stamp Set
Small 4" x 1-1/4" tin or box
Tsukineko Stazon Ink - Jet Black
Adhesive (I used Tonic Studio Nuvo Deluxe and Aleene Clear Gel Tacky Glue)
Small Embellishments (I used Ranger Liquid Pearls in Gold)
Trimmer & Scissors
Stamp block/ platform 

So, let's get started.
1. Trace the lid of the tin onto scratch paper. You just need it as a easy template. If you have a 4" circle die - you can use that instead. Cut the 4" circle from the desired Foil Paper. I used the Starstruck Lavender Light Purple. Next, cut 2 strips from the same Foil Paper - one measuring 1/4" x 12" and the other 3/4" x 12". these will go around the lid and base of the tin. The paper is just shy of the full circumference of the tin - I needed a small filler piece of the Starstruck Lavender Light Purple. 
2. Adhere all the cut pieces to the tin. Circle on the top of the lid. The 1/4"  x 12" around the lip of the lid. and 3/4" x 12" around the base of the tin. Set aside to dry.
3. Stamp the desired amount of flowers* using the Joy Clair - Doodle Flowers Stamp Set using Tsukineko Stazon Ink - Jet Black. You want a multi-surface ink - because the foil paper is slick. I used from the  Starstruck Blush Pink, Starstruck Silver Glossy Blush Pink/Gold and Glossy Lavender Light Purple/Gold.  I also used some Starstruck Jade foiled paper. Next, fussy cut the flowers out. Then arrange the flower as you wish onto the lid of the tin. Adhere in place.
4. Embellish as desired.
Now you have a complete Treasure Tin - Perfect to give to that special someone.
I hope you enjoyed this quick tutorial. If you create a Treasure Tin of your own be sure to share it with us!!
Have a Crafty Day!