Monday, December 3, 2018

Sweet Baby Card with Doodles Paper Playground

Hello  Crafty Friends - I am here with a cute baby card. It's seem like families everywhere are welcoming new additions. 

For this card I used the Limited Edition Oh Baby Sparkle Blend
 a pink, blue and yellow base, and added yellow duckies,
 white and yellow baby bottles, blue safety pins,
 BABY confetti in a variety of pastel colors,
multi-hued iridescent rattles, and teenie iridescent hearts.

I love that the  Limited Edition Oh Baby Sparkle Blend has the word BABY in the mix. It's perfect to add to the sentiment. I replaced the stamped word with the sparkle word. I added a few more sequins to the corners along with eht teenie iridescent heart in purple. I also added some hearts pink and yellow to the sentiment. You can view a close up of the sentiment below.


Thank you for stopping by today. Be sure to tag us Doodles Paper Playground on social media if you create a project with our Sparkle Blends. All of our Sparkle Blends can be purchased on the White Rose Crafts LLC Website.

Sunday, December 2, 2018

Merry Christmas Window Card with Dies R Us

Hello Crafty Friends - I am here with a fun Christmas card using only die cuts and a few embellishments.


So, Let's get started!

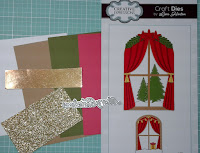
Step 1: Gather your supplies. Start die cutting your images. You will need 4 trees: 2 Kraft & 2 Green, 2 Red curtains, 4 Gold tassels, 2 gold curtain draw back sashes, 1 Gift base, 1 bow, 2 string lights & 1 Snow pile. Sentiment: Merry:2 Cream & 1 Gold, Christmas: 2 Cream & 1 Gold 


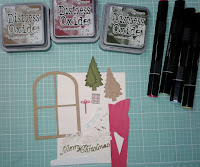
Step 2:  Inking: This part if optional - but it gives your die cuts more dimension. I inked the edges of the trees, gift, bow, curtain and snow. First start with the trees. ink the kraft tree trucks only with gather twigs. Next, ink the edge of the green trees. Then, cut off the trucks only of the green trees. Adhere to the kraft trees. I added a bit of texture snow - again, optional. If you add snow set aside to dry.
  

Step 3: Next, ink the curtain in Aged Mahogany - just the edges and were the curtains gather. Then, adhere the tassel and draw back sashes to the curtains. Repeat the process with the bow for the gift. I added a bit of Forest Moss to the gift. Adhere the bow to the gift. Next, ink the window with gathered twigs. I also added a bit of Broken China to the snow. Set aside.

Step 4: I used my alcohol markers to color the string of lights, Then, I added Wink of Stella in clear glitter for shimmer. Once dry, I added a bit of Metallic Silver Gel Pen to the tops of the lights and a White Gel Pen highlight to the lights.


Step 5: Assembly: Adhere your 3 Merry together creating a stack. Repeat the process with Christmas. Once all my die cuts are dry and ready to assemble the card.


 Adhere the curtains to the window from behind. Making sure not to add to much glue. 


Then, adhere the gift to window adding adhesive only to the edges that touch the curtain and the bottom of the window.

Next, adhere the snow pile to the front - bottom of the window.

Now, It's time for the lights,  add a bit of adhesive to the string and each of the bulbs. I use tweezers for this, because they are so tiny. Create a swag of the lights.

Now, Flip over the window and add adhesive to the back. I used thin foam adhesive for a slight dimension. Set aside. Next, I layered the Cream card stock onto the pattern paper. Then, center the window and place onto the card front.
  

Next, place some foam adhesive onto the trees. Then, place them next to the window one on each side. Now, adhere the sentiment to the top of the card front.

Step 6: Finishing touches: I added a few sequins and jewel to the card. This optional if you don't like to add these you don't have to. I added one gold tiny sequin to the center of the window, then in the center of the gold sequin I added a tiny green jewel. I also added a trio of sequins in Gold, Red and Green by each tree and near the sentiment.

Now your card if finished and ready to mail or hand to that special someone on your list.

Thank you for stopping by today!
We can't wait to see what you create using our amazing collection of Dies. Be sure to tag us on Social Media #diesrus  Stop by our Facebook Page 


Supplies Used:
Most of from Dies R Us

Inks - Optional

Adhesive:

Card Stock:
Recollections Brand:Cream, Red, Green,
 Kraft - Glitter Snow white, Gold Foil

Pattern Paper: 
DCWV Brand: Plaid Christmas print 

Sequins:
Elle Tru Chrismas Mix

Wednesday, November 28, 2018

Have a Frightfully Good Holiday Season with Kindred Stamps

Hello Crafty Friends - I am here with a fun holiday card featuring our favorite Nightmare Pals 
from the stamp set called Holidays are a Nightmare
Holidays are a Nightmare

We all love a huge mug of Hot Chocolate during the holidays - How about a Giant marshmallow? For this card I created a just that. The mug features the Nightmare couple and the the marshmallow is none other that Mr. Spooky sack guy.


This is a fun shaker card. I used some shiny brown glitter and metallic sequins for the hot chocolate. A bit of pattern paper for the mug*Note: I hand drew the mug - you can use a die if you have one.
Finished it off with a bit of Christmas washi tape.

Thank you for stopping by the blog today!
Be sure to visit our shop for some amazing stamp sets. Don't for get to tag us Kindred Stamps on Social Media or stop by our Fan Club page on Facebook to share your work featuring our stamp sets.

Joy To You with Doodles Paper Playground

Hello Crafty Friends - I am here with a fun snowflake card. This is a twirling card - the snowflake does a fantastic twirl when you open the card. I accented the card with the Frozen Sparkle Blend

this mix it has hues of Blue, soft Teals and white. Some snowflakes, small crystals in both clear and pale blue. This Sparkle Blend along with all the other Sparkle Blend can be purchased at White Rose Crafts LLC


Thank you for stopping by today. Be sure to tag us Doodles Paper Playground on social media if you create a project with our Sparkle Blends. All of our Sparkle Blends can be purchased on the White Rose Crafts LLC Website.

Tuesday, November 27, 2018

Thanks with A2Z Scrapbooking

Hello Crafty Friends - I am here with a card of  Thanks for A2Z Scrapbooking - In keeping with our theme this month of Give Thanks. This card is perfect a simple thank you for any occasion.


Thank you for stopping by today - Remember to use my discount code Annie15 to get 15% off your purchase of $25 or more.


Supplies Used: 
Hero Arts Layering Bird Stamp - CL866
Hero Arts Celebrate Stamp Set - CL498
Pattern Paper: Echo Park Celebrate Fall Collection
Inks: Tsukineko Versafine Onyx Black - -Tim Holtz Distress Oxides Ink: Fossilized Amber, Gathered Twigs, Aged Mahogany, Peeled Paint, Forest Moss, Broken China, Blueprint Sketch, Wilted Violet & Shaded Lilac
Card Stock: Recollection Brand: Light Yellow, White & Brown
Washi Tape: Recollection Brand in Copper
Adheseive: Scotch 3M ATG, Dollar Tree - low profile Foam tape
Tools: Tim Holtz Stamp Platform, Paper Studios Paper Trimmer, Scissors

Monday, November 26, 2018

Tea Light Centerpiece with Rinea

Hello Crafty Friends - I am here with another fun project in collaboration with Imagine Crafts. Today, I have a Tea Light Centerpiece perfect for the dining table or mantel. 


Let's gather our supplies and get started on our project:
Autumn Variety Crafter's Pack -  Ruby Red Starstruck 
Recollections Brand heavy weight card stock in Golden
Aleene's Tacky Craft Glue
Horizon Group USA- Braiding Cord in Chocolate Brown
Tools: Rinea Clear Round Stamp Block, Tim Holtz Platform
Electronic Die Cutting Machine, Scissors


So, let's get started. First, download and cut the Flourish Tealight Holder from the Golden card stock and the Ruby Red Starstruck foil paper. Note: I did not cut the flourish part of the file. I instead stamped some images. I assembled the tealight holder following the instruction on the PDF and Video by Simply Crafty SVG


Once the Tealight Holder is assembled I stamped the wreath & Pine Cone with Imagine Crafts Ganache Stazon Ink. Then, the Star Anise, Orange slice with  Imagine Crafts Stazon Claret Ink. . The Pine Boughs I did with Imagine Crafts Stazon  Cloudy Sky
I added a bit more color using Distress Oxide ink in Fozziled Amber and Evergreen Bough. I then cut the wreath toward the bottom so that it would fit my holder. I used the cut pieces to fill in were needed. I placed thin foam adhesive behind the pine cone and placed onto the holder in the center of the wreath.


 Now the Tealight Center Piece is finished and ready to decorate the table or mantel.
Thank you for stopping by today - if you create a project using Rinea Foil Paper be sure to link us on social media we love to see your creations! 


Sunday, November 25, 2018

Season's Greeting with Dies R Us

Hello Crafty Friends - I am here today with a fun holiday card. 
The season is here for us to start creating and send out cards to our friends and family.

For this card I created a simple scene of traveling for the holiday season. Using mostly Lawn Fawn products. This a simple die cutting and layers type card. ** Unfortunately I lost my step by step photos I hope my description of how I made this card is helpful.


I started by stamping the images from Lawn Fawn Home for the Holidays stamp set. I stamped the car twice. I trimmed off the top have of the car to create a utility trailer. I colored the images with my Spectrum Noir Alcohol Markers. I trimmed 3 thin strips of gray card stock to create the gate for the trailer. 

Next, I die cut 2 snow from white glitter card stock and 1 hill from black card stock using Lawn Fawn Hillside Border Die. I also die cut 1 Forest Border and 2 Simple Puffy Clouds. I set all my die cuts and colored images a side. Then, On light blue card stock using a bubble stencil and white dye ink I created a snowy sky.

I then assembled my card by layering  and adhering the tree border onto the blue card stock, next the snow hill, road and snow hill. Once I had all the background adhered in place. I then adhered the present onto the trailer. The tree onto the car and also attached the car and trailer together. Using foam adhesive placed the car and trailer onto the card front. Next, I adhered the 2 clouds to the card front layering them and using a bit of thin foam adhesive on the small cloud to give some dimension. For finishing I stamped the sentiment which I layered onto dark blue card stock and I added a few sequins.

Supply List 


Spectrum Noir Markers

Recollections Brand Card stock in: 
White, Blue - light and dark, 
Black and Glitter in White Snow

Doodles Paper Playground's 
Frozen Sparkle Blend


Thank you for stopping by today.