Tuesday, January 1, 2019

Goals 2019 Notebook with Robin's Nest

Hello Crafty Friends - I am here with a quick notebook for your Goals for the New Year!

This is a quick notebook for you to take along and jot down your notes or goals for the day.


So, Let's begin the project. - I like to break it down into a few steps.

1. Next, Trim the 12" x 12" White heavy weight card stock into 3-1/2" x 11-3/4". Save the remaining card stock for another project. 

2. let's score the cover for our note pad. Using a scoring board or a trimmer channel - using the bone folder - score at  5" & 5-1/4".  Then at 10-1/4" & 10- 3/8". Next, crease the score lines - using the bone folder.

3. Apply a bit of gesso to your cover. heat set or air dry (I heat set). Then, spray some Heidi Swapp Color Shine, Tim Holtz Distress Stain Spray. Heat set to dry. 

4. Adhere the pad into the cover. Place adhesive of choice on the back of the note pad and the creased section of the cover. I added an extra piece cardstock to the inside of the cover as well as to the bottom closer.  Press firmly. Next, push on the crease so the top of the note pad really sticks to the cover. I use the bone folder to press it. Plus, it give it a nice crisp look.


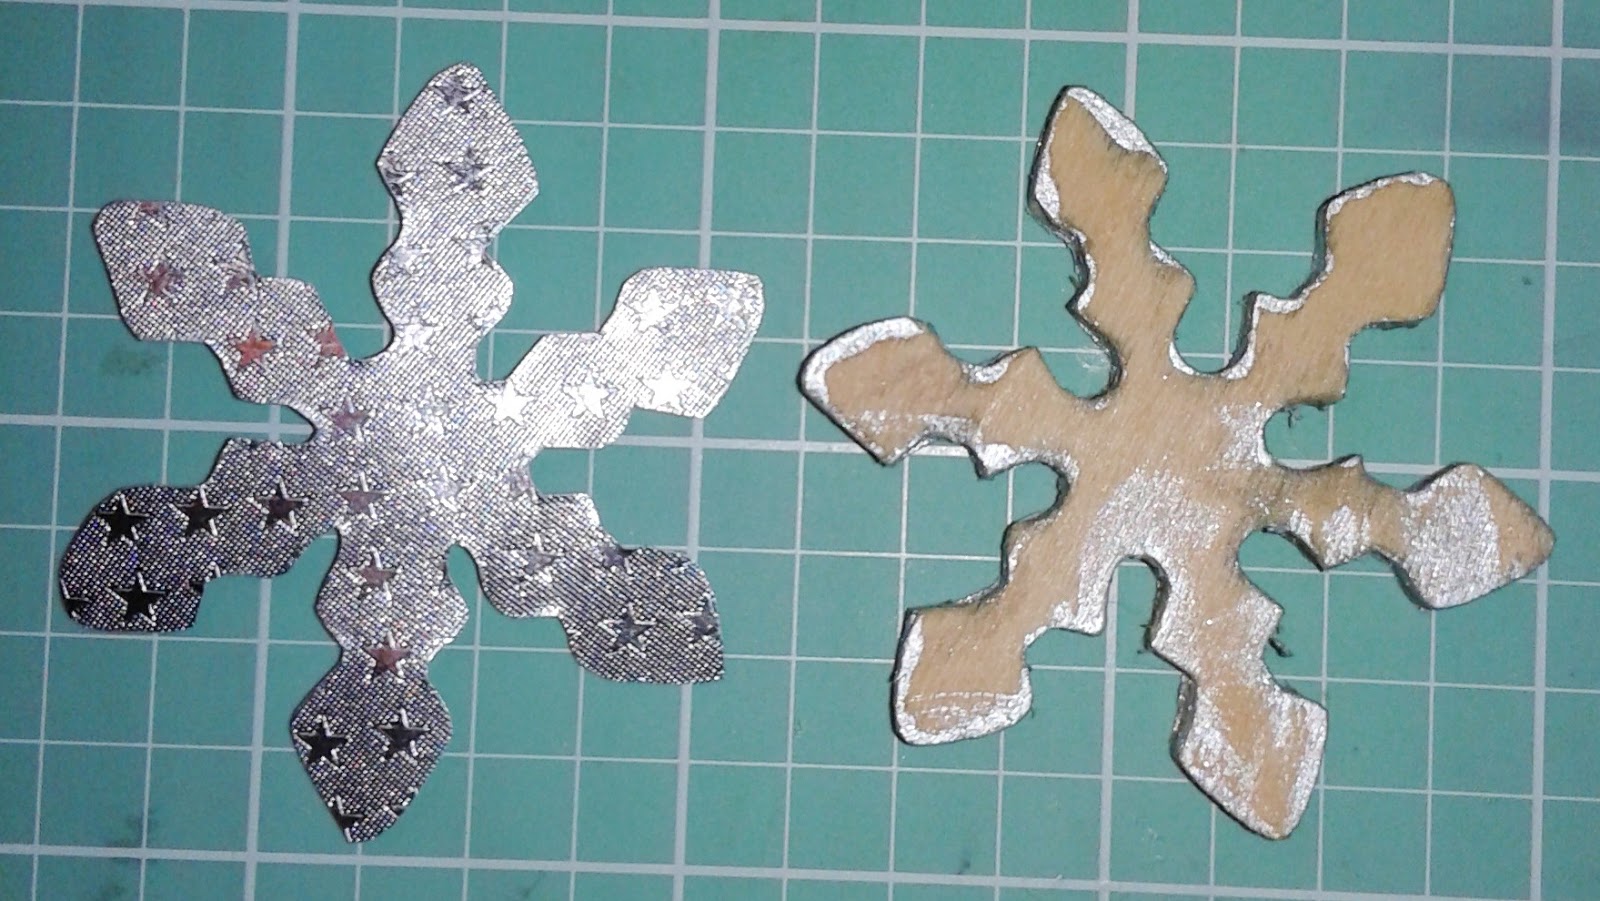
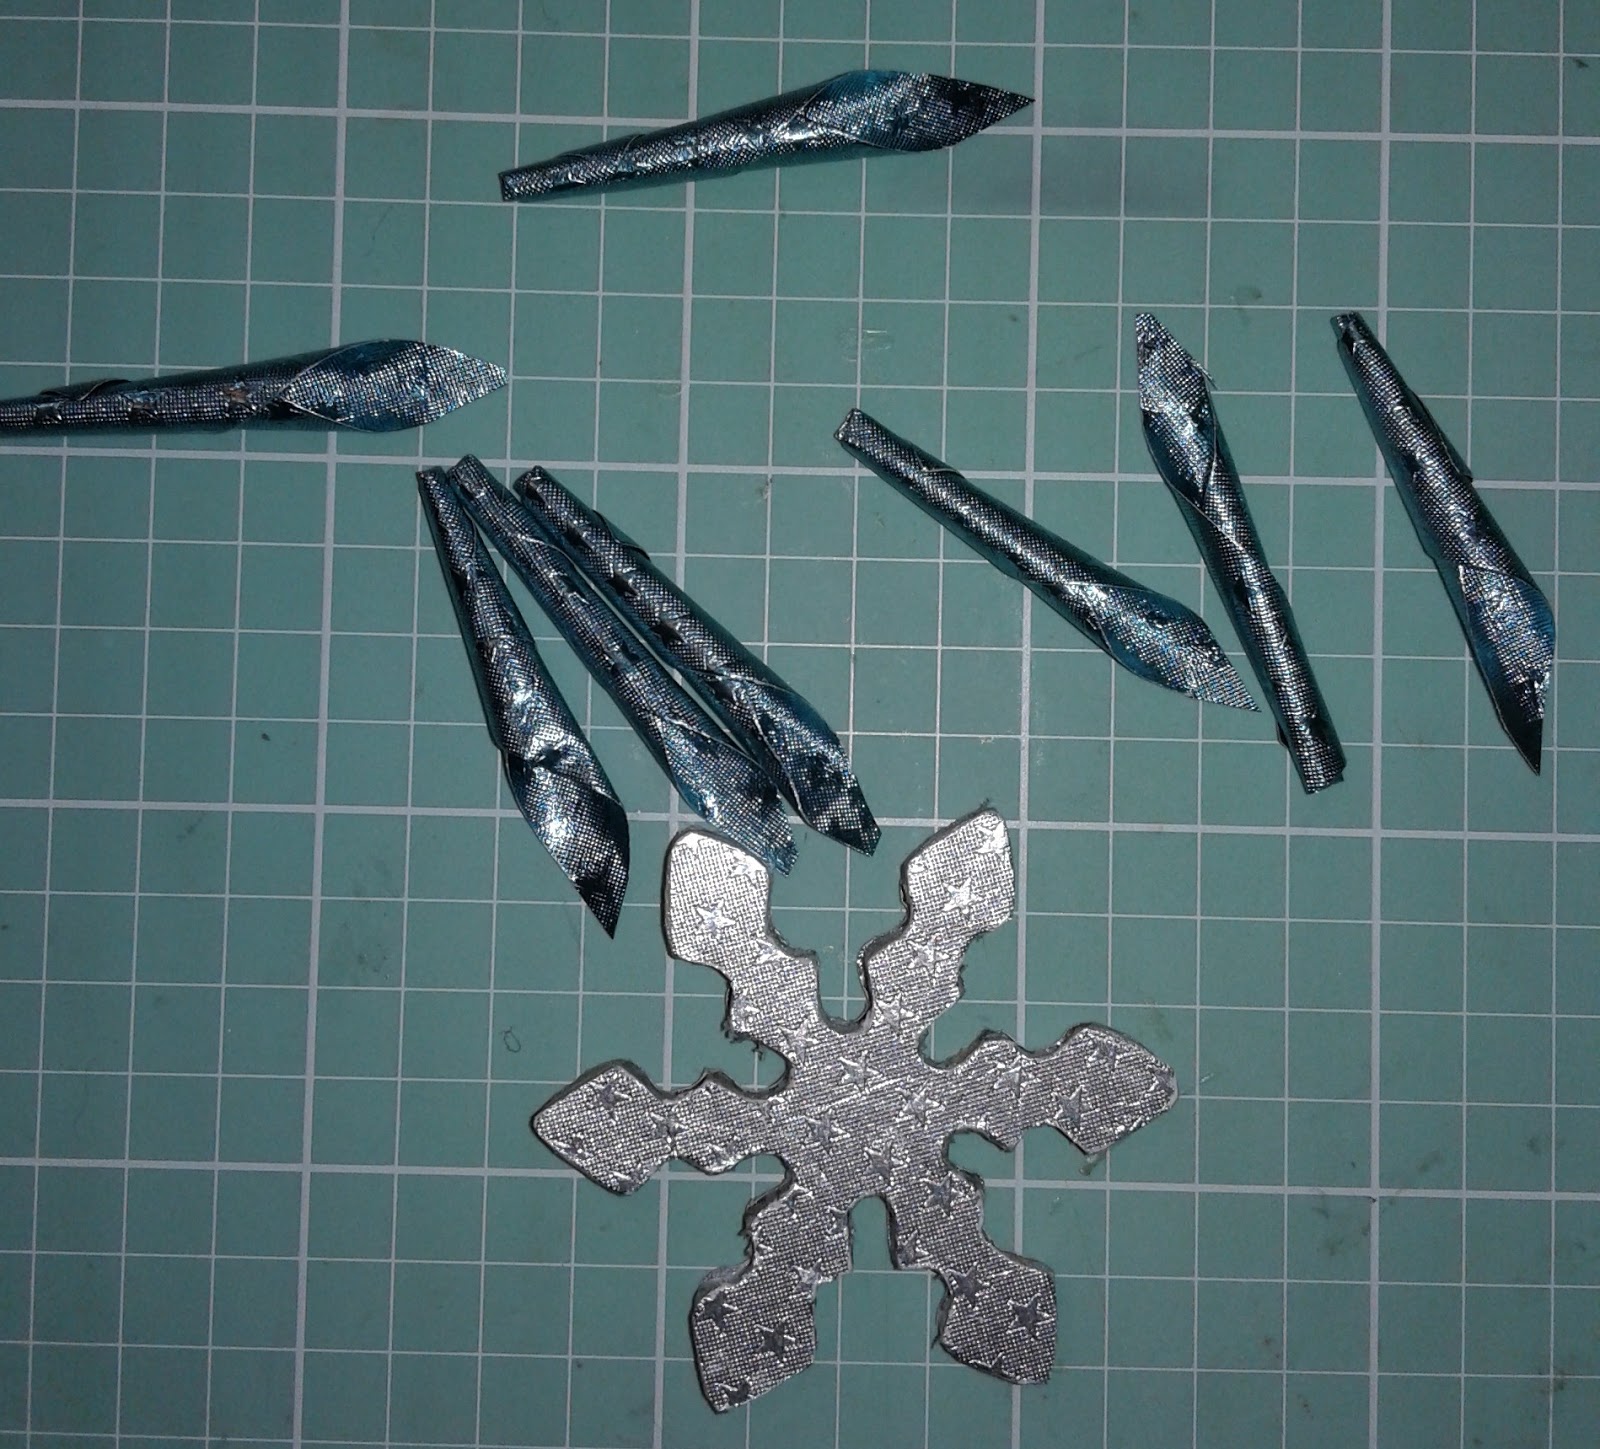
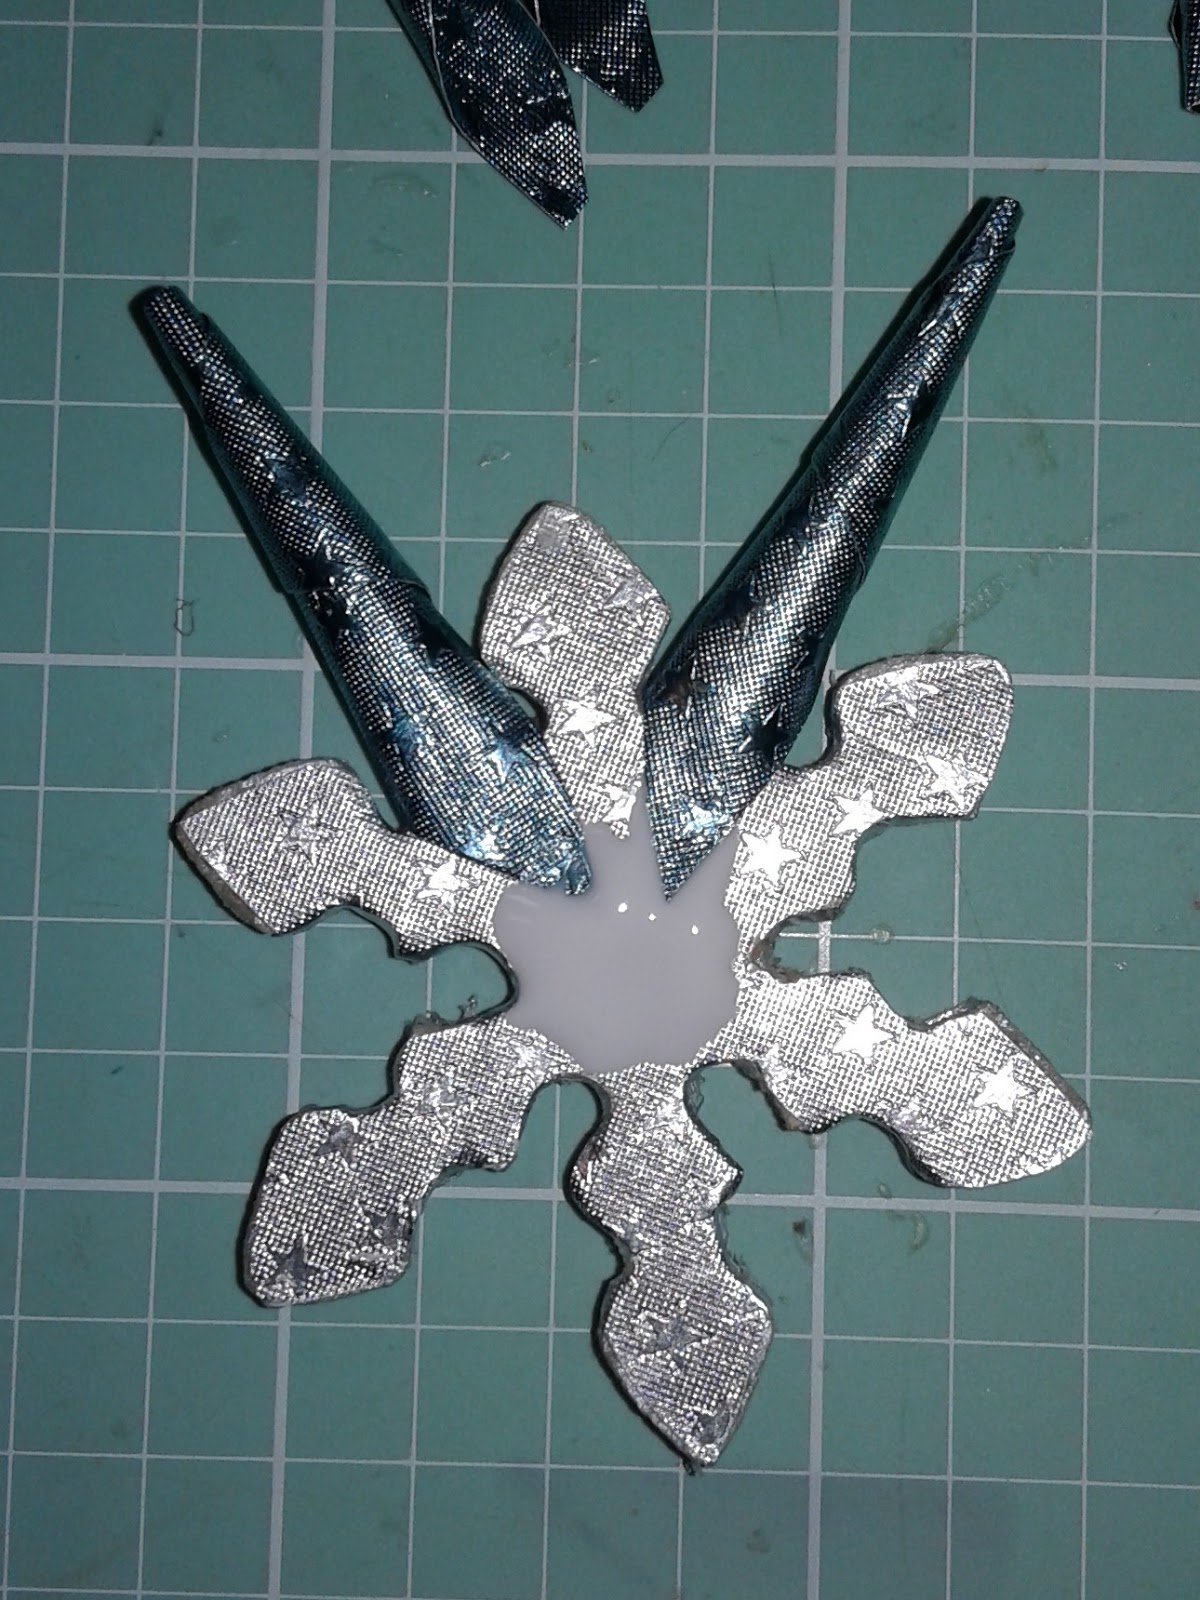
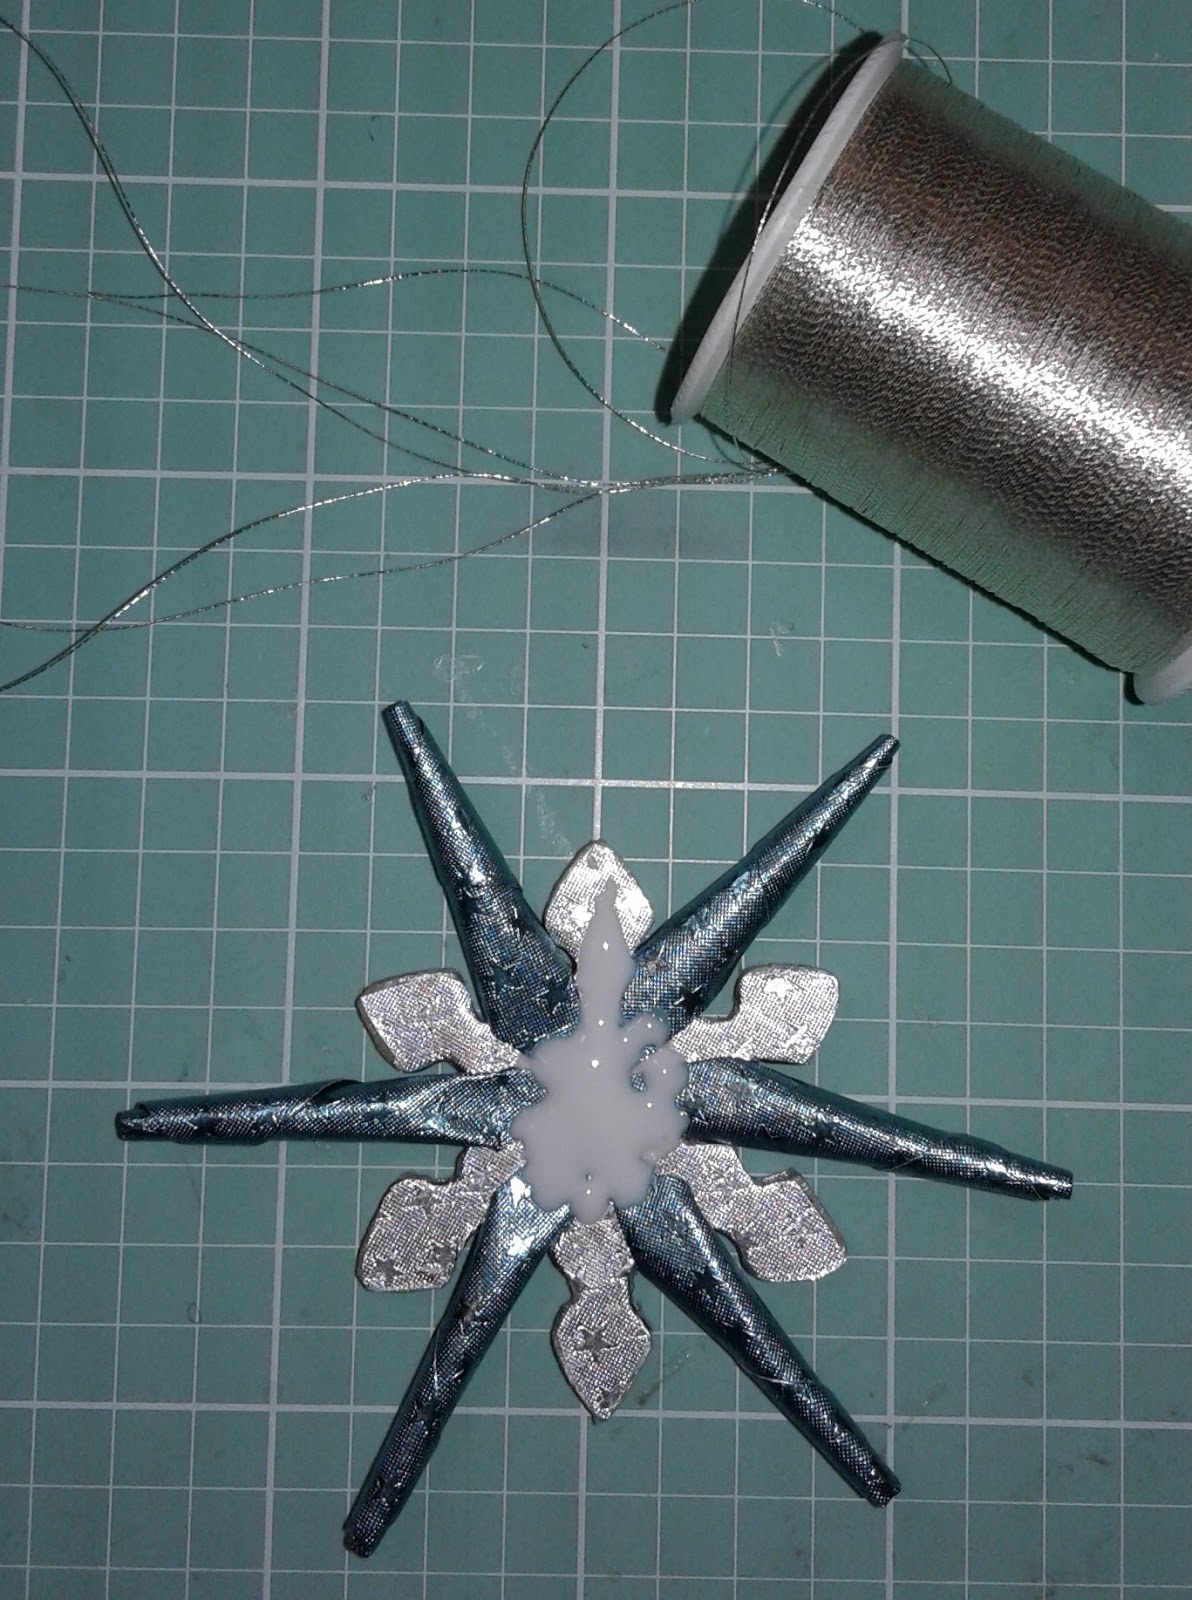
5. Now, Adhere the Tear & Dew Drops to the cover creating a flower. Each flower will require 6 Tear Drops and 1 Dew Drop per flower. Then, an adorable Butterfly just under the top flower.  
Next, add sticker letters and washi tape. Note* - Add a bit adhesive to the stickers and washi because of the gesso & sprays. Then, adhere the doilie die cut to the bottom right. Then, add the number stickers, the trimmed Chipboard Saffron Card and a bit of washi. Trim off anything extra.


6. Now, for the closer - I peel off one Velcro tab and center it onto the other - stacking them. The Velcro has strong adhesive this is why I only expose one side first - I then center the Velcro stack onto the lower tab - press in place - then remove the remain plastic backing and press the lower tab closed.


You now have a very Goals Notebook - prefect for a gift. You can modify this tutorial using more masculine design with the Dew Drops. 

Supplies Used:

Black/White/Silver Dew Drops

Sea Glass Tear Drops

Sun Shower Tear Drops

Butterflies Dew Drops
Doillie Die Cuts

Saffron Cards

Dew Dew Glue
DCWV -Canvas Cardstock
Recollections Cardstock - Blue 
EK Success - Letters & Numbers
Tim Holtz  Distress Stain Spray - Cracked Pistachio
Heidi Swapp Color Shine Spray - Teal
Doler-Rowney Gesso

Velcro Fastener - I purchased mine at the Dollar Tree Pack of 12

Tools: Score Board, Bone Folder, Trimmer & Scissors

Adhesive - Scotch adhesive


Thank you for spending some time with me today here at the Robin's Nest Blog.
 Be sure to share with us if you create a  Goals Notebook of your own. 
Have a Great Crafty Day!!
Stop by and visit us at Robin's Nest Store, Facebook  & YouTube

Sunday, December 30, 2018

Happy New Year Card with Dies R Us

Hello Crafty Friends - I am here with a New Year card. 
I think everyone would love a card to ring in the new year.

This card is a die cut inlay design. 
It's pretty easy to make and you can cut all your paper ahead to create lots of the same card just in case you have lots of friends and family you would like to send these out to!


Let's get started!!

First, I die cut the Flute glasses, champagne bottle in the ice bucket from white cardstock, holographic foil paper. I also die cut the champagne bottle in the ice bucket from red glitter cardstock.  Making sure to save all the pieces.

I trimmed white and black cardstock to A2 panels. 
I then trimmed the white panel down by a 1/8" so to create a border around the card front panel. 


Next, I adhered the flute glasses and the champagne bottle in the ice bucket to a black cardstock card front using the white cardstock I die cut the items from for placement.  I then used the red glitter die cut to place the labels on the bottle and the bow on the bucket.


Then, I added foam adhesive to the white cardstock and place it onto the card front panel.


Next, I die cut the words Happy New Year 2 times from plain black cardstock and once from Black glitter cardstock. Using some adhesive between - I stacked the words. Adhered them to the card front panel on the top left.


Next, using some dimensional silver stars I added some in two clusters for a finishing touch.
Then, adhered the front panel onto a card base.

Now, the card is finished!


Supplies Used:
Dies
Yvonne Creations - Champagne


Elizabeth Craft Designs - Happy New Year

cardstock & Paper
Recollections Brand - Black & White
DCWV - Red Glitter Cardstock
Jot Brand - Holographic Silver Paper


 Don't forget to come join in the fun at the Dies R Us Challenge Blog. There's a new challenge theme offered on the 1st and 15th of each month and one lucky randomly drawn winner will receive a gift voucher prize to the Dies R Us Store. For your convenience, all the important Dies R Us links are provided below.


Thanks for stopping by and have a great day!

Saturday, December 29, 2018

Happy New Year Card with Doodles Paper Playground

Hello Crafty Friends - I am here with New Year's card using the New Release Sparkle Blend Celebrate! 

This shaker card is a prefect to send to that special someone to ring in the New Year! The Sparkle Blend is a fun way to add the bubbly to the card. 

I used the Celebrate Sparkle Blend both inside the shaker(both the bottle and glass) and on the card as a finishing touch.

Celebrate Sparkle Blend
 this New Year inspired blend includes
 lots of gold and silver stars & glitter & metallic sequins
, matte black gems, and zebra striped sequins, in an iridescent black base. 

No automatic alt text available.

Thank you for stopping by today. Be sure to tag us Doodles Paper Playground on social media if you create a project with our Sparkle Blends. All of our Sparkle Blends can be purchased on the White Rose Crafts LLC Website.

Thursday, December 27, 2018

Lazy Winter with A2Z Scrapbooking

Hello Crafty Friends -I am  here with this month's theme of  Winter Wonderland for
A2Z Scrapbooking I wanted to have the colors of my card soft.

I used soft blue and gray instead of the traditional red and green. These colors go perfect with the Polar Bear Greeting stamps in creating a winter wonderland scene.

20181204_211749

Note: Polar Bear Greetings has a die set - I did not use them but they are available in the shop.  Polar Bear Greeting Coordinating Dies


a2z scrapbooking december 2018 challenge

Please join us in this month’s “Winter Wonderland” challenge for your chance at a free digital stamp AND, if you used Hero Arts or Sugartree Stamps, a $20 gift card to our Hero Arts store. Our current monthly challenge can always be found in the menu bar, and runs from the 1st to last day of the month.  Use my discount code Annie15 to get 15% off your purchase of $25 or more. If you’re looking for a Hero Arts product you don’t see in store, use the Request Custom Order button from with-in the shop.


 Supplies Used:
  •   Polar Bear Greeting stamps
  • Pattern Paper: Stampin' Up Little Foxy Designer Series
  • Cardstock: Recollections Brand- Heavy Weight:
  • Medium Blue and White
  • Glitter Cardstock: Jot Brand - Dollar Tree Dark Blue
  • Lawn Fawn Stitched Hillside Border dies
  • Finishing Touches: Elle Tru - Clay Snowflakes - White, Light Blue & Medium Blue
  • Darice Brand Craft Foam
  • Scotch ATG Adhesive

Happy New Year With Kindred Stamps

Hello Crafty Friends - I am  here with a Cute New Year card featuring some of Kindred Stamps New Kids on the Blocks. 

I want to wish all of you a Happy and Healthy New Year!!

For this card I used the following Stamp Sets:
 
Stamped the images onto heavy weight card stock and colored with Spectrum Noir markers, I also stamped & colored the banner from the Llama Get This Straight set and adhered it to the sentiment from Hero Arts. The hats, pantukas aka horns and tiny background confetti are Lawn Fawn. For finishing touches I added a bit of Silver washi tape and a bit Silver Holographic paper. Matted the front panel onto medium gray heavy weight card stock.

Thank you for stopping by the blog today! 
 

Wednesday, December 26, 2018

Snowflake Ornament with Rinea

Hello Crafty Friends - I am  here with a Holiday decoration. This ornament can be used to decorate your tree, presents or just decor around your home or office. It's perfect for gift giving as well.

You just need about 30 minutes and a few supplies.


Supplies Needed:
Lara's Crafts - Wooden Snowflake
Plaid-FolkArt Metallic Silver Paint
Coats Brand Metallic Silver Thread
My Minds Eye Brand Turquoise Bling
Adhesive : Aleene's Tacky Glue
Paint Brush


Step 1: Paint the edges of the wooded snowflake - set aside to dry about 1 minute. * Note: if you do not like using paint you can color you edges with a Metallic Silver Sharpie.


Step: 2 Using the Rinea 3D Rolled Star Die or Stars N More Templates to die cut 2 star maker shapes from Starstruck Turquoise. Using the handle of your paint brush curl the circle edges as indicated on the back of the package. The best art of the Rinea Foil paper is that it holds it shape - but if you prefer you can add a tiny bit of glue. Set aside.


Step 4: trace the snowflake on to the Starstruck Silver foil paper trim and adhere to the wooden snowflake. Repeat this for the other side. 

Step 5: Assembly of the snowflake - Start by cutting a part one of the rolled stars. Then, adhere the little cones onto the back of the wooden snowflake. *Note: you can use a glue gun and glue sticks for this process if you prefer unless creating this project with children. Next, cut a length of the silver thread - about 8 inches; then fold in half and tie off one end. Adhere it to the snowflake(this will be your hanger) try to center it.
   
Step 6: Now, place the other rolled star onto the snowflake - this is the back of the snowflake. Make sure that the points go in between the others.


Step 7: Finishing touches: Now, turn you snowflake over and add a jewel to the center. Your snowflake is complete and ready to hung on your tree, gifts, anywhere that you want to decorate.


Look at the shine! 
Side view of the Finished Snowflake

Thank you for stopping by today.
Be sure to stop by the shop and stock up on all the beautiful Rinea Foil Paper.