Friday, April 19, 2019

April's Sparkle Blends Release Blog Hop with Doodles Paper Playground


Hello Sparkle Blends Fans!

 Its time for the Doodles Paper Playground, April Sparkle Blends Release Blog Hop!! 

We’ve got 6 beautiful spring-y blends to share with you this month: Easter Basket, Springtime, Sunshine, Cafe Au Lait, Birthstone Collection: April - Diamond, & Birthstone Collection: May - Emerald. If you love soft, pastel shades, and budding greens, you're definitely going to love this release!

Check out the descriptions and close up photos of each of these gorgeous Sparkle Blends from our April release in our detailed release blog post!

This month there are beautiful new blends for you to choose from--or even better, order them all! Do you have a favorite? Make sure you circle back to the Doodles Paper Playground post after the hop, and comment on that post with your favorite blend from the April Release, for a chance to win a package of that blend!

Here is the card I created for this hop using Sparkle Blends: Easter Basket

Continue the hop for more inspiration and for chances to win a set of all 6 Sparkle Blends from this release, make sure you leave some comment love on each leg of the hop! You will receive one entry for each comment--and don’t forget to share with your friends!

As always, the limited edition April Release is available for purchase while supplies last, exclusively at White Rose Crafts--so if you fall in love, make sure you order, or you just might miss out!


Carrot Hot Rod with Simply Crafty SVGs

Hello Crafty Friends - I am here with an adorable project from Simply Crafty SVGs.

Using the Carrot Hot Rod SVG - I created this adorable bunny in his too cute hot rod! This bunny is burning rubber instead of hopping along to bring some Easter goodie to everyone!


I love that Sandy at Simply Crafty SVGs includes a PDF and a Video Tutorial for all her SVGs with simple and clear instructions.

Be sure to give this or any of the wonderful SVGs that are available a try!!

Thank you for stopping by today!


Be sure to join us over on the Facebook Group Simply Crafty SVGs Creators Group
If you create any of the Wonderful Project designed by Sandy from Simply Crafty SVG share them with us in the group and social media.

Wednesday, April 17, 2019

You're My Lucky Star with A2Z Scrapbooking

 Hello Crafty Friends- I am here today with a fun Pop- up box card as part of this month's Challenge Fun Folds.
I am using Hero Arts Lucky Star Stamp Set CM315.
20190417_003555

Side view of the card
20190417_003807

Top view of the card
20190417_003425

Let's get started on how to create this simple yet fun card.

First, Cut 2 pieces of cardstock 7-1/2" long by 4-1/4" wide.
You will be scoring on both pieces.

Next, you need to score the cardstock at 1/2" and 1" mark. You need to do this on both sides of your cardstock and on both pieces of cardstock.

Then, you will be folding on these score lines. The old fan style - like back in the elementary school days.
   

Next, you will need to cut a shape of your choice into one of the cardstock pieces.
(I did a rectangle).

You should have one with an opening and one sold. Both with the folds on the sides.

Now, that you have the cutting and folding done you can start decorating the inside of your card. I adhered a pattern paper onto the solid cardstock (which is the back of the card) and then add the stamped and fussy cut constellations to it. Then, I adhered the front and back of the cards together at the folded tabs we created. You can use liquid or tape adhesive.
  20190417_003807

Now, you can decorate the rest your card and add your sentiment. For finishing touches, I added some white details with a gel pen and a bit of Nuvo Glitter Drops in white blizzard.

Your Pop-up Box Card is now complete!
Thank you for stopping by today!

Please join us on TwitterInstagram and Facebook? so you don’t miss any fun promotions or new challenge announcements!
Hero Arts Monthly Challenge

a2z scrapbooking april challenge

Please join us in this month’s “Fun Folds” challenge for your chance at a free digital stamp set AND, if you used Hero Arts or Sugartree Stamps, a $20 gift card to our etsy store.  Our current monthly challenge can always be found in the menu bar, and runs from the 1st to last day of the month.

The a2z scrapbooking store carries a wide variety of Hero Arts products as well as a nice selection of digital stamps! Get discounted new releases, sales, grab bags & more. Proceeds from our store benefit Celiac & Behcets disease foundations. Use my discount code Annie15 to get 15% off your purchase of $25 or more. If you’re looking for a Hero Arts product you don’t see in store, use the Request Custom Order button from with-in the shop.


Happy Mother's Day with White Rose Crafts LLC

Hello Crafty Friends - I am here with a watercolor mother's day card.

Don't worry I promise you can do this. If you can stamp, heat emboss and add a bit of color then you can create this card.

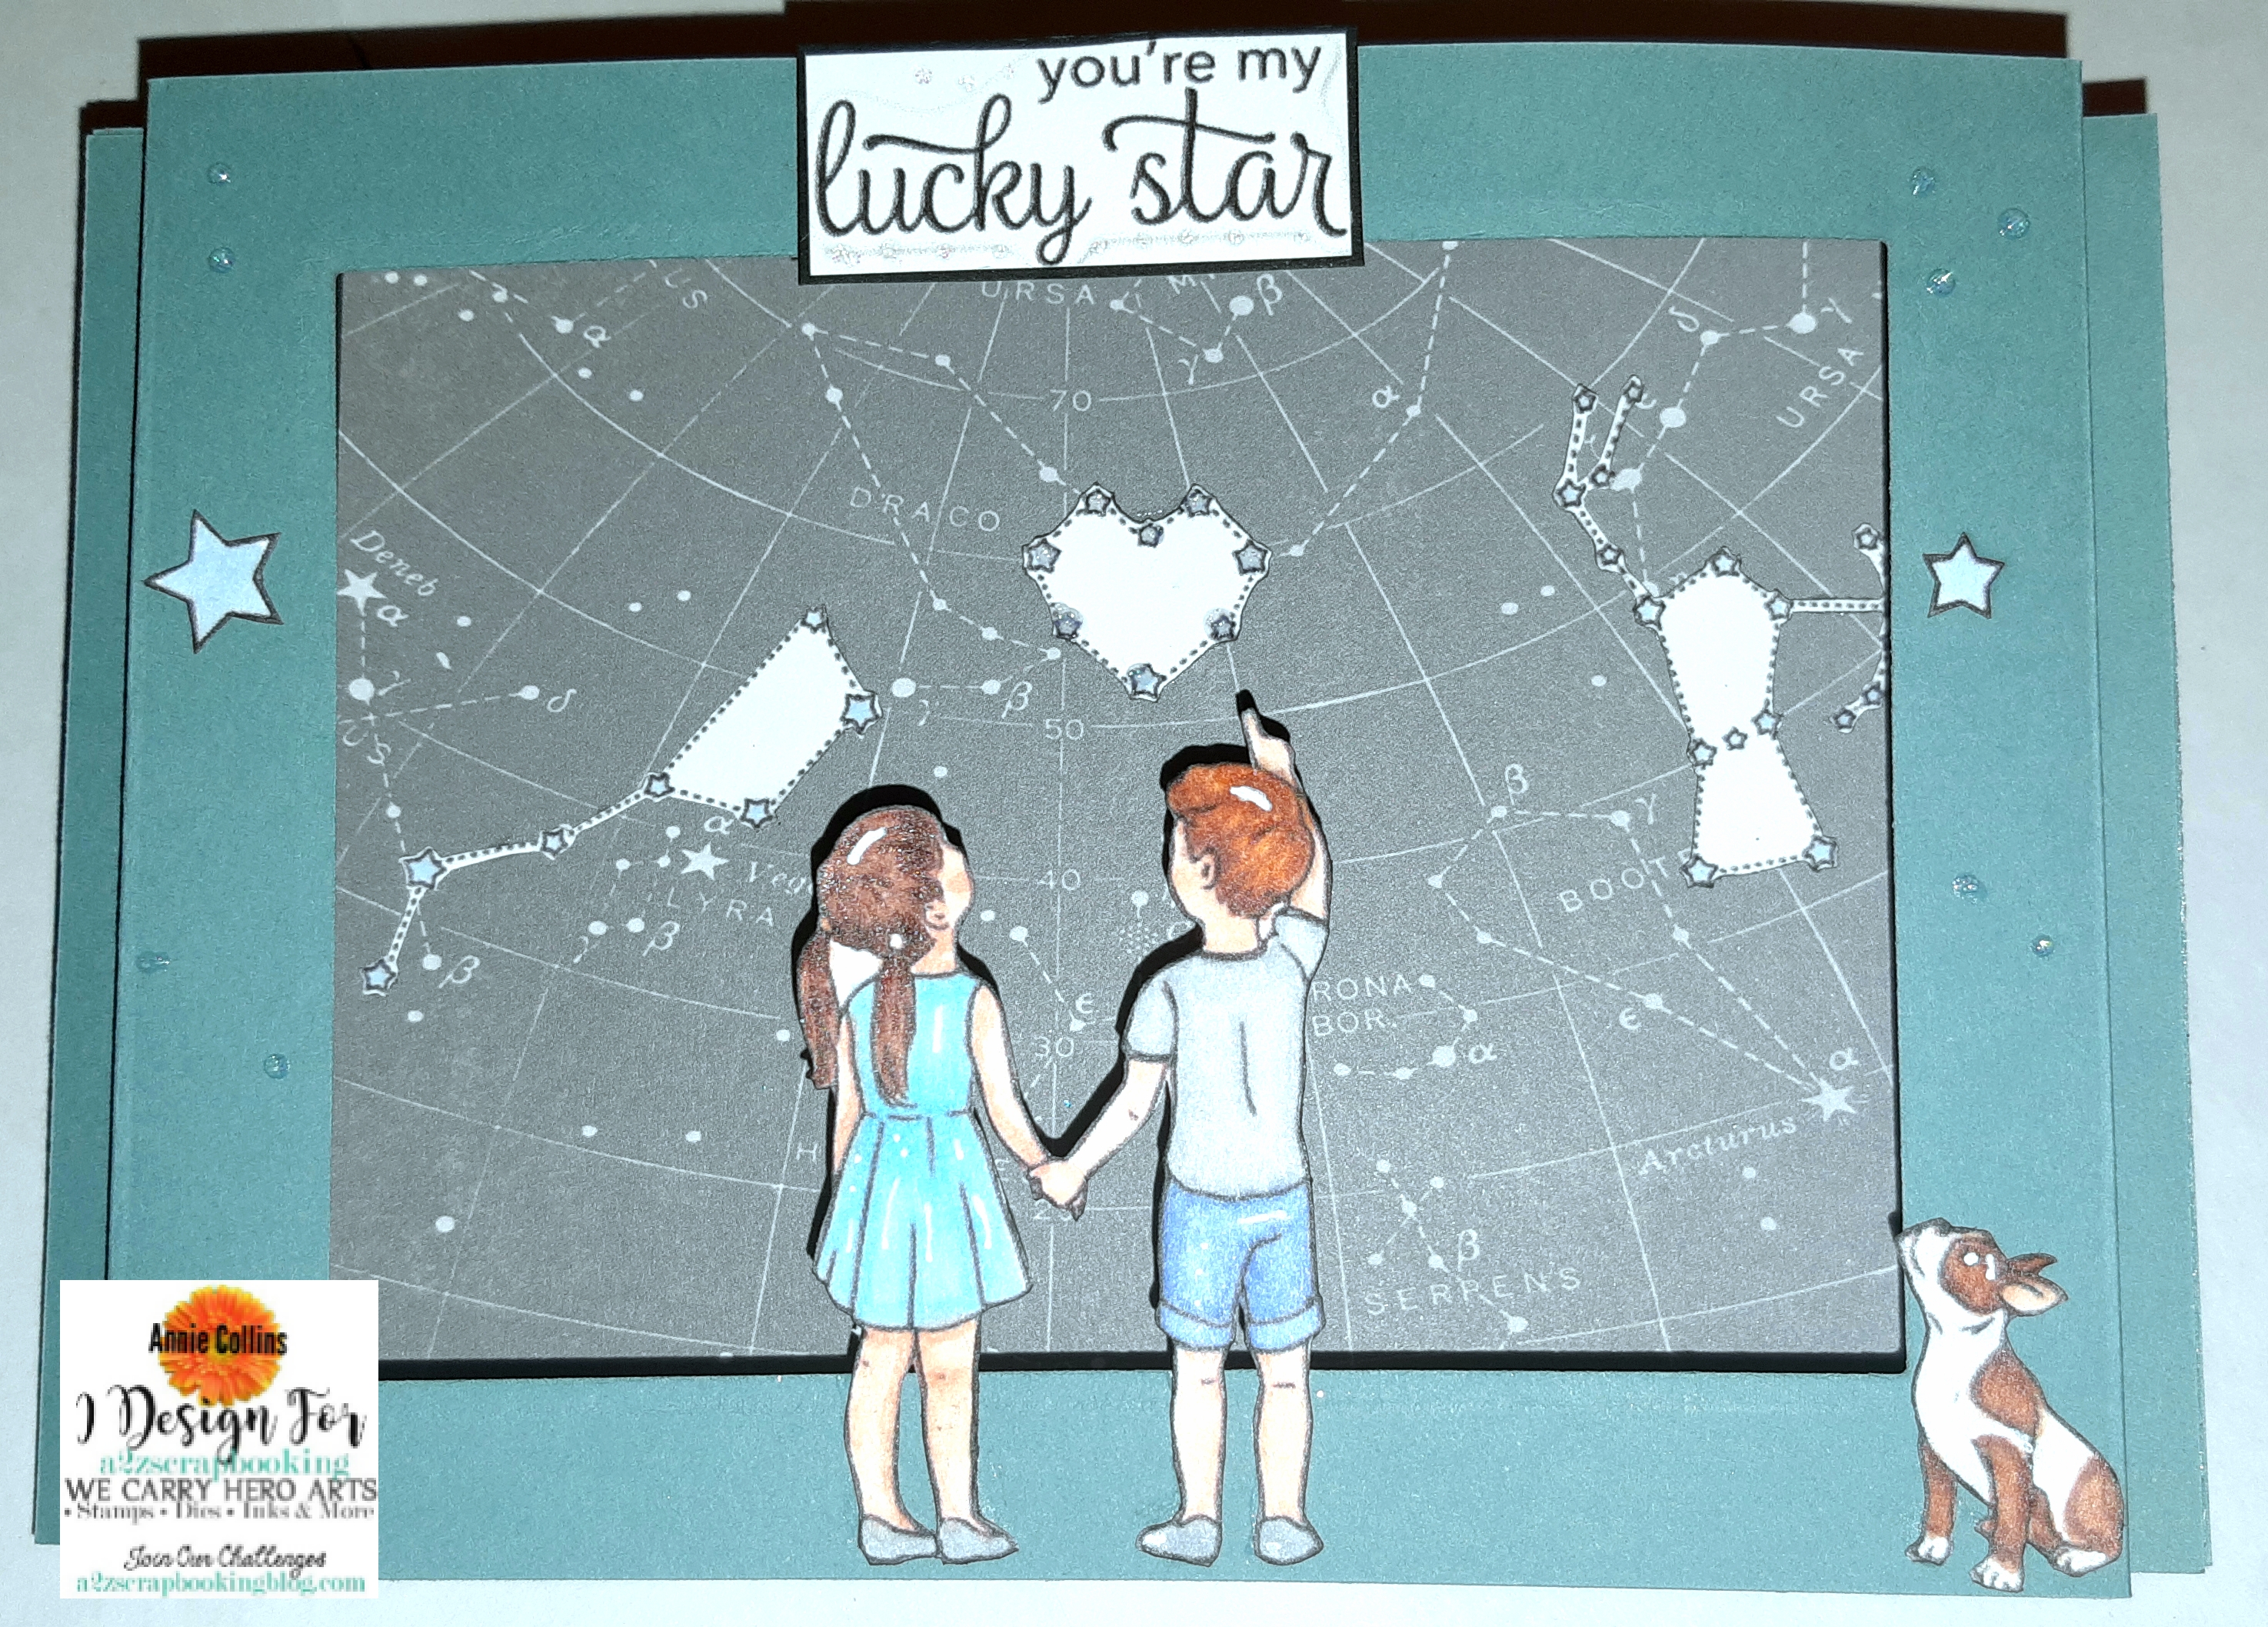
So let's get started. This is the card I created.

First, you will need to stamp your image onto watercolor paper (unless you are using Zig or Arteza Real brush pens - I would use Strathmoore Bristol Smooth Cardstock). I cut my watercolor paper to a A2 size piece so that I easily turn it into a card later.

Now, I prep my paper for heat embossing with an anti-static tool. Then, I stamp my image using VersaMark ink and then cover the image with white embossing powder. Shake off the excess powder and heat set it with a heat tool until powder is melted and shiny.

Next, gather your watercolor supplies, I am using Distress ink mini cubes along with a water brush pen and a piece of plastic for a palette. 

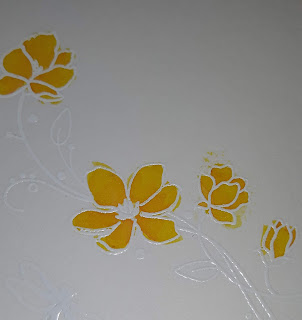
I will be doing the wet on wet technique (this is when you wet your paper first with clean water then you just drop in a bit of watercolor in the same spot). The embossing creates little wells for the colors to gather so it's pretty easy. I start with a bit of yellow. If any of the color goes outside the white lines just use a paper towel or towel to clean it up. If any of the color remains then just add a bit of clean water and dab with a paper towel until the color is removed.

Now, I add a bit of orange color to the center of the flowers. The, I will blend the yellow and the orange together. Just like when you color with your markers or color pencils.

Next, repeat the process with the greens. I used 2 shades of green for the leaves and the dragonfly.

Then, I added a bit of light blue around the image for a bit of shadow. I did the blue a bit darker towards the bottom of both the flowers and the dragonfly. You are now done water-coloring your images. You can either set it aside to dry or use your heat tool to dry it. I set mine aside to dry since the images are small and I didn't use a lot of water. 

Now, while the images are drying I trimmed some pattern paper, cardstock and die cut part of my sentiment.  Then, I gathered all the components to create the card front panel.

I start with the base of my panel (notice I trimmed away some of the pattern paper- I was thinking of using it for my die cut word then I changed my mind). I adhere the pattern paper to the cardstock mat making sure to leave about an 1/4" all around. Next, I adhere the water-color panel.

Now, I take the die cut word - HAPPY - which I die cut 3x. once from specialty gold paper and 2x from white cardstock. I then do the glue and stack process to create a nice sturdy piece.

Next, I stamped the rest of the sentiment onto light green cardstock using the darker green Distress ink. I then cut it into a strip and did a decorative slant end on one side. I adhere the die cut word onto the card front panel and just tuck it into the Y from the word happy. Next, I adhered the card front panel onto my card base. For finishing, I added a few Sparkle Blends: Birthstone Collection May Emerald to the card.

Now, the card is complete! 

Supplies Used:
Ranger-Tim Holtz: Distress Inks: Spiced Marmalade, Mustard Seed, 
Hero Arts Stamp & Cut Happy Set
Recollection Brand Cardstock: White, Butter yellow & soft pink
* Inkadinkado's Beauty Stems is sold out - 
I link another set just in case you are interested

Thank you for stopping by the blog today! 

Be sure to tag us Doodles Paper Playground on social media 
if you create a project with our Sparkle Blends.
 All of our Sparkle Blends can be purchased on the 
be sure to use the discount code
 Annie 10(there's a space between my name and the number).

Sunday, April 14, 2019

Happy Easter Card with Dies R U

Hello Crafty Friends - I am here with a quick and easy Easter card. 


For this card, I used the sheep, the chicken, the chick and egg from Lawn Fawn - Hay There stamp set. I know this isn't an Easter set - but I wanted to use a set that wasn't meant for the holiday. A stretch you set kind of challenge to myself.

I one of each of the animals and 10 eggs. I colored them with Copic markers. I then used an oval die to cut a window into my cream cardstock - which is my card front panel.

I then adhered the pattern paper to the white cardstock. Next, I centered the cream cardstock onto the white cardstock so that the pattern paper shows through the die cut window.

Then, I adhered the leaf sprigs and flowers to the bottom of the oval window. Next, I arranged and adhered the images onto the pattern paper. I wanted the little chick and chicken to be building an egg tower/pyramid that the little sheep would be jumping over.  I thought it looked cute. I added the little centers to the flowers and a few of the centers onto the sprigs.


Then, I adhered the card front panel onto my card base and the card is complete.


Supplies Used
Stamp: 

**This set has a coordinating die set(I didn't used it for my project)

Dies: 

Adhesive: 
Thermoweb 3D Foam Squares

Other Supplies:
Hero Arts CL498 Celebrate Stamp Set - Happy Easter Sentiment
Cardstock: Recollection Brand - White, Cream, Green, Pastel Blue,
Pastel Pink & Pastel Yellow
Pattern Paper: Doodlebug

For further inspiration, please stop by the 
There is a new challenge theme offered on the 1st and 15th of each month and one lucky randomly drawn winner will receive a gift voucher prize to the Dies R Us Store
For your convenience, here are the Dies R Us links;
click below for:

Saturday, April 13, 2019

Spring Greetings with Doodles Paper Playground

Hello Crafty Friends - I am here with a simple Spring shaker card.

Today, I am using Sparkle Blends: Springtime along with Sunny Studios Spring Greetings stamp for a lovely spring card that can be sent or given to anyone to welcome Spring.

Image may contain: 1 person, food
this is a beautiful, more subtle spring blend. 
A perfect palette of pastel pink, yellow, teal, grey and 
silver, Springtime heralds a time of New life,
fresh blooms and budding leaves.


Here's my card - I love this Sparkle Blend it's so soft and pretty. I colored the images soft as well.


Supplies Used:
Sunny Studios Spring Greetings Stamp Set
Copic Markers
Recollection Brand Cardstock: White, Butter yellow & soft pink
Tattered Lace Die

Thank you for stopping by the blog today! 

Be sure to tag us Doodles Paper Playground on social media 
if you create a project with our Sparkle Blends.
 All of our Sparkle Blends can be purchased on the 
be sure to use the discount code
 Annie 10(there's a space between my name and the number).

Friday, April 12, 2019

New Release Foxy Lady from SumMore Fun Stamps

Hello Crafty Friends - I am Guest Designing for SumMore Fun during their release week.
 I created 4 cards featuring the New Release Foxy Lady Stamp Set which will be available for purchase on Friday, April 12th.

This set is simply adorable! It contains 2 adult foxes and 1 baby along with 4 sentiments. As you will see the sentiments are perfect for a variety of cards.

Here are the cards I created. 


Card 1: Happy Birthday you Old Fox! - Masculine card


Card 2: Foxy Mama - Feminine card

Card 3: Feeling Foxy - Anniversary/Love card

Card 4: Congratulations on your new Kit!  New Baby card - pop-up box card.

Close-up of the foxes - you can see all the dimension.

Supplies Used for the cards:
Foxy Lady Stamp Set
Pattern Papers: Echo Park, Pebbles & Stampin' Up
Cardstock: MFT, Stampin' Up & Recollections
Dies: Lawn Fawn, MFT & Memory Box
Markers: Copics & Spectrum Noir 
Ink: Memento Tuxedo Black, VersaMark, Versafine Onyx Black,
Distress Oxide Ink: Broken China & Forest Moss
Adhesive: Nuvo Deluxe Liquid, Jot Brand Low-Profile Foam tape
Tools: Tim Holtz: Stamp Platform, Cuddlebug Die Machine,
Fiskars Trimmer & Scissors 

Thank you so very much for stopping by the blog today!

New to SumMore Fun?
Click the store link below for your purchase!
Check out the SumMore Fun Store

You can find me at these links on Social Media: