Saturday, July 6, 2019

Hello Summer Card with White Rose Crafts LLC

Hello Crafty Friends - I am here with a quick and easy card using the New July Kit from
 White Rose Crafts LLC called Mediterranean Dreams this is a stunning summer themed kit. 


This is a subscription kit so if you are interested in getting it 
head on over to the White Rose Crafts LLC Site and sign up.

The new kit is available for preorder now (it will start shipping on July 1st), 
so don't miss out on your chance to own this stunning kit.  
Last month the kit sold out before everyone could pick up one!
EK has done an unboxing video for you to see all the beautiful items
 in the Mediterranean Dreams Kit. 
If you missed the unboxing of this fun kit, click here to see all the fun!

I used this Month's Sketch for this card. 
You can join the Monthly Sketch Challenge on the 
No photo description available.

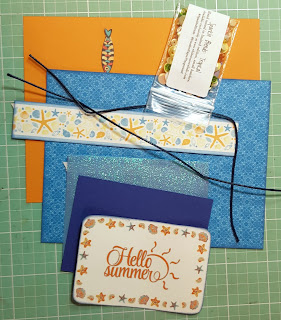
Here is my card base on the sketch and using the New July Mediterranean Dreams Kit. 

Let's get started on how I created this card.

I gathered all the components for the card. I brought in dark blue & orange cardstock from my stash.  I cut the sentiment topper from the 12 x 12 sheet as well as the strip of pattern paper with the sea life on it. I also fussy cut out one of the tiny fish. Then, I added a bit of Distress Oxide ink in Faded Jeans to the sentiment, the pattern paper strip and the blue pattern paper.


Next, I adhered the topper to the dark blue cardstock and rounded the corners on one side.
then. added some foam tape to the back and placed it onto the blue specialty paper. Again, rounding the corners.
  

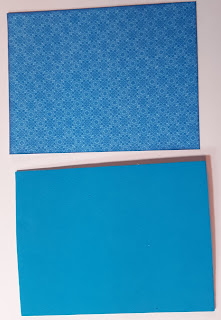
Now, for the card front panel. I adhered the blue pattern paper to craft foam. 
 

Then, I adhered the strip of pattern paper to the dark blue cardstock and trimmed it. Leaving a nice thin edge all around the strip. I then adhered it to the blue pattern paper.
  

Next, I cut two pieces of blue cord from the kit. I quickly realized that I wanted some more color to that side of the card. So, I brought in a piece of orange cord from my stash. I adhered the three cords to the back of the craft foam on the top and bottom of the panel.
 

Then, I placed the blue pattern paper onto the orange cardstock. 
  

I then adhered the Sentiment using foam tape onto the card front panel. Next, I added the tiny fish with foam tape just above the sentiment and added a few of the Sparkle Blend from the kit for a finishing touch.
 . 

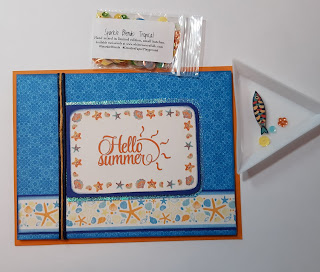
Now, the card is complete. Quick and Easy!

Materials Used From the Mediterranean Dreams Kit:
(The blue floral background pattern paper)
(The Hello Summer Sentiment)
(The Sealife strip of pattern paper and the little fish)
Other Materials Used:
Recollections Brand Heavy Weight Cardstock:
 Dark Blue & Medium Orange
Darice Brand: Orange Cord

Thank you for stopping by the blog today - I hope you found some inspiration!

Be sure to tag us White Rose Crafts LLC on social media 
if you create a project with products or kits purchased on the 

Friday, July 5, 2019

Sand, Sea, You and Me Shaker Card with Doodles Paper Playground

Hello Crafty Friends - I am here with a sunny beach shaker card featuring a variety of Doodles Paper Playground Sparkle Blends.

For this card, I used the following Sparkle Blends: Birthstone Collection: March-Aquamarine, 


I did some blending of Distress Oxide inks for the background creating my sand, ocean, and sky. I then stamped the sand mounds and flying birds onto the panel. Added some white gel pen and a bit of Accent Metallic Baroque Pearl acrylic paint for the wave caps. I then die cut the frame from the panel to create the base of the shaker card. Then, adhered the stamped and colored images, along with the sentiment to finish the card.

A close up of all the Sparkle Blends.

Materials Used:
Copic Markers
Spectrum Noir Markers
Recollections Brand: Heavy Weight Cardstock
White 

Thank you for stopping by the blog today. I hope you found some inspiration! 

Be sure to tag us Doodles Paper Playground on social media -
if you create a project with our Sparkle Blends. 

There is also a new Facebook group where you can share 
creations you have made with Sparkle Blends!
Come check it out, share some inspiration!

All of our Sparkle Blends can be purchased only at the 

Thursday, July 4, 2019

Happy 4th of July!

Hello Crafty Friends - I am here with a quick card and some sale information.

Happy Fourth of July to all of our American Friends today, as well as a belated Happy Canada Day or our Canadian Friends.


To help celebrate these events, we are having a FREE SHIPPING event.  All you have to do is type in the code:
Happy Fourth

The free shipping event extends to July 5th at 11:59pm EST, and there is a minimum purchase of $15, but this is also a great opportunity to pick up some supplies you have had your eyes on.


This is my 4th of July card.
Materials Used:
DoveCraft Flamingo stamp set
Lawn Fawn: Party Animal: Bear
Memento Ink
VersaClair ink
some hand-drawn celebration hats.
Spectrum Noir Markers
Recollections Brand: Heavy Weight Cardstock - White

We hope you are as excited as we are about our Free Shipping Event! 
 Stay safe friends and Happy Fourth.

Thank you for stopping by the blog today - I hope you found some inspiration!

Be sure to tag us White Rose Crafts LLC on social media 
if you create a project with products or kits purchased on the 

Tuesday, July 2, 2019

Grilling Fun with Xyron

Hello Crafty Friends - I am here with a fun BBQ Grill Gift Box.

With 4th of July just around the corner and BBQ season in full swing; I thought it would be fun to create a BBq Gift box for the hostess/host of the BBQ party.

You can put a gift card for their favorite grocery store, some of your favorite spices and a recipe or just some fun goodies.


Inside the grill

The box view.


Let's get started on this project!
I first download the cut files from Simply Crafty SVGs - BBQ Box and Card Set   
Then, I cut the files on my Brother Scan n Cut.

I stamped some of the bbq food from Lawn Fawn Let's BBQ Stamp Set. I colored and fussy cut them out. Ran the stamped images through the Xyron 150 Sticker Maker and I also ran the smaller parts of the Grill through the Xyron 150 Sticker Maker and the Xyron 3" Disposable Sticker Maker.

Now for the assembly. I followed the PDF provided by Simply Crafty SVGs.
  1. Fold all the box pieces.  Start with bottom box piece. Add some Xyron Mega Runner Adhesive on the tabs that will be the bottom of the box. Place the tabs under the bottom piece and press to secure. Adhere on side pieces to the inside of the sides of the boxes. 


  1. I ran the door panels through the Xyron 3" Disposable Sticker Maker. Then, I attached door panels to the bottom box.  Bottom edge of doors should be slightly above score line and very slightly from right and left score lines, as shown. This is to ensure there is a little gap in the middle. I then attach the door handles.


Next, I formed the grill top.  I first adhered the grill side tops and the grill fire pit section. I ran the pieces through the Xyron 3" Disposable Sticker Maker for even coverage.


 I ink all the sides of the grill and the side tops. I then placed the side tops and grill fire pit section onto the grill top panel. I like to do this before forming it.


Add a bit of Xyron Mega Runner adhesive to the small triangular tabs to the underside of each side, to create the form for side burners.    

Next, add a bit of Xyron Mega Runner to the front of the tabs back, as shown, they will form stabilizers for the side tops/burners.
  

When adhered it will look like a little triangle.

  1. Adhere back tab of grill top to the bottom box, inside the top back side of the box. Rounded section and stabilizers should be facing towards the front of the box.

  1. Flip box over and apply pressure to the tab to secure. Carefully line up the fold of tab with the edge of the box. Make sure both sides of the burners clear the bottom box before setting. This forms the opening for the box portion. 


Now, for the grill cover. I ran some Xyron Mega Runner on all the triangle tabs and back tabs. I then slowly pressed into place going with the curve of the lid. Repeating this on both sides. I then press the back tabs into place.
 

Now, It's time to add the handle to the grill top. The cut file has two small slits for inserting the handle into place. I add a bit of Xyron Mega Runner to the tapered edges and slide them into the slits. 

Then, I press down the tabs to secure.


Now, to add the top to the grill bottom. I add some Xyron Mega Runner to both sides of the back tab. **Please note that the PDF will have to adhere this top on the outside of the bottom box. I didn't like the look of that so I am placing the tab on the inside.
I then gently pulled apart the grill pit and side top/burners from the bottom. I adhered the lid to the back tab of the grill pit and side top/burners. I then place it back inside the bottom box and press into place.

I did get some adhesive on the outside of my box. That's when my Xyron Adhesive Eraser can into action and quickly removed it without any damage to my project. Gotta love that!


Now, to add the knobs, bbq tools, and thermostat on the lid. 
I ran all the pieces through the Xyron 150 Sticker Maker which makes so easy - especially with all the small pieces.

I started with the knobs. I like to leave the pieces on the backer sheet of the Xyron150 Sticker Maker because it makes easier not lose any of the small pieces. I layer the black smaller circles on top of the silver circles. Then, the little bow tie looking pieces on top of the black circles.


Now, for the thermostat. Layer the silver circle onto the black one. Doing the best to center 


Next, the bbq tools. I run the brown handles through the Xyron 150 Sticker Maker and then, I add a bit of ink to the edges. I then layered the brown handles onto the silver tools. This gives the look of real tools. 
  

Then, I flip over the tool and add a bit only to the ends of the tool of Xyron Mega Runner adhesive. I then press them onto the grill front just under the grill sides. One on each side.


Now, what grill is complete without food! Am I right!?! So, I added some of the stamped and colored images from Lawn Fawn Let's BBQ Stamp Set. I ran them through the Xyron 150 Sticker Maker to make placing them onto the grill easy.

I first place one of the plates on the side top. I then place one of the steaks onto the plate.
 

Next, I added a bit of Xyron Mega Runner to the little tab I left on all the flames. I then bent the tabs into an L shape. I then pressed the flame tab to the back of the food I wanted on the grill.


Then, I took the little pieces that were leftover from the grill grid and added some Xyron Mega Runner to them. I folded them in half only pressing down the top leaving the bottom open to form two little legs. I did this three times.

I then place one of the little leg pieces onto the back of the burger. I then place the other burger on top of it. Making sure to line everything up. I placed the burger onto the plate on the side top. I repeat the process for Ketchup and Mustard bottles. This will allow the burger, ketchup, and mustard to stand up.


Now, the BBQ Grill Box is complete and ready to be filled with a gift of your choice. 
Any true BBQ enthusiast will love this grill box.

Materials Used: 
Adhesive:

Cut Files:

Stamp:

Inks:
Recollections Brand: Metallic Silver Ink

Cardstock:
Recollections Brand Heavy Weight Cardstock:
Black, White, Burnt Orange, and Kraft
Recollection Brand Specialty Cardstock: Metallic Silver
Spectrum Noir Markers

Tools:
Brother Scan n Cut Electronic Machine
Brother Scan n Cut Software
Apple Macbook Pro
Tim Holtz Stamp Platform
Fiskars Texture Plate: Basketweave
Fiskars Stylus

Thank you for stopping by the blog today. I hope you found some inspiration!