Monday, August 12, 2019

Hi Beautiful Card with Doodles Paper Playground

Hello Crafty Friends - I am here with a floral card.

Today, I am using one of our New Release for August - Sparkle Blends: Grapefruit.

No photo description available.
Citrus tones rule in the summer, and this bold, 
juicy blend is the perfect cure for parched projects! 
A base of two-tone coral in every finish you can think of 
is complimented perfectly by slightly rusty orange, 
magenta and just a touch of sunny lemon yellow. 
Imagine this blend for beach scenes or with images 
of fruit and drinks with umbrellas by the pool.


I used the colors of the Sparkle Blend to inspire me on coloring the flowers. I used soft pinks and oranges. I added a bit of Gold Gel pen details to the centers of the flowers and a few dots to the leaves.

Materials Used
Doodles Paper Playground Sparkle Blends: Grapefruit
Evaney's Stamps Design: Sentiment
Sakura Gelly Roll Pen: White, Black and Gold
Spectrum Noir Markers:
Leaves: CG3, LG3, LG5 & JG4
Flowers: MG1, OR1, BO1, PP1 & PP2
Recollection Brand Heavyweight White Cardstock
Brother Scan n Cut Machine
Lawn Fawn Stitched Rectangle Die

Thank you for stopping by the blog today - I hope you found some inspiration!

Sunday, August 11, 2019

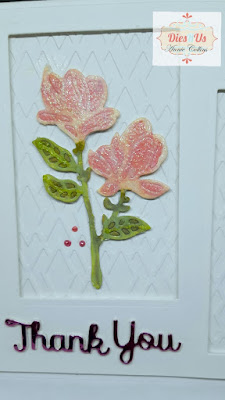
Thank You Floral Card with Dies R Us

Hello Crafty Friends - I am here with a floral thank you card.

This card is on the larger side. When finished it's a 5"x 8" card. I am giving it by hand to someone special. However, if you create this card just make a note that you will need a larger envelope and extra postage to mail it.


 Close up of the sentiment and flower


Let's get started

I start by gathering all the supplies I will need. I am using watercolor paper for my flower die cuts - however, you can use cardstock.

I trimmed some white heavyweight cardstock to 8"x10". Then, I scored it at 5" on the 10" side. This will be my card base. I trimmed another piece of heavyweight white cardstock to 5"x 8" for my card front panel. I did trim off a 1/4" from the top and side.


Next, I added some Stick It adhesive to the watercolor paper and die cut the flowers. I then die cut 3 rectangles into my card front panel. I die cut the sentiment 3x from white cardstock and once from the Pink Foil Cardstock. I also embossed some white cardstock for the back of the floral section for some texture. 

Then, I added some Distress Oxide ink to the flowers for a pop of color. I started with stems and leaves. I used Distress Oxide in Peeled Paint and Forest Moss.
 

For the buds of the flowers, I used Tattered Rose and Worn Lipstick.


Now, it's time to put the card together. I

I adhered the embossed panels directly to the card base. 
I used the card front panel to check the placement.

Next, I added foam adhesive to the card front panel and place it onto the card base. I trimmed one of the flowers so that it would only have one flower. I then adhered the trimmed flower to one of the other flowers. Then, I added the flowers also with some foam adhesive.
As for the sentiment - I did the stacking method with my die cuts to create thick chipboard. I then adhered it to the center of the card front panel.

For finishing touches - I used some Nuvo Glitter Drops in White Blizzard on the buds of the flowers for some sparkle. I also used some Ranger Liquid Pearls in two shades of Pink for little droplets by the flowers.

Now, the card is complete.


Materials Used:
Memory Box - Dies - Open Studio -  Rectangle Basics Set

Paper Rose - Dies - Thank You

ScrapMan - Dies - Bloom

Distress Oxide Ink Pad - Forest Moss
Distress Oxide Ink Pad - Peeled Paint
Distress Oxide Ink Pad - Tattered Rose
Distress Oxide Ink Pad - Worn Lipstick

Stick-It Adhesive Sheets 8" x 6"


Thermoweb - 3D Foam Squares - White .5" 88/Pkg


Liquid Pearls - Flamingo


Liquid Pearls - Petal Pink


Cardstock: Recollections Brand 110lb White & 65lb Pink Foil 
Embossing Folder: Lifestyle Crafts - Lattice Design
Canson Watercolor Cold Press Paper

Thank you for stopping by today. I hope you found some inspiration!

Don't forget to come and join in the fun at the Dies R Us Challenge Blog. There's a new challenge theme offered on the 1st and 15th of each month and one lucky randomly drawn winner will receive a gift voucher prize to the Dies R Us Store. For your convenience, all the important Dies R Us links are provided below.


Back To School Fun with Rinea

Hello Crafty Friends - I am here with some fun projects for this year's Teacher! 

I know it's that time already - Summer is just flying by. Here in Florida, the children head back to in August. I know that some of your children will be heading back in September. 

I thought why not create some projects for the teacher this time and 
some for the students on my next post.

Here are the fun projects I created. 

Teacher Fuel Mug
is a paper Mug perfect for giving the teacher some instant coffee or assorted creamers. 
Maybe the teacher would prefer some hot cocoa or tea.

along with the Coffee Cup SVG file from Simply Crafty SVGs

Materials Used:
Coffee Cup svg file from Simply Crafty SVGs.
Recollections Brand 12x12 Cardstock: Black
3Birds Alpha Stamps
3Birds Coffee Stamp
Aleene's Tacky Glue
Brother Scan n Cut Machine 
Mac Book Pro

Let's get started

I download the file into my Brother Scan n Cut software and cut the file onto black cardstock. Then, I cut the file onto Rinea Starstruck Blush Foil Paper.

I then stamped my sentiment onto one of the Rinea Starstruck Blush Foil Paper panels. I used Imagine Crafts Tsukineko StazOn Pigment Ink in Piano Black and stamps from 3 Birds.

Next, I followed the instructions that Sandy of Simply Crafty SVGs provided. I start by adhering all the Rinea Foil Paper: Starstruck Blush onto the black panels.

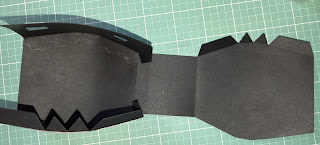
Next, I add some adhesive onto the tabs of the black panels and I adhere it to the next black panel. I continue the process one three of the panels.  Making sure to clean off any extra adhesive if needed.
  

Then, I adhered the last panel. I start on the bottom of the mug. I add some adhesive onto the tab. Next, I place the flat bottom right up against the tab and press into place.
  

Next, I add some adhesive onto the remaining tabs and place the last panel into place.

Now, for the handle of the mug. It's a bit tricky because of its small tabs.  I add a bit of adhesive on to the tabs and press them to the underside of the handle. I repeat the process on the other side.
  

Next, I put a bit of adhesive onto the tabs on the top and bottom of the handle. I gently place into place and press the tabs against the inside of the mug.


Now - the mug is complete!


For The Best Teacher Apple Box 
This cute little box is perfect for a small treat for the teacher.


I didn't do a complete tutorial for this project. I have provided the template I used. I simply adhered the Rinea Foil Paper onto the already printed pattern and stamped the hearts with

Materials Used:
Hero Arts Just A Note Stamp Set CL404
Woodware Craft Collection School Tots Stamp Set
Recollections Brand Cardstock: White & Cream

Thank you for stopping by the blog today - I hope you found some inspiration!
Be sure to stop by the Rinea Store to pick some of the wonderful Rinea Products.