Tuesday, November 26, 2019

Christmas/ New Years Bells with Rinea


Hello Crafty Friends - Annie here with some Christmas Bells!

Today's project is 2 beautiful bells for Christmas. 
They would make fun decorations for a New Year's Eve party. 

Each bell has a real jingle bell as a clapper - However, I didn't add any to my bells because I have cats and anything with jingle bells are stolen by them.

I found this tutorial on Pinterest by Susan Janes. 


Materials Used:
Aleene's Tacky Glue
DMC Brand Metallic Thread: Red and Green
Poppy Stamps: Poinsettia Joy Set
Ms. Sparkle and Co. Brand: Snowflakes
EK Success Brand: Score Board
EK Success Brand: Scissors
Fiskars Brand: Stylus
Recollections Brand Cardstock: White

Let's get started!


It's much easier than it looks! 
You can easily make these up in quantity as party favors or decorations.

Beautiful Bells Tutorial


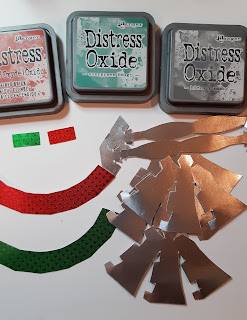
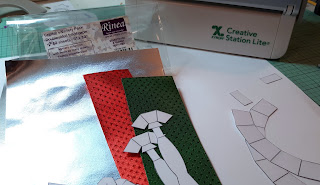
1. Prepping: Print and cut the bell pattern from white cardstock twice. Next, I ran the pieces through my Xyron Creative Station Lite and then place then onto the Rinea Foil Paper. The bell bodies and handles are in Rinea Glossy Silver/Gold Foil Paper and the decorative bands - I did one in Rinea Starstruck Ruby/Ruby Foil Paper and Rinea Starstruck Emerald/Emerald Foil Paper
 

I then trimmed the pieces from the Foil paper and inked the edges. Since we have the white cardstock underneath I didn't want it to show. You should have 2 decorative bands, 2 decorative tabs, 2 handles and 4 bell pieces.

Next, I scored on all the lines on the back of the pieces. You can use a scoreboard like I did here or you can use a ruler, stylus, and mat or your trimmer. 

2. Assembling the bell halves: Now,  put some adhesive on all the tabs and press then underneath the panel next to it. Hold in place until the glue sets. Do this to both pieces. 
 

3. Assemble two half-bells. Simply adhere together the adjacent tabs. You notice the 2 little hexagon tabs on the top are still not adhered.


4. Next, glue one top hexagon on top of the other, sealing the bell top. **If you are going to add a jingle bell this is when you do so. Pierce a hole through the little hexagon tabs. Using some thread pass the thread loop through the top loop of the jingle bell. Make a half-hitch knot and tighten it. Then, thread tails through a needle. Pass the needle through the hole in the top of the bell. The jingle bell cord should extend to the bottom of the bell. Knot the craft thread at the top. Trim it off close to the knot.

5. Join the decorative band into a ring. Apply glue onto the tab only. Meet the two ends together to form a ring. Next, add a bit of adhesive to the bell center as shown below. Slide the ring onto the bell and press in place.


6. Time to make the handle. Bend the handle into a loop - I used the handle of stylus tool so not the crease the loop. glue the
straight section near the base together. 


Next, The decorative band is wrapped around the straight section. Glue the band in place. Wrap it around the bell handle, creasing the folds.
  

7. Time to attach the bell handle to the bell body. 
Open out the bell handle - spread its "wings". 
 

Apply adhesive to a center section. Place the handle on top of the bell. Take your time and align the hexagons.

 Then, fold the "wings" downwards and glue them onto the top section of the bell. The sections will align perfectly. 
Repeat the above steps for the other bell.
 

8. More Decorations: Next, I decorated the bells with some stamped little tags. I die cut 2 labels from Rinea Glossy Gold/Gold Foil Paper and white cardstock for extra stiffness. I used the Stazon Pigment Ink in Piano Black and a Sentiment stamp that says JOY and another stamp that has little snowflakes. I punched a small hole on the top of the labels to make them into little tags. I then used some Metallic thread to tie them onto the bells.
  

Now, your bells are complete!


This is the Pattern Susan Janes Provided and I used.

Thank you for stopping by the blog today. I hope you found some inspiration!

Please stop by the Rinea Shop to purchase the beautiful Foil Paper.
If you create projects using our Wonderful Foil Paper be sure to tag us on Social Media.

Thursday, November 21, 2019

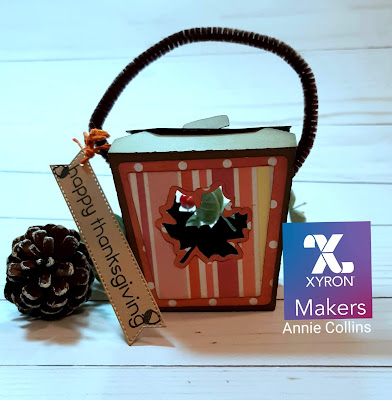
Thanksgiving Table Decorations with Xyron

Hello Crafty Friends - I am here with some fun Thanksgiving table decorations.

I used my Xyron Creative Station Lite and Xyron Mega Runner along with cut files from
  Simply Crafty SVGs for these wonderful decorations.


Let's begin!

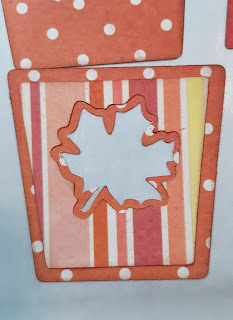
I start by cutting  The Autumn Takeout Box  SVG files on my Brother Scan N Cut CM350. I then inked all the edges of the papers and shapes. I also die cut a few extra leaves to decorate the sides of the box.

I ran all the decorative panels and leaves through the Xyron Creative Station Lite for easy no-mess application.

Next, I layered the decorative panels. I then placed them onto the box fronts. 
  

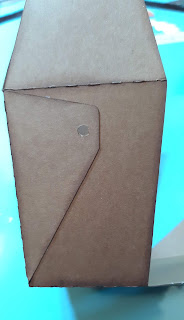
I then used some Xyron Mega Runner on the inside of the side panels of the box. I pressed them into place. Making sure that the holes line up. 
  

Now, that the box is formed, I add a Pipe Cleaner into the holes and curl the ends to hold. You can put some Xyron Mega Runner for extra hold. I didn't because I want the handles to move. I then decorated the sides with some leaves. One of the leaf from the front cut out panel and a Gold die cut leaf.
 

Fill your box with goodies (I will be doing this Thanksgiving Morning). Close the box by simply sliding the tab through the slot.
 

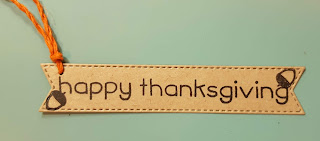
I die cut a fishtail sentiment banner and stamped Happy Thanksgiving along with a few acorns in Memento Dew Drop: Brown Sugar. I then punched a small hole in the corner and tied some DMC floss in a medium Orange. I attached the tag onto the box handle.
 

Now the box is complete!
Materials Used:
Brother Scan N Cut CM350
Crafter's Edge Crossover II Die Cutting Machine
Memento Dew Drop: Brown Sugar
DMC Floss: Medium Orange
Distress Ink: Ground Expresso
Darice Brand: Pipe Cleaner- Brown
Scenic Route Paper Co: Sentimental Silly Strip/Dot Pattern Paper
SEI Brand: Kraft Basic Foil Cardstock - Gold
Recollections Brand Cardstock: Kraft
Impression Obsession Dies: Leaf
Lawn Fawn Stamp: Forest Feast


Let's begin!

I start by cutting The Pilgrim Hat Box SVG files on my Brother Scan N Cut CM350. I then inked all the edges of the papers and shapes. I also die cut a few extra leaves to decorate the sides of the box. I also ran my hat top panels through the Crafter's Edge Crossover II Die Cutting Machine along with a Fiskars Embossing template - Carpet.

Next, I ran all the leaves through the Xyron 3" Disposable Sticker Maker

To create the bottom of the hatbox I added some Mega Runner adhesive to the side tab and pressed the other panel into place. I then added some Mega Runner adhesive to the other tab and pressed the side into place. I added some more Mega Runner adhesive to the inside of the top tabs and pressed the small hexagon to the inside of the bottom section of the box I just formed. The tabs will be hidden by the circle. I then adhered the hexagon box onto the circle base - making sure to center it.


To create the top of the hat. Simply run some Mega Runner adhesive onto the tab of the section of the hat that has the hexagon top attached to it. Press the other section onto the tab. Next, apply some Mega Runner adhesive onto the tabs and press the Hexagon top down onto the hat form.


To create the band simply apply some Mega Runner adhesive to one of the tabs. Press the other tab onto it. 
 

Slide the buckle onto the band. You can add a bit of Mega Runner Adhesive to the middle bar of the buckle to hold it in place.
 

Add the decorative leaves to the side of the hat.

Now, the Pilgrim Hat box is complete!
Materials Used:
Brother Scan N Cut CM350
Crafter's Edge Crossover II Die Cutting Machine
Distress Ink: Ground Expresso
Darice Brand: Pipe Cleaner- Brown
Scenic Route Paper Co: Sentimental Silly Strip/Dot Pattern Paper
SEI Brand: Kraft Basic Foil Cardstock - Gold
Impression Obsession Dies: Leaves
Recollections Brand Cardstock: Black
Fiskars Embossing template - Carpet

Thank you for stopping by the blog today. I hope you found some inspiration!

Christmas is Best with You with The Maker's Movement

Hello Crafty Friends - I am here with 2 cards using 1 stamp set for The Maker's Movement.


Here are the cards I created.


Card #1: Christmas is Best with you
Materials Used:
DCWV: Christmas Collections
Recollections Brand Cardstock: White & Red
Bazzil Cardstock: Blue
Tsukineko Memento Ink: Tuxedo Black
Tsukineko Versafine Ink: Onyx Black
Lawn Fawn: Reverse Scalloped Frame Die
Lawn Fawn: Party Animal Stamp Set (Small Gift)
Lawn Fawn: Home for the Holidays (Small Gift Cluster)
Sakura Gelly Roll Pens: Black, White, Sparkle, and Silver
Spectrum Noir Markers:
CT4, GY2, TB3, TB4, TB5, GT1, GT2, IG2, IG3, IG4, 
MG1, MG2, AG2, AG4, HB3, LV3, EB3, EB4, 
BG2, BT2, AND BLENDER

Card #2: Seasons Greetings - Shaker Card

Materials Used:
Tattered Lace Pattern Paper: Christmas Night Collection
Recollections Brand Cardstock: White 
Bazzil Cardstock: Blue
Tsukineko Memento Ink: Tuxedo Black
Tsukineko Versafine Ink: Onyx Black
Lawn Fawn: Stitched Hillside Border Dies
Avery Elle Postage Stamp Die
MFT Fishtail Sentiment Die
Sakura Gelly Roll Pens: Black, White, Sparkle, and Silver
Spectrum Noir Markers:
CT4, GY2, TB3, TB4, TB5, GT1, GT2, IG2, IG3, IG4, 
MG1, MG2, AG2, AG4, HB3, LV3, EB3, EB4, 
BG2, BT2, AND BLENDER

You can view the process video 

Thank you for stopping by the blog today. I hope you found some inspiration!

Join the Movement: MyMakersmovement.com

Sunday, November 17, 2019

Hey Friend Card with Die Cut Divas

Hello Crafty Friends - I am here with a fun Fall card featuring Bugaboo Stamps for Die Cut Divas.

Every month the Divas do a Challenge. 

November's challenge theme is Thanksgiving or Thank You.


Our sponsor is Bugaboo Digi Stamp and it offers a $12.00 gift code which is approx. 4 images.

My project today features the Autumn Fox. 

Materials Used:
Lawn Fawn Knit Picky Fall Pattern Paper
Lawn Fawn Die: Reverse Scallop frame
Lawn Fawn Grass Die
Recollections Brand 65lb Cardstock: Medium Yello and Kraft
Recollections Brand 110lb Cardstock: White  card base
Spectrum Noir Markers
Tsukeniko: Memento Tuxedo Black Ink
Sakura Gelly Roll Pens: White and Black

You could find the detailed supply list on my blog: https://littlewingscreates.blogspot.com/


Thank you for stopping by the blog. I hope you found some inspiration!
  And I look forward to seeing your creations in our challenge gallery. 
 Click the "This Month's Challenge" button on the right sidebar for more details and link up.

Friday, November 15, 2019

Stampendous and Doodles Paper Palyground Collaboration Hop

Hello, Sparkle Blends Fans! 
We are super excited to be Collaborating with Stampendous for our 
Winter/Holiday themed Hop this Weekend!

Both of our teams have incredible projects to share with you, 
featuring seasonal stamps and Sparkle Blends, as well as
 some New WindowRama Kits from Stampendous!

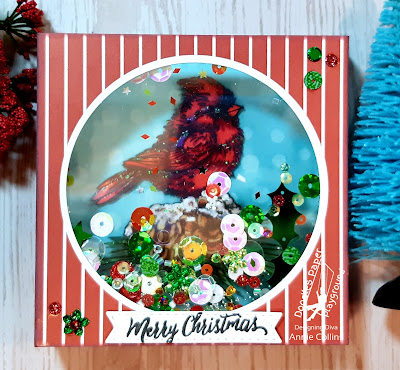
 I created two shaker box cards.

Card One: Merry Christmas

Materials Used:
Sakura Gelly Roll Pen: White, Black, and Metallic Gold
Copic Alcohol Markers: G29 and G21
Spectrum Noir Alcohol Marker: HB2
MFT Stitched Fishtail Sentiment Strip Die
MFT Stencil: Snow Flurry
Hero Arts: Unicorn White Ink

Card Two: Have A Pawsome Holiday

Materials Used:
Sakura Gelly Roll Pen: White and Black
Copic Alcohol Markers: G29 and G21
Spectrum Noir Alcohol Marker: TN2, TN3, TN4, TN5, and AG2
MFT Stitched Fishtail Sentiment Strip Die
Tattered Lace Pattern Paper: Snowflakes
Papercrafter Magazine: Snowglobe multi-scene die set


Prizes: 
We have 3 prize Bundles! 
Each Bundle will include: 1 Holiday themed Stampendous Stamp Set, 1 Package of Stampendous WindowRama Card Kit (Card ), 1 Package of Stampendous WindowRama Card Kit (Chipboard), and 3 Full-size Packages of Doodles Paper Playground Sparkle Blends. Prize Bundles are Approximately a $30.00 value. 

Discounts: 
30% Off Doodles Paper Playground Sparkle Blends during the hop (Friday, November 15th thru Sunday, November 17th) at White Rose Crafts LLC Shop. Plus a FREE gift with every order. Use code: SPLURGE30

Hop List:
* You Are Here*


Thank you for stopping by the blog today. I hope you found some inspiration!