Showing posts with label Lawn Fawn dies. Show all posts

Sunday, March 17, 2024

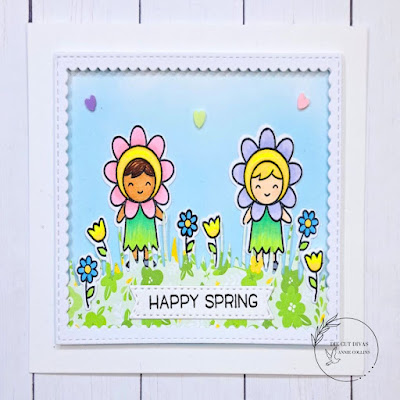
Happy Spring Card with Die Cut Divas

  Hello Crafty Friends - Today, I am sharing a fun Spring card featuring the Easter Party Stamp set and Dies along with a bit of Spring Fling paper collection from Lawn Fawn. 

This month over at the Die Cut Divas Challenge Blog we're doing "Anything Goes"  and Lawn Fawn is our amazing sponsor.

Products Used:
Accent 80lb Ultra Smooth Cardstock: Opaque White
Recollections 110lb Cardstock: White
Distress Oxide Ink: Tumbled Glass
Copic Markers
Memento Ink: Tuxedo Black
VersaFine Ink: Onyx Black
Bearly Art Glue and Foam Tabs
Heart Clay Bits


Let's Begin A Lawn Fawn Month With A Bang! 

Die Cut Divas is pleased to have Lawn Fawn sponsor Die Cut Divas for the month of March with a $25 gift card.

The theme for this month is "Anything Goes"


Tuesday, January 17, 2023

I Love You Card with Die Cut Divas

 Hello Crafty Friends - I am here with a fun Valentine's Day card featuring the Hay There Stamp set from Lawn Fawn for the Die Cut Divas Challenge.

Here's a closer look at these adorable sheep.

We are so pleased to open the new year with a new sponsor, Lawn Fawn!


The challenge is Valentines, so make our hearts happy because it's time to plan and make those fun, sappy, elegant, heartfelt cards for our next holiday, 
Valentines Day.

Lawn Fawn's Prize is a $25 gift card.


Thank you for stopping by the blog today. I hope you found some inspiration!

Tuesday, November 17, 2020

So Thankful for You Card with Die Cut Dives

Hello Crafty Friends - I am here with a Thanks card in keeping with our theme this month.

Frantic Stamper is our Sponsor for the month of November.
The theme is Thanks or Thanksgiving.  
Are we ever happy and ready to post our inspiration projects.  We know everyone will be making cards this month and we hope you join our challenge.

PRIZE: FALL HARVEST DIE (over $25 US) 
Due to the high cost of shipping, only US residents are eligible.


Here's the card I created

Supplies Used:
Copic Markers: Acorns: E33, E35, E57
Leaves: B95, G05, R59, BV11,  & YR02
Sakura Gelly Roll Pen: Metallic Gold
Aspire Specialty Cardstock: Metallic Gold 
Accent Opaque White 80# cardstock: Ultra Smooth
Recollections Brand 110# Cardstock: White
Recollections Brand 65# Cardstock: Brown & Light Orange
Doodles Paper Playground Sequins
Art Glitter Glue
Crafter's Square: Low profile Foam Tape

Thank you for stopping by the blog today. I hope you found some inspiration!

Thursday, June 11, 2020

Happy Father's Day Card with Rinea

Hello Crafty Friends - I am here with a quick and easy Father's day card 

Just like our other beautiful Foil papers, it comes in both Starstruck Cobalt and Glossy Cobalt.

Materials Used:

Let's get started!

I gathered all the supplies and then I die cut the Rinea Foil Paper: Starstruck Cobalt with Lawn Fawn Cross-Stitched Rectangle Die and the Rinea Foil Paper: Glossy Arctic White/ Gold with the MFT Stitched Fishtail Sentiment Strip. I also punched out the Craft UK Vintage Bikes pieces I needed.
Next, I ran the base of the bike and the Rinea Foil Paper: Starstruck Cobalt panel through the Xyron Creative Station Lite. 
 

Now, that all the pieces are ready I placed the Rinea Foil Paper: Starstruck Cobalt panel onto the black card front panel. Then, I layered the bike base onto the Rinea Foil Paper: Starstruck Cobalt 
I then added some foam adhesive to the other pieces of the bike and place them on top of the bike's matching base.
 
You will have some nice dimension to the bike (as you can see below).
 

Next, I took the Hero Arts - Happy Father's Day stamp along with the StazOn Ink and stamp it onto the Rinea Foil Paper: Glossy Arctic White/ Gold banner strip.  I gave it some time to dry(if you want to move quickly you can use a heat tool to set the sentiment). Then, I used some foam adhesive and adhered the sentiment to the left top of the card front panel. I then adhered the card front panel onto a white card base. 

I added a few Dew Drops for a finishing touch.

Thank you for stopping by the blog today. I hope you found some inspiration!

Please tag us on social media if you create any project using any of our wonderful Foil Papers!
Don't forget to stop by the shop Rinea.com

Thursday, March 26, 2020

Happy Easter Card with Dies R Us

Hello Crafty Friends - I am here with a simple Easter card.

I am sad that this will be my last card for Dies R Us. My term has come to an end. It's has been a great pleasure creating projects for Dies R Us. I hope that we can work together again in the future.


Let's get started!

I die cut all the components, stamped and colored the bunny.

I adhered the grass border to the bottom of my card base.


Next, I adhered the sentiment and eggs to the card base.
 
Then, I adhered the bunny using a bit of foam tape to the center of the grass. I added a bit of detail to the sentiment with the Sakura Gelly Roll pen in Sparkle as well as to the bunny's heart. For finishing touches, I added a puffy heart and two jewels by the sentiment.


Materials Used:

Lawn Fawn - My Silly Valentine Stamps

Lawn Fawn - Meadow Borders Dies

Frantic Stamper - Dies - Mixed Font Happy Birthday

Frantic Stamper - Dies - Script Spring & Easter Greetings
Paper Rose - Dies - Balloon Trio
Various small dies from my stash
Memento Ink: Tuxedo Black
Brilliance Ink: Sky Blue and Pearlescent Purple
VersaMagic Ink: Pretty Petunia and Turquoise
Spectrum Noir Markers: IG1, IG2, IG3, and CR3
Sakura Gelly Roll Pens: White, Black, and Glitter
EK Success Brand: Puffy Heart
Elle Tru Brand: Jewels
Recollections Brand 110lb Cardstock: White
Recollections Brand 65lb Cardstock: Green, Blue, Yellow, Pink, and Purple
Accent 80lb Ultra Smooth Cardstock

Thank you for stopping by the blog today. I hope you found some inspiration!

Before I write the list of the supplies I used, I wanted to share some exciting news with you. Dies R Us now has a sister store called Didi Crafts, which has warehouses located in the USA and Canada. Didi Crafts carries some of the same products as Dies R Us, but most are different and you will be able to purchase a huge variety of crafty supplies for a variety of crafts. Having this sister store means that our Canadian crafting friends won't have to worry about huge taxes or shipping fees. Isn't that great?! Go take a peek and be pleasantly surprised!


Don't forget to come and join in the fun at the Dies R Us Challenge Blog. There's a new challenge theme offered on the 1st and 15th of each month and one lucky randomly drawn winner will receive a gift voucher prize to the Dies R Us Store. For your convenience, all the important Dies R Us links are provided below.


click below for:


Thursday, March 19, 2020

Happy Birthday Card with Dies R Us

Hello Crafty Friends - I am here with a simple birthday card.

You can personalize the card by using the person's initials instead of the H and B for happy birthday,


I die cut all the components and trimmed some yellow cardstock for a card front panel. 

From the yellow cardstock, I die cut and H and B. I then adhered the yellow cardstock panel to the card base. Using some foam adhesive I replace the H and B back into the die-cut areas.
  

Next, I adhered the layers of the flowers together.
 

Then, I adhered the flowers, leaves, and sprig onto the card.

Next, I stamped the sentiment onto a white banner and adhered it to the card using some foam adhesive. I added a few gold sequins and some white gems to the center of the flowers for a nice finishing touch.
  

Now the card is complete!

Materials Used
Cheapo Dies - Font - Newsprint

Sue Wilson Designs - Finishing Touches - Faux Quilled Blooms

Sue Wilson Designs - Finishing Touches - Striped Nasturtiums

Lawn Fawn - Spring Sprig Dies

Lawn Fawn - Ahoy, Matey Stamps


Thank you for stopping by the blog today. I hope you found some inspiration!


Before I write the list of the supplies I used, I wanted to share some exciting news with you. Dies R Us now has a sister store called Didi Crafts, which has warehouses located in the USA and Canada. Didi Crafts carries some of the same products as Dies R Us, but most are different and you will be able to purchase a huge variety of crafty supplies for a variety of crafts. Having this sister store means that our Canadian crafting friends won't have to worry about huge taxes or shipping fees. Isn't that great?! Go take a peek and be pleasantly surprised!

Don't forget to come and join in the fun at the Dies R Us Challenge Blog. There's a new challenge theme offered on the 1st and 15th of each month and one lucky randomly drawn winner will receive a gift voucher prize to the Dies R Us Store. For your convenience, all the important Dies R Us links are provided below.


click below for:


Saturday, February 29, 2020

Hugs Koala Card with The Coffee Beans

Hello Crafty Friends - I am here with a sweet card using the
Mommy and Me Koala digital stamp. This adorable digital stamp was 
created by Judy Markowitz

The  digital stamp set can be purchase via 
The Coffee Bean Stamping Machine located in 
the Facebook group Multi Crafters Craft Cafe
Click photos, albums. Coffee Bean Stamping Machine

This is the card I created with the Mommy and Me Koala digital stamp
Materials Used:
Concord and 9th Die: Hugs and Hearts
Lawn Fawn Die: Grass Border 
Sizzix Die: Mini Flowers
Spectrum Noir Markers: CR2, IG2, IG3, BG2, BG3, and BG4
Nuvo Crystal Drops: Bubblegum Blush
Zig Wink of Stella Glitter Pen: Clear
Sticko Brand: Puffy Hearts
Imagine Crafts: Tear It Tape
Foam adhesive
Recollections Brand 110lb Cardstock: White 
Recollections Brand 65lb Cardstock: Pink, Green, and Gray
Recollections Brand: Vellum 
Recollections Brand Pattern Paper: Clouds
Accent Ultra Smooth 80lb Cardstock: White

I printed my image and sentiment onto white cardstock. I colored the image with my Spectrum Noir markers. Next, I fussy cut the image. I trimmed the pattern paper a quarter inch smaller than the gray cardstock. I then die cut the grass border, flowers, and sentiment.

I adhered the pattern paper to the gray cardstock. I then layered the Koala image used foam adhesive. Next, I adhered the grass and flowers. Followed by the sentiment. I added the card front to the base and finally adhered the little hearts.

Thank you for stopping by the blog today, I hope you found some inspiration!

Please join in on the fun at The Coffee Bean Challenge Blog and in the
 Facebook group Multi Crafters Craft Cafe

Thursday, February 13, 2020

Will You Be My First Mate Card with The Coffee Beans

Hello Crafty Friends - I am here with Valentine's Day Card using the
 All at Sea with Love digital stamp set. 
This cute little rowboat was designed by Anne Ingram.

The All at Sea with Love digital stamp set can be purchase via 
The Coffee Bean Stamping Machine located in 
the Facebook group Multi Crafters Craft Cafe
Click photos, albums. Coffee Bean Stamping Machine

All at Sea with Love digital stamp set.

This is the card I created using the All at Sea with Love digital stamp set.
Materials Used:
The Coffee Bean Stamping Machine: All at Sea with Love digital stamp set
Distress Ink: Seedless Preserves
Distress Ink: Tumbles Glass
Distress Ink: Salty Ocean
Distress Ink: Fossilized Amber
Lawn Fawn Dies: Stitched Heart, Cross Stitched Rectangle,
Sun, Cloud, and Ocean Waves
MFT: Cloud Stencil
Spectrum Noir Markers: DP1, DP2, and DP3
Imagine Crafts: Tear It Tape
Foam adhesive
Recollections Brand 110lb Cardstock: White 
Recollections Brand 65lb Cardstock: Purple, Medium Blue, and Yellow
Recollections Brand: Vellum
Accent Ultra Smooth 80lb Cardstock: White

I printed my image and sentiment onto white cardstock. I colored the image with my Spectrum Noir markers. I then used the could stencil with Tumbled Glass ink on the white cardstock. Next, I die cut the panel, add the stitched heart to the background.

Then, I die cut the waves from the blue cardstock and the vellum. 
along with the sun and cloud from yellow and white cardstock. I adhered the waves to the card front panel, the image of the boat. I used foam adhesive on the boat and sentiment.

I colored the heart in with Seedless Preserves ink and adhered the sun and cloud. Next, I adhered the front panel to the purple cardstock and then the card base.

Thank you for stopping by the blog today, I hope you found some inspiration!

Please join in on the fun at The Coffee Bean Challenge Blog and in the
 Facebook group Multi Crafters Craft Cafe

Saturday, February 1, 2020

Wishing You Tons of LOVE Card with Doodles Paper Playground

Hello Crafty Friends - I am here with a fun LOVE shaker card using 

Here's the card I created. I love these little elephants they are just so adorable. 
I bust out my color pencils and colored them, the balloons, flowers and a tiny butterfly.

Materials Used
MFT: Adorable Elephants Stamp
Sizzix Heart Die
Lawn Fawn Cross-stitched Rectangle Die
Impression Obsession Alpha Dies
Recollections Brand 110lb Cardstock: White
Recollections Brand 65lb Cardstock: Light Pink
Recollections Brand 65lb Cardstock: Light Gray & Dark Gray
Lily Bee Design Pattern Paper: Heart Over Heels Collection
Prismacolor Pencils

Thank you for stopping by the blog today. I hope you found some inspiration!

Be sure to tag us Doodles Paper Playground on social media -
if you create a project with our Sparkle Blends. 

There is also a new Facebook group where you can share 
creations you have made with Sparkle Blends!
Come check it out, share some inspiration!

Sunday, November 17, 2019

Hey Friend Card with Die Cut Divas

Hello Crafty Friends - I am here with a fun Fall card featuring Bugaboo Stamps for Die Cut Divas.

Every month the Divas do a Challenge. 

November's challenge theme is Thanksgiving or Thank You.


Our sponsor is Bugaboo Digi Stamp and it offers a $12.00 gift code which is approx. 4 images.

My project today features the Autumn Fox. 

Materials Used:
Lawn Fawn Knit Picky Fall Pattern Paper
Lawn Fawn Die: Reverse Scallop frame
Lawn Fawn Grass Die
Recollections Brand 65lb Cardstock: Medium Yello and Kraft
Recollections Brand 110lb Cardstock: White  card base
Spectrum Noir Markers
Tsukeniko: Memento Tuxedo Black Ink
Sakura Gelly Roll Pens: White and Black

You could find the detailed supply list on my blog: https://littlewingscreates.blogspot.com/


Thank you for stopping by the blog. I hope you found some inspiration!
  And I look forward to seeing your creations in our challenge gallery. 
 Click the "This Month's Challenge" button on the right sidebar for more details and link up.

Thursday, October 31, 2019

Happy Thanksgiving Card with Dies R Us


Hello Crafty Friends - I am here with a fun interactive card featuring Lawn Fawn Products.

This is the card I created. The second image shows the hidden Chickie and sub-sentiment.


Let's get started.

I stamped, colored, fussy cut the images. I die cut all the components for the card.

Next, I start assembling the card. I adhered the trees first because I need to die cut the slot for the pull tab through the tree layer. I line up the slot die with the notch at the top of the card and run it through my Crossover II die-cutting machine.
 

Then, it's time to work on the pull tab. I first fold on the scoreline close to the long pull handle. I fold inwards towards the pull handle. Then, I fold on the next scoreline away from the handle.
 

Next, I slip the pull handle through the slot I created on the card panel. I then cover the folded section with adhesive and placed a piece of pattern paper onto it. *Note: I covered the fold section because my image is smaller than the folded section. If your image is the same size or a bit larger than skip this part.
 

Then, I folded on the scorelines of the pull handle holder. * Not sure if that's the real name for this piece but it's what I am calling it for now.

I adhere it to the back of the card panel beneath the pull handle. Making sure the handle is straight. Then, I wrap the handle holder around the handle and adhered the small tab onto the larger one.
 

Then, I adhered the first layer of grass using foam adhesive. Making sure that the pull handle mechanism isn't obstructed. 
 

Next, I trim off the extra of the pull handle. I do this by checking with my image is well covered by the first layer of grass. I then adhered the decorative arrow tab to the top of the pull handle.
 

Then, I adhered the top layer of grass. I gathered all my images and start decorating my card by creating the little Forest Feast.
 

Once, my scene is adhered in place I then add my sentiment to the top left corner of the panel. I just tucked it under my trees to anchor it to the scene. I then adhered the card front panel to a Kraft card base to complete my card.


Materials Used:
Lawn Fawn - Forest Feast Stamps

 Lawn Fawn - Party Animal Stamps

Lawn Fawn - Let's Toast Pull Tab Add-On Dies

Lawn Fawn - Stitched Tree Borders Dies

Lawn Fawn - Stitched Hillside Borders Dies

See the source image

Best Glue Ever

Thermoweb - 3D Foam Squares Combo Pack - White .25" &  .5"
Other supplies:
Recollections Brand Cardstock: White, Kraft, Green & Brown
Recollections Brand Specialty Cardstock: Copper dot on Kraft & Solid Copper
Sakura Gelly Roll Pens: White & Black
Tsukineko Ink: Memento -Tuxedo Black
Tsukineko Ink: Versafine - Onyx Black
Spectrum Noir Alcohol Markers

Thank you for stopping by the blog today. I hope you found some inspiration!

Don't forget to come and join in the fun at the Dies R Us Challenge Blog. There's a new challenge theme offered on the 1st and 15th of each month and one lucky randomly drawn winner will receive a gift voucher prize to the Dies R Us Store. For your convenience, all the important Dies R Us links are provided below.