Wednesday, July 2, 2025

Happy 4th of July Shaker Card with Clear Scraps

 Hello Crafty Friends - I am here with a 4th of July shaker card featuring a easy to assemble shaker from Clear Scraps.

Supplies Used:
Clear Scraps Mini Flag Shaker
Clear Scraps: 4x6 Star Stencil
Red, White & Blue Cardstock
Hero Arts Celebrate Stamp Set CL498
DCWV- Star Pattern Paper(Summer Stack)
Brutus Monroe Glitter Glaze Fallen Snow
Hero Arts Pigment Ink: Unicorn
Apple Barrel Paints: Red, White, & Navy
FolkArt Metallic Paint: Gun Metal Gray 
Star Spangle Shaker Mix
VersaFine Ink - Onyx Black
Bearly Art Glue & Foam Tape
Scissors
Pencil

Step. 1 - I start with the my card panel. This gives it some time to dry. I the Blue cardstock onto a stick mat then placed the Clear Scraps: 4x6 Star Stencil onto of the blue cardstock. 


I used the Hero Arts Pigment Ink in Unicorn with a sponge applicator to fill in the stars.
 I then did a quick heat set with my heat tool. 
I then applied a thin layer of the Glitter Glaze through the Clear Scraps: 4x6 Star Stencil.

I removed the Clear Scraps: 4x6 Star Stencil and allowed the panel to dry completely.

Step. 2 -  I started by masking the sections of the Clear Scraps Mini Flag Shaker with a bit of washi tape.

I painted the pole of the shaker with metallic paint. Then a portion of the flag with the Navy paint.

I removed the washi tape and then paited the red sections.

Finally I painted the white sections of the flag.

Step. 3 - I gathered all the items to make the shaker.

I start by tracing the flag onto the pattern paper and cutting it out. Then adhered it to the base of the Clear Scraps Mini Flag Shaker

I love putting Clear Scraps shakers because no foam tape is needed in the assembly. You just adhere the two inner chipboard shapes together then adhere them onto your base, 

Next, I remove the film on both sides of the acetate that comes with your shaker.

I filled the shaker with my mix. Then put some adhesive onto the edge of the base.

I adhered the clear acetate piece to the back of the painted flag piece.

I finally adhere the top to the shaker. Then placed it under a heavy block to allow the glue to dry.


Step. 4 - Now, that the card front panel is dry as well as our flag it's time to assemble the card. I stamp the sentiment and cut it out. I add a bit of foam adhesive to it.

I adhere the layers of the card starting with red cardstock panel, then the white, finally added the blue panel to my card base.

Next, I adhere the flag shaker and the sentiment to the card front,

Now, the card is complete!


Thank you for stopping by the blog today. I hope you found some inspiration
 and create a shaker card soon!.

Tuesday, July 1, 2025

Happy Birthday Card with Die Cut Divas

Hello Crafty Friends - I am here with a Magical Birthday card
 featuring MFT's Once Upon A Time stamp set for this month challenge over on the Die Cut Diva's Blog.

This Month's Challenge is Birthday!


We are aware that My Favorite Things is closing so we don't know if they will be able to give a prize, however we have loved so many of MFT's products and at the least, wish them a bit "Thank You" for all the wonderful things they have done in the industry.

Please enter even though there may not be a prize.  Show MFT that we remember them well.

A huge THANK YOU to MFT for inspiring us all these years!

Thank you for stopping by the blog today. I hope you found some inspiration!

Monday, June 23, 2025

Floral Mason Jar Home Decore with Clear Scraps

Hello Crafty Friends - I am here with a fun project featuring the Mason Jar Medium DIY Pallet Shape from Clear Scraps.


Supplies Used:
My Stash
Apple Barrel Paints: Matte Aquamarine,  Caribbean, &  Laguna
Crafts Smart Paint: Matte Vanilla
 Martha Stewart Brand: Jute Twine
Artifical Flowers_ Yellow & Purple
Laser Cut Doily Heart- Small
Ad Tech Glue Tool & Glue Sticks
Brushes & Water
Paper Towels


Step 1. - I painted the Tiny Doily Heart in Vanilla and the Mason Jar Medium DIY Pallet Shape in the an ombre of Aquamarine, Caribbean, & Laguna


Step 2. - Once the Mason Jar Medium DIY Pallet Shape was dry. 

I adhered the Jute Twine to the neck of the  Mason Jar Medium DIY Pallet Shape

Next, I adhered the leaf and the flowers to the  Mason Jar Medium DIY Pallet Shape with the Glue Tool.

Step 3. - Finally, I adhered the heart doily to the Mason Jar Medium DIY Pallet Shape with the glue tool.


The Project is now complete!

Thank you for stopping by the blog today. I hope you found some inspiration and create your own decorative Mason Jar Medium DIY Pallet Shape !

Follow us for more inspiration on social media:

Tuesday, June 17, 2025

Love Lives on in Little Kindness Card with Die Cut Divas

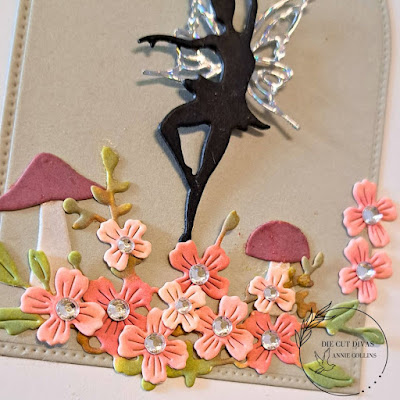
 Hello Crafty Friends - I am here with a kindness card featuring River Faerie, floral cluster and mushroom dies from PoppyStamps for this months Die Cut Divas challenge. This month's Challenge is use the Color Pallet (see below)


Supplies Used:
PoppyStamps: River Faerie Die
PoppyStamps: Floral Cluster Die
PoppyStamps: Mushrooms & Toadstools Dies
Distress Oxide Inks: Gathered Twigs, Bundled Sage, Peeled Paint, 
Tattered Rose, Saltwater Taffy & Aged Mahogany
Recollections Brand 110lb Cardstock: White & Black
Recollections Brand 80lb Cardstock: Light Gray & Medium Gray
Holographic Specialty Paper
VersaFine Ink: Onyx Black
Dies: Arch 
Bearly Art Glue & tabs
Clear Rhinestone Gems


Poppy Stamps always has unique products to work with and the Divas are happy to show them off.

 Poppy Stamps is giving away a $20 gift card to the lucky winner.

This month we're having a color challenge.  Use at least three or more colors from the color palette, plus optional black/white and skin tones (on people).  Remember to also use die cut and/or dry embossing on your project to qualify. 


This beautiful palette is from Design SeedsFresh Hues 2024-04-17.

Thursday, June 5, 2025

Relax & Unwind Card with Dare 2B Artzy

Hello Crafty Friends - I created this summer card using the Dare 2B Artzy stamp set called Beach Life along with the coordinating dies. I inked the background and added a bit of the Summer Breeze paper for the water and the Rectangle Framelit dies.


Products used:
Distress Oxide Inks: Squeezed Lemonade, Saltwater Taffy,
Carved Pumpkin, Dusty Concord & Gathered Twigs
OLO Markers: Umbrella- R0.2, R0.3, O1.2, O1.3, C-G3 & C-G5
Chair - OR3.4, OR3.7, Y1.1, Y1.2, B0.2, & B0.3
Accent Ultra Smooth 80lb Cardstock: Opaque White
Recollections Brand Layering 65lb Cardstock: Kraft and Light Blue
Recollections Brand 110lb Cardstock: White (card base)

Wednesday, June 4, 2025

Happy Father's Day Card with Clear Scraps

Hello Crafty Friends - I am here with a Father's Day card featuring Chipboard Compass Embellishment from Clear Scraps.

Supplies Used:
My Stash:
Tim Holtz Idea-ology Tissue: Melange Wrap
Distress Stain: Weathered Wood, Brushed Corduroy, & Antiqued Bronze
Brutus Monroe Chroma Glaze: Copper
Hero Arts Stamp Set: Celebrate CL498
Canson Watercolor Cardstock
Recollections Brand 80lb Cardstock: Kraft
Recollections Brand 80lb Coragated Cardstock: Kraft
Recollections Brand 110lb Cardstock: White
Dare 2B Artzy Dies: Rectangle Framelits
The Rabbit Hole Designs: You've Been Framed (Banner)
The Rabbit Hole Designs: Clear Enamel Dots
VersaFine Ink - Onyx Black
Bearly Art Glue
Scissors


Step. 1 - I started by applying some Distress Stainin Weathered Wood onto the watercolor cardstock. Then, I applied Distress Stain in Antiqued Bronze onto an 1" strip of the tissue paper. Set them aside to dry.


Step. 2 - I applied some Distress Stain in Brushed Corduroy and Brutus Monroe Chroma Glaze in Copper to the Clear Scraps: Chipboard Compass Embellishment. Making sure to fill in the center and the direction letters with the Chroma Glaze.

Step. 3 - I adhered the Tissue paper onto the watercolor panel and die cut it. 

Step. 4 - I used the Clear Scraps: Grunge Brick 5x9 Stencil and Brutus Monroe Chroma Glaze in Copper on the Panel. Set it aside to dry about 5 minutes.

Step. 5 -  Now that all the delements are dry it's time to adhere them together.  

I adhered the stenciled watercolor panel onto the Kraft cardsrock. Then, I adhered the panel onto the card base. I adhered the coragated piece overlappeing the tissue paper area.

and stamp  sentiment onto the card front.

I finished the card with a few clear enamel dots.

Now, the card is complete!


Thank you for stopping by the blog today. I hope you found some inspiration
 and create a shaker card soon!.