Showing posts with label Lawn Fawn dies. Show all posts

Thursday, October 10, 2019

So Thankful for You with Dies R US

Hello Crafty Friends - I am here with an easy thankful card perfect to send out for Thanksgiving or as a simple thank you card.

I used light fall colors for this card.

Let's get started!

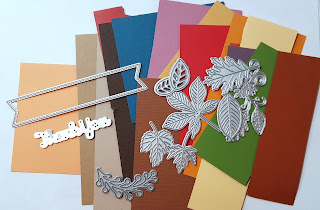
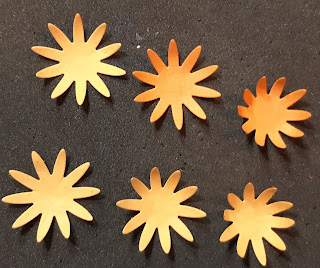
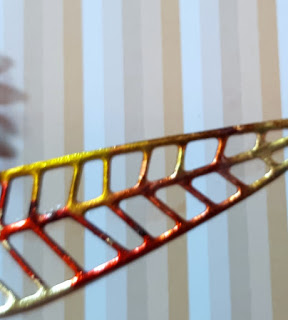
I started by die cutting the flowers from yukon gold and pumpkin orange cardstock. 6 in total - 4 yukon gold and 2 pumpkin orange. I die cut the center of the flowers from metallic copper cardstock, the sentiment from the light yellow ochre cardstock. The leaves I die cut from leftover Rinea Foil Paper I used for another project - I used some Tim Holtz Alcohol inks on the foil paper. I trimmed my card front panel from Kraft cardstock (4-1/4" x5-1/2") and I also trimmed some striped pattern paper(4" x 5-1/4")

I adhered the pattern paper to the kraft cardstock panel. I then set it aside to work on the flowers.

I use a pad (you can use a mouse pad or thick craft foam) under my flower and a stylus and curl the flowers upward towards the center. I then put a bit of glue in the center of the flowers and stack them making sure that the petals are all alternating.  Finally, I adhered the center of the flowers.
 

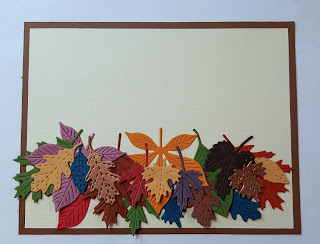
Then, I adhered the leaves to the card panel. I placed them in the left bottom corner. Next, I adhered the flowers overlapping the leaves. Making sure to place the Medium flower toward the bottom for some weight. Then, I adhered the sentiment to the top of the card. 
(below you can see a close- up of the leaves. I used reds and some green on the leaves)
 

For some finishing touches, I added some Jewels to the center of the flowers and in the upper right corner. I also added a yellow Heart to the card panel. I adhered the card panel to a white card base.

Now the card is complete!

Materials Used:
Lawn Fawn - So Thankful Border Dies
Elizabeth Craft Designs - Dies - Big Flower Set 1

Frantic Stamper - Dies - Boho Flowers

Best Glue Ever
Tim Holtz Alcohol Inks
Rinea Glossy Gold/Gold Foil Paper
Teresa Collins Brand: Memorabilia Collection Pattern Paper
Bazzil Cardstock: Pumpkin Orange & Yukon Gold
Recollections Brand 65 lb Cardstock: Kraft
Recollections Brand 110lb Cardstock: White (card base)
Elle Tru: Jewels and Pearl Yellow Heart 

Thank you for stopping by I hope you found some inspiration!

Sunday, September 8, 2019

Fall Thank You Card with Dies R Us

Hello Crafty Friends - Annie here with a quick and easy Fall card.

You can make a few of these cards and have them ready to give out throughout the Fall season. 
You can simply change the sentiment.


Let's get started!

I gathered all the supplies. Then, I die cut several leaves from a variety of cardstock in fall colors. I also die cut some leaves from Aspire Petallic Cognac cardstock. 
Along with the sentiment (I die cut 3x) and a sentiment banner.
 

I adhered the cream cardstock(4"x5-1/4") panel to the medium brown panel to create my card front panel. Next, I start adhering and layering the leaves into the card panel, towards the bottom half.

Then, I adhered the sentiment - I die cut it 3x and stacked them for some dimension. I adhere the sentiment onto the banner. I added some foam adhesive to the back of the sentiment banner and layered onto the leaves. Next, I tucked a few leaves and the sprig behind the banner. I made sure to add the Petallic Cognac leaves in three areas to keep the warm color throughout the card.

I added some Doodles Paper Playground Sparkle Blends in 
3 clusters to keep the eye moving across the card. Now, the card is complete.

Materials Used
Lawn Fawn - Stitched Leaves Dies

Lawn Fawn - Spring Sprig Dies

Impression Obsession - Dies - Small Leaf Set


Sue Wilson Designs - Finishing Touches - Faux Quilled Blooms


Paper Rose - Dies - Thank You


Thermoweb - 3D Foam Squares - White .25" 176/Pkg

Aspire Petallic Cognac cardstock
Recollections Brand Cardstock: Heavy Weight Cream, Kraft & Medium Brown
Doodles Paper Playground Sparkle Blend: Be-Leaf in Yourself

Thank you for stopping by today. I hope you found some inspiration!

Don't forget to come and join in the fun at the Dies R Us Challenge Blog. There's a new challenge theme offered on the 1st and 15th of each month and one lucky randomly drawn winner will receive a gift voucher prize to the Dies R Us Store. For your convenience, all the important Dies R Us links are provided below.

Friday, August 23, 2019

School Cards With White Rose Crafts LLC

Hello Crafty Friends - I am here with some School Cards.

Most of our children have started or will be starting school soon. I thought it would fun to create a few cards to inspire them to back into school.

Card # 1 Learn Full Tutorial


Let's get started.

I gathered the components for the card. 
I stamped and colored the Ruler, & Pencil. I also stamped the Notebook paper 3x and added a few of the mini sentiments, math problem and letter grade to the paper. I trimmed the pattern paper and card front panel. I die cut a File Folder from yellow cardstock for some finishing touches I used some Gold stars, paper clip & chipboard tag.

 Next, I start layering the blue star pattern paper and a red cardstock onto the card front panel. Then, I layered the Ruler to cover the seams of the other papers.


I tucked two of the notebook papers into the little file folder. I added a bit of adhesive to make sure they don't move. Then, I added a paper clip. Place some foam adhesive to the back of the folder and placed it onto the card front. Next, I added the chipboard tag.


Then, I added a bit of foam adhesive onto the notebook paper with all the stamped mini sentiments and layered on the file folder. Next, I adhered the pencil toward the bottom of the notebook paper. For finishing touches, I added 3 gold stars.


Materials Used:
Woodware Collections: School Tots Stamp Set (math, ABC, school days, letter grades)
Hero Arts: Just A Note Stamp Set (Ruler & Notebook paper)
Tsukineko Memento Ink: Tuxedo Black
Recollections Brand Cardstock:  White, Red, & Yellow 
Sizzix Die: File Folder
Walmart Brand: Paper Clip
Dollar Tree Brand: Gold Stars
Spectrum Noir Markers: Pencil - MG1, IG1, & FS1
Ruler: RB1 &GY1
Chipboard Tag: Unknown - for my stash


Card # 2 - Hi-Ho- Hi- Ho It's Off To School We Go!

For this card, I basically followed the steps above. I added a scalloped yellow cardstock border under the white cardstock. I stamped and colored the elements (backpack, apples, book stack, & Lunchbox) I fussy cut them and popped them up on some foam tape and placed them on the white cardstock strip. I added a bit of foam tape on the back of the white cardstock strip and added it to the card front.

I cut some fishtail banners from the pattern paper and stapled them together with Tim Holtz mini Stapler. Tuck them just under the white cardstock strip. For the sentiment, I used a sticker that I backed onto white cardstock for a firm piece. I also added a bit of foam behind it. For a finishing touch, I added some Zig Wink of Stella on the apples and some Sakura Gelly Roll White pen.

Materials Used:
Sakura Gelly Roll Pen: White
Recollections Brand Cardstock:  White, Red, & Yellow 
Tim Holtz Idea-ology: Tiny Attacher & Staples
Lawn Fawn Dies: Stitched Scalloped Borders
Spectrum Noir Alcohol Markers: 
Backpack: TB1 & TB2
Apple: DR1, DR7, RB1, LG1 & LG2
Lunch Box: LG2 & LG3
Books: CT4, OR1, LG1, TB1, DR1
Sentiment Sticker: Making Memories (old school - I know)


Thank you for stopping by the blog today - I hope you found some inspiration!

Be sure to tag us White Rose Crafts LLC on social media 
if you create a project with products or kits purchased on the 

Wednesday, July 10, 2019

Two Cards One Kit with White Rose Crafts LLC

Hello Crafty Friends - I am here with 2 very different cards from one kit. This post is a bit long but, I hope you will enjoy it.

I am using the July Mediterranean Dreams Kit from White Rose Crafts LLC

 Image may contain: food No photo description available. No photo description available. No photo description available. No photo description available. No photo description available.
This fabulous Subscription Kit brings together sparkling, azure Mediterranean seas, sun-bleached shores and the rich colors of vibrant Mediterranean cultures in a carefully curated kit. Just gorgeous!

 Card #1 - Fresh 
 This is a simple card. Using one of the cut apart topper sheet for the sentiment and image.


Let's get started.


I used one of the card bases that comes in the kit. I pulled some MFT Gumdrop Green cardstock
 from my stash to accent the image and pattern paper.

First, I trimmed my topper and layered it onto the green cardstock. Then, I did the same to the pattern paper. I adhered the pattern paper and cardstock layer onto the yellow card base.

Next, I adhered the topper to the pattern paper with some foam adhesive.

Then, I pulled out the Doodles Paper Playground Sparkle Blend from the kit along with some Nuvo Drops for embellishing the card. I added two clusters of sparkle blends to the corners of the card and a butterfly to the topper. I added a bit of Dandelion Yellow to the center of the butterfly and some White Blizzard to the sentiment and as an accent to the lemons.

Now, the card is complete. Quick and easy.
Materials Used:
From the Kit: 

Other:
My Favorite Things Cardstock: Gumdrop Green


Card # 2 - Wish You Were Here

This card is a bit more detailed. I used the stamp set from the kit, pattern papers and sparkle blend.

Let's get started.

I started by cutting two strips from the pattern paper. I used the blue pattern strip and the cream and tan pattern paper. Then, I die cut the blue pattern paper into waves and the cream pattern paper into a sand hill. Then, I stamped the 2 little beach cottages and colored them. I also stamped the palm trees and boat. I used some Distress Oxide Ink for the boat and palm tree. I fussy cut the sun from the other cut apart Topper sheet 2. I pulled some yellow and light blue cardstock from my stash.

Next, I inked the edges of the waves and sand hill with some Distress Oxide inks. This will give them more definition. Then, I adhered the blue waves onto the light blue cardstock. Next, I layered the sand using some foam adhesive onto the waves. Then, I adhered the blue panel on to the yellow cardstock.
   

Next,, I adhered the palm tree and boat. Tucking the palm tree just behind the sand. I tucked the boat behind the palm tree. Then, I added the little cottages. I tucked in some clouds - one behind the palm tree and one just behind the sun which I popped up on foam adhesive. Finally, I added the sentiment and some Sparkle Blends. I used 6 Sparkle Blends from the past kit (Barista) for coconuts for the palm trees. I also added 2 small clusters to the left corner of the card and to the sentiment. I added a few seagulls to the sky - because we all know the Beach would not be the same without them.

Now, the card is complete!
Materials Used:
From the Kit: 
Kaiser Crafts Summer Splash Stamp Set (Cottages & Sentiment)

Other
Apple Blossom Stamps: Summer Holiday Set (Seagulls)
Fiskars Stamps: Tropical Getaway Set (Palm Trees & Boat)
Lawn Fawn Dies:
Spring Showers Dies (Clouds)
Stitched Hillside Border Dies
Ocean Waves Border Dies
My Favorite Things: Stitched Sentiment Strips Dies
Spectrum Noir Markers: CT4, TB4, LG3, BO2

Thank you for stopping by the blog today - I hope you found some inspiration!

Be sure to tag us White Rose Crafts LLC on social media 
if you create a project with products or kits purchased on the