Showing posts with label chipboard. Show all posts

Wednesday, June 4, 2025

Happy Father's Day Card with Clear Scraps

Hello Crafty Friends - I am here with a Father's Day card featuring Chipboard Compass Embellishment from Clear Scraps.

Supplies Used:
My Stash:
Tim Holtz Idea-ology Tissue: Melange Wrap
Distress Stain: Weathered Wood, Brushed Corduroy, & Antiqued Bronze
Brutus Monroe Chroma Glaze: Copper
Hero Arts Stamp Set: Celebrate CL498
Canson Watercolor Cardstock
Recollections Brand 80lb Cardstock: Kraft
Recollections Brand 80lb Coragated Cardstock: Kraft
Recollections Brand 110lb Cardstock: White
Dare 2B Artzy Dies: Rectangle Framelits
The Rabbit Hole Designs: You've Been Framed (Banner)
The Rabbit Hole Designs: Clear Enamel Dots
VersaFine Ink - Onyx Black
Bearly Art Glue
Scissors


Step. 1 - I started by applying some Distress Stainin Weathered Wood onto the watercolor cardstock. Then, I applied Distress Stain in Antiqued Bronze onto an 1" strip of the tissue paper. Set them aside to dry.


Step. 2 - I applied some Distress Stain in Brushed Corduroy and Brutus Monroe Chroma Glaze in Copper to the Clear Scraps: Chipboard Compass Embellishment. Making sure to fill in the center and the direction letters with the Chroma Glaze.

Step. 3 - I adhered the Tissue paper onto the watercolor panel and die cut it. 

Step. 4 - I used the Clear Scraps: Grunge Brick 5x9 Stencil and Brutus Monroe Chroma Glaze in Copper on the Panel. Set it aside to dry about 5 minutes.

Step. 5 -  Now that all the delements are dry it's time to adhere them together.  

I adhered the stenciled watercolor panel onto the Kraft cardsrock. Then, I adhered the panel onto the card base. I adhered the coragated piece overlappeing the tissue paper area.

and stamp  sentiment onto the card front.

I finished the card with a few clear enamel dots.

Now, the card is complete!


Thank you for stopping by the blog today. I hope you found some inspiration
 and create a shaker card soon!.

Wednesday, March 11, 2020

Shamrock Shaker Card with Rinea and Creative Embellishments

Hello Crafty Friends - I am here with a fun and easy Shamrock shaker card.

This month Rinea Design Team is collaborating with Creative Embellishments.
I know you will be inspired by all the wonderful projects the Design Team has created.  

If you haven't heard of Creative Embellishments let me tell you a bit about them.
They create laser-cut Chipboard, Wood Veneer, and Stencils. They also have their own brand of Stamps and Flair.

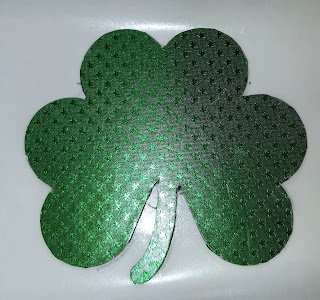
This the card I created using the combined products.
Materials Used:
Recollections Brand 110lb Cardstock: White (card base)
Recollections Brand 65lb Cardstock: Green
Darice Brand Twine: Green and White

Let's Get Started!

I gathered all the components to the card. 
 Along with my Xyron Creative Station Lite and

I start by inking* all the edges of my Creative Embellishments: Shamrock Shaker Set.
I set them aside to dry.
  

Then, I inked the words good luck from the
 I then set them aside to dry.
  

the sentiment, and the open shaker components through the Xyron Creative Station Lite
  

Then, I pressed the Rinea Emerald/Emerald Starstruck Foil Paper onto the solid part of the 
Creative Embellishments: Shamrock Shaker Set which is the bottom of the shaker. I then trimmed the extra Rinea Emerald/Emerald Starstruck Foil Paper away leaving the base covered. I did the same thing with one of the open shamrock pieces creating the top of the shamrock.
 

Next, I pressed the Rinea Gold/Gold Starstruck Foil Paper onto the green cardstock which is 
cut to 4-1/4" x 5-1/2. Then, I adhered the shamrock base onto the card front panel. 
I slid the twin under the stem of the shamrock. Next, I stacked the open shamrock pieces onto 
 

I filled the Creative Embellishments: Shamrock Shaker Set with a mix of
Doodles Paper Playground Sparkle Blend: Gold Rush. Then, I adhered the acetate piece to the shaker. Followed by the top piece of the shamrock. I then tied a bow on the stem and adhered the sentiment in place. Adhered the card front panel to my card base and the card is complete.

Thank you for stopping by the blog today. I hope you found some inspiration!

Please tag us on social media if you create any project using any of our wonderful Foil Papers!
Don't forget to stop by the shop Rinea.com

Tuesday, January 14, 2014

My Prize!

I received my prize from Scrapbook.com - I entered the contest they were having during December. It was a cards & tags challenge. I won $30.00 worth of products. Thank you Kels & Scrapbook.com
The prize contains the following: 2 - 6x6 pads (1- Webster's Pages Holiday Collection Pack, 1 - My Mind's Eye Bluebell Collection), Making Memories Rub-ons Giggle Kids, Elle's Studio - Lil' Snippets: Labels - Saltwater, Zva Creative Bling Embellishment, Bo Bunny - Smoochable Dimensional Stickers, Webster's Pages-Polka Dots Embellishments, Webster's Pages Designer Washi Tape - New Beginings, Doodlebug design Inc. - Treat Bags, K &Company - Brenda Walton - Flower Petal Fabric Art, Petaloo Floral Embellishments, Kaiser Craft Collectables Enchanted Garden Die cut Shapes, Prima Chipboard Stickers, Crate Paper - Pretty Party Eclectric Buttons, Webster's Pages Trim & Ribbon - Black Sequin Roll.


These are the card and tags I entered.