Wednesday, April 24, 2019

Believe in Yourself Card with White Rose Crafts LLC

Hello Crafty Friends - I am here with another card created with the March Blue Skies Kit. This Kit is so full and I can keep creating cards for another month.


I keep this one pretty simple. Some die cutting and a bit of Tim Holtz Distress Spray for a splash of fun.


Let's get started!

I gathered all the materials I would be using for this card. All but a few things are from the kit. The Distress Spray, the White Tiny Flowers, and Specialty paper are from the Add-on section of the shop. From my stash I am using Spellbinders: Card Creator Dies and Lawn Fawn: Spring Sprig Dies.

First, I did all the die cutting. I used 3 of the Spellbinder card creator dies(#, #2 & #3) to create 2 little frames. I die cut the Gold Specialty paper from the kit.

Next, I used the Lawn Fawn Spring Sprig dies to die cut the sprig from Green Specialty paper and the little flower for die cut from 2x of the creamy Specialty from the add-on section.

Then, I trimmed my sentiment and a few extra strips from the pattern paper that is included in the kit. I then used a bit of the Scrapberry ink included in the kit to add some color to the edges of the strips.

Next, On the Blue card base included in the kit - I did some brush strokes and splatter from Distress Spray in Spiced Marmalade and I then add a bit of Mermaid Lagoon Distress Spray splatter.

Once the background was dry I am ready to create the card. 
I gather all the components to the card.

I start with the little frames. I adhered one frame flat and the other with some foam tape for some dimension.


Next, in the little space that the two overlapped frames created, I build my cluster. I start with little sprigs then I added the little tiny white flowers (from the add-on section). I then added the pattern paper strips on foam tape. Finally, I added the tiny die cut flowers some are adhered directly and some are adhered with foam tape. 


Next, I add the finishing touch with the sequin Butterfly and some of the Doodles Paper Playground Sparkle Blend Sunny Skies from the kit. I start with the butterfly - I add some foam adhesive to the body and wings. Place it just under the sentiment. Then, I add some liquid glue to the center of the butterfly and added 3 of the Gold curly Q's from the Doodles Paper Playground Sparkle Blend Sunny Skies. Cleaned up any extra glue.  


I also added a 5 small Glitter sparkles from the  Doodles Paper Playground Sparkle Blend Sunny Skies toward to left bottom and top right of the frames.


Now, the card is complete. I will add and piece of white cardstock inside for writing my message.

Supplies Used for Both Cards:
Gold Specialty Paper, Kaiser Craft Pattern Paper, 
Blue Cardstock Card Base, Scrapberry Ink & 
Doodle Paper Playground Sparkle Blends: Sunny Skies

With so many beautiful stamps, papers, 
Specialty papers & Inks in the shop 
I know you are bound to create something wonderful!

Thank you for stopping by the blog today!

If you would like to join in the fun for the White Rose Crafts April's Sketch Challenge and other fun activities and conversations make sure you join the White Rose Crafts Gallery group on Facebook!   

Sunday, April 21, 2019

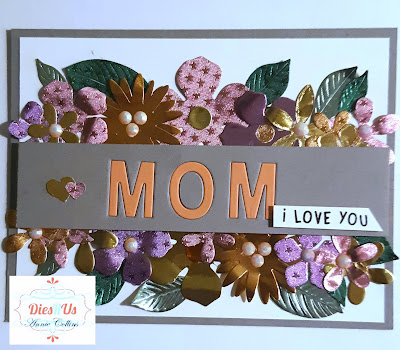
Mom I Love You Card with Dies R Us

Hello Crafty Friends - I am here with a Mother's Day card. 

This card is mostly die cuts and some simple stamping. It's not my usual kind of card because it's very shiny. I like some shine here and there but, I decided to use Rinea Foil paper for my flowers.


Let's get started

I gathered all my supplies and then I die cut all the flowers, leaves and letters. I die cut more flowers than I actually used and colors I didn't use. I just add them to my die cut stash for future projects.


Then, I die cut the letters for the word MOM.
 I wasn't in my craft room so didn't have my mat to line up the dies so I used my trimmer.
I cut the word 2x - once from the gray cardstock that I will inlay the coral-pink cardstock letters.


Next, I stamp my sub-sentiment and trim it down.

Now, that I have all the components ready - Let's build the card.

I start by layering the white cardstock onto the gray card front panel.

Then, I inlay the word MOM into the gray band I cut. I add adhesive to the back of the opening of the word MOM this way it's easy to inlay the letters.


I check my spacing.

Next, I get a piece of craft foam and measure the length I need and trim. I like using the craft foam for the middle band like this so that it stays nice and even. Also, it's not too bulky for mailing.


Then, I start to arrange the flowers how I think I might want them. I call this a dry run. I do not use any adhesive until I know this will be the final placement.

Once, I know this is how I want the flowers to be and the band looks good I start to adhere the flowers into place. I keep checking with the band to make sure I stay straight (I tend to stray off sometimes). I also tuck the leaves here and there.

 I trimmed apart the one set of leaves so that I would have several leaves in different sizes without having to die cut lots of leaves.


Now, that I have all the flowers adhered in place - I adhered the middle band in the center. Next, I added a few jewels to the center of a couple of flowers. I kept the jewels in Iridescent White.


Now, My card is complete!

A simple inlay, lots of layered flowers and beautiful results.

Supplies Used:
Dies:
Fineline 20 Gauge Applicator


Other Supplies:

Recollections Brand: 
White Cardstock, Medium Gray Cardstock 
Rinea Foil Paper
Jewels: Elle TRU Jewels - Medium Orange
Adhesive: tape

Don't forget to come join in the fun at the Dies R Us Challenge Blog. There's a new challenge theme offered on the 1st and 15th of each month and one lucky randomly drawn winner will receive a gift voucher prize to the Dies R Us Store. For your convenience, all the important Dies R Us links are provided below.


Thanks for visiting... hope to see you again soon, Have a great day.

Saturday, April 20, 2019

You're Beautiful Inside and Out Card with Doodles Paper Playground

Hello Crafty Friends - I am here with a simple shaker card featuring 
one of April's New Release Sparkle Blends - Sunshine.

No photo description available.
A bright, cheerful blend of lemony yellows, 
chartreuse, white and transparent, iridescent butter shades.
You’ll want to use this blend on all of your happiest projects.

I created a slim shaker card. 
Meaning I used several layers of paper instead of foam adhesive to create my shaker. 
I didn't want to create a lot of bulk. I also didn't overfill my shaker.

Let's get started on how I did this.

First like always - I gathered my supplies. I stamped and colored my image. I die cut the sentiments a total of 7 times. 6x from white cardstock and 1x from specialty Gold paper. I also trimmed my pattern paper and cardstock card front panel along with some specialty purple cardstock.

After I have all the components together I start putting the card together. I layer the pattern paper onto the medium yellow cardstock card front panel. Then, I adhered purple cardstock in the center - however, you will notice in a bit I change my mind and move it.

I then start layering the sentiment and gluing the layers. making sure to sandwich the acetate/packing between layers. I did this because the sentiment is so thin and I wanted a thin shaker. I am showing you that the sentiment isn't very thick but it is very sturdy.


Next, I add a bit of the Sparkle Blends- Sunshine to the card front panel. I choose some of the gold pieces, mostly the yellow and the starburst looking ones. I notice that the larger butterfly is reading a bit orangy in the photo but trust me it's a beautiful iridescent yellow. 

I adhered the shaker top to the Sparkle Blend and I moved the purple cardstock to the left a bit so that my girl could fit nicely on the right side.

That's it the card is complete. I did add a few highlights to the girl with a white gel pen.


Thank you for stopping by the blog today! 

Be sure to tag us Doodles Paper Playground on social media 
if you create a project with our Sparkle Blends.
 All of our Sparkle Blends can be purchased on the 
be sure to use the discount code
 Annie 10(there's a space between my name and the number).

Friday, April 19, 2019

April's Sparkle Blends Release Blog Hop with Doodles Paper Playground


Hello Sparkle Blends Fans!

 Its time for the Doodles Paper Playground, April Sparkle Blends Release Blog Hop!! 

We’ve got 6 beautiful spring-y blends to share with you this month: Easter Basket, Springtime, Sunshine, Cafe Au Lait, Birthstone Collection: April - Diamond, & Birthstone Collection: May - Emerald. If you love soft, pastel shades, and budding greens, you're definitely going to love this release!

Check out the descriptions and close up photos of each of these gorgeous Sparkle Blends from our April release in our detailed release blog post!

This month there are beautiful new blends for you to choose from--or even better, order them all! Do you have a favorite? Make sure you circle back to the Doodles Paper Playground post after the hop, and comment on that post with your favorite blend from the April Release, for a chance to win a package of that blend!

Here is the card I created for this hop using Sparkle Blends: Easter Basket

Continue the hop for more inspiration and for chances to win a set of all 6 Sparkle Blends from this release, make sure you leave some comment love on each leg of the hop! You will receive one entry for each comment--and don’t forget to share with your friends!

As always, the limited edition April Release is available for purchase while supplies last, exclusively at White Rose Crafts--so if you fall in love, make sure you order, or you just might miss out!


Carrot Hot Rod with Simply Crafty SVGs

Hello Crafty Friends - I am here with an adorable project from Simply Crafty SVGs.

Using the Carrot Hot Rod SVG - I created this adorable bunny in his too cute hot rod! This bunny is burning rubber instead of hopping along to bring some Easter goodie to everyone!


I love that Sandy at Simply Crafty SVGs includes a PDF and a Video Tutorial for all her SVGs with simple and clear instructions.

Be sure to give this or any of the wonderful SVGs that are available a try!!

Thank you for stopping by today!


Be sure to join us over on the Facebook Group Simply Crafty SVGs Creators Group
If you create any of the Wonderful Project designed by Sandy from Simply Crafty SVG share them with us in the group and social media.