Wednesday, November 28, 2018

Joy To You with Doodles Paper Playground

Hello Crafty Friends - I am here with a fun snowflake card. This is a twirling card - the snowflake does a fantastic twirl when you open the card. I accented the card with the Frozen Sparkle Blend

this mix it has hues of Blue, soft Teals and white. Some snowflakes, small crystals in both clear and pale blue. This Sparkle Blend along with all the other Sparkle Blend can be purchased at White Rose Crafts LLC


Thank you for stopping by today. Be sure to tag us Doodles Paper Playground on social media if you create a project with our Sparkle Blends. All of our Sparkle Blends can be purchased on the White Rose Crafts LLC Website.

Tuesday, November 27, 2018

Thanks with A2Z Scrapbooking

Hello Crafty Friends - I am here with a card of  Thanks for A2Z Scrapbooking - In keeping with our theme this month of Give Thanks. This card is perfect a simple thank you for any occasion.


Thank you for stopping by today - Remember to use my discount code Annie15 to get 15% off your purchase of $25 or more.


Supplies Used: 
Hero Arts Layering Bird Stamp - CL866
Hero Arts Celebrate Stamp Set - CL498
Pattern Paper: Echo Park Celebrate Fall Collection
Inks: Tsukineko Versafine Onyx Black - -Tim Holtz Distress Oxides Ink: Fossilized Amber, Gathered Twigs, Aged Mahogany, Peeled Paint, Forest Moss, Broken China, Blueprint Sketch, Wilted Violet & Shaded Lilac
Card Stock: Recollection Brand: Light Yellow, White & Brown
Washi Tape: Recollection Brand in Copper
Adheseive: Scotch 3M ATG, Dollar Tree - low profile Foam tape
Tools: Tim Holtz Stamp Platform, Paper Studios Paper Trimmer, Scissors

Monday, November 26, 2018

Tea Light Centerpiece with Rinea

Hello Crafty Friends - I am here with another fun project in collaboration with Imagine Crafts. Today, I have a Tea Light Centerpiece perfect for the dining table or mantel. 


Let's gather our supplies and get started on our project:
Autumn Variety Crafter's Pack -  Ruby Red Starstruck 
Recollections Brand heavy weight card stock in Golden
Aleene's Tacky Craft Glue
Horizon Group USA- Braiding Cord in Chocolate Brown
Tools: Rinea Clear Round Stamp Block, Tim Holtz Platform
Electronic Die Cutting Machine, Scissors


So, let's get started. First, download and cut the Flourish Tealight Holder from the Golden card stock and the Ruby Red Starstruck foil paper. Note: I did not cut the flourish part of the file. I instead stamped some images. I assembled the tealight holder following the instruction on the PDF and Video by Simply Crafty SVG


Once the Tealight Holder is assembled I stamped the wreath & Pine Cone with Imagine Crafts Ganache Stazon Ink. Then, the Star Anise, Orange slice with  Imagine Crafts Stazon Claret Ink. . The Pine Boughs I did with Imagine Crafts Stazon  Cloudy Sky
I added a bit more color using Distress Oxide ink in Fozziled Amber and Evergreen Bough. I then cut the wreath toward the bottom so that it would fit my holder. I used the cut pieces to fill in were needed. I placed thin foam adhesive behind the pine cone and placed onto the holder in the center of the wreath.


 Now the Tealight Center Piece is finished and ready to decorate the table or mantel.
Thank you for stopping by today - if you create a project using Rinea Foil Paper be sure to link us on social media we love to see your creations! 


Sunday, November 25, 2018

Season's Greeting with Dies R Us

Hello Crafty Friends - I am here today with a fun holiday card. 
The season is here for us to start creating and send out cards to our friends and family.

For this card I created a simple scene of traveling for the holiday season. Using mostly Lawn Fawn products. This a simple die cutting and layers type card. ** Unfortunately I lost my step by step photos I hope my description of how I made this card is helpful.


I started by stamping the images from Lawn Fawn Home for the Holidays stamp set. I stamped the car twice. I trimmed off the top have of the car to create a utility trailer. I colored the images with my Spectrum Noir Alcohol Markers. I trimmed 3 thin strips of gray card stock to create the gate for the trailer. 

Next, I die cut 2 snow from white glitter card stock and 1 hill from black card stock using Lawn Fawn Hillside Border Die. I also die cut 1 Forest Border and 2 Simple Puffy Clouds. I set all my die cuts and colored images a side. Then, On light blue card stock using a bubble stencil and white dye ink I created a snowy sky.

I then assembled my card by layering  and adhering the tree border onto the blue card stock, next the snow hill, road and snow hill. Once I had all the background adhered in place. I then adhered the present onto the trailer. The tree onto the car and also attached the car and trailer together. Using foam adhesive placed the car and trailer onto the card front. Next, I adhered the 2 clouds to the card front layering them and using a bit of thin foam adhesive on the small cloud to give some dimension. For finishing I stamped the sentiment which I layered onto dark blue card stock and I added a few sequins.

Supply List 


Spectrum Noir Markers

Recollections Brand Card stock in: 
White, Blue - light and dark, 
Black and Glitter in White Snow

Doodles Paper Playground's 
Frozen Sparkle Blend


Thank you for stopping by today. 

Saturday, November 24, 2018

Happy Thanksgiving Card with A2Z Scrapbooking

Hello Crafty Friends - I am here with another card for you. In keeping with this months theme of Give Thanks - I created a Thanksgiving card. Perfect to give the hostess of the Thanksgiving gathering you are attending or mailing it out to family and friends.

Happy Thanksgiving

Using Hero Arts Layering Bird stamps make this is a quick and simple card. I simply followed the layering steps that on the back of the package for the bird, the stem and flower to stamp onto white card stock. Then I stamped the sentiment from Hero Arts Celebrations Stamp Set onto white card stock and trimmed and layered onto yellow card stock.  Then, I adhered the card front to the purple card stock then the card base. Finished off the card with a few sequins and the card was complete.

20181112_211036

Thank you for stopping by today - Remember to use my discount code Annie15 to get 15% off your purchase of $25 or more.


Supplies Used: 
Hero Arts Layering Bird Stamp - CL866
Hero Arts Celebrate Stamp Set - CL498
Inks: Tsukineko Versafine Onyx Black - -Tim Holtz Distress Oxides Ink: Fossilized Amber, Gathered Twigs, Aged Mahogany, Forest Moss, Blueprint Sketch, Wilted Violet & Shaded Lilac
Card Stock: Recollection Brand: White, Yellow & Purple
Adheseive: Scotch 3M ATG, Dollar Tree - low profile Foam tape
Tools: Tim Holtz Stamp Platform, Paper Studios Paper Timmer, Scissors

Friday, November 23, 2018

Peace on Earth with Doodles Paper Playground

Hello Crafty Friends - I am here with a holiday card. You still have time to create a few more cards for friends and family.

I used the Bells Are Ringing Sparkle Blend for this card. It's a perfect mix of Silver, Gold, White and Clear elements in a variety of sizes and finishes. The blend includes stars and beautiful bells.


I used the Greeting Farm Angel Anya and a combination of Copics and Spectrum Noir Markers to color the image. I used a sentiment from a stamp set called Festive Flourishes, glitter gold washi strip along with some older pattern paper in my stash.  The Bells Are Ringing Sparkle Blend add the perfect finishing touch to this angelic card.
Thank you for stopping by today. Be sure to tag us on social media if you create a project with our Sparkle Blends. All of our Sparkle Blends can be purchased on the White Rose Crafts LLC Website.

Monday, November 19, 2018

May Your Holiday Be Lit with Beth Duff Designs

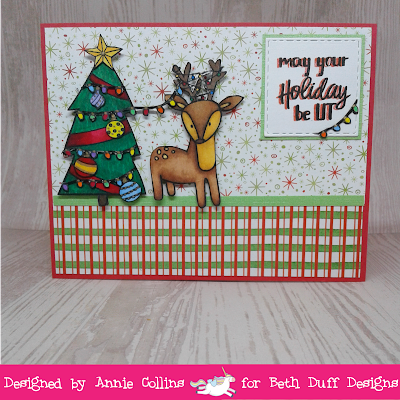
Hello Crafty Friends - I am here with a cute holiday card featuring the New Release Set called

Let's Get Lit


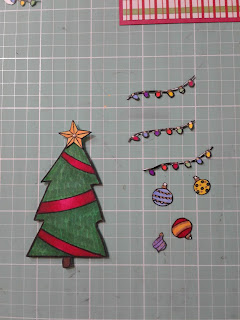
I started by stamping and coloring the images. Then, fussy cutting them. I also cut by card front panel and card base. I also double stamped the sentiment onto white card stock and used stitched square die to cut it.


Now, that I have all the components ready for the card - I started putting some adhesive behind my pattern paper and images.

Now, I placed the plaid pattern paper towards the bottom of the red card stock card front. Then, I placed the sparkle pattern paper and now, I layered the green pattern paper on top of the pattern papers so to hide the seam.

  
Now, It's time to build the Christmas Tree. Then, I placed it onto the front panel. Next, I placed the deer by the tree. I used a string of light to attach the tree to the deer. 


Next, I layered the sentiment onto light green shimmer card stock. I add another string of lights. Adhered the card front onto the card base.
Now, Our card is complete.