Monday, August 26, 2019

More Back To School Fun with Rinea

Hello Crafty Friends - Annie here with some fun projects for this year Student! 

I know it's that time already - Summer is just flying by. Here in Florida, the children head back to in August. I know that some of your children will be heading back in September. 

I thought why not create some projects for the student this time. 

Here are the fun projects I created. 
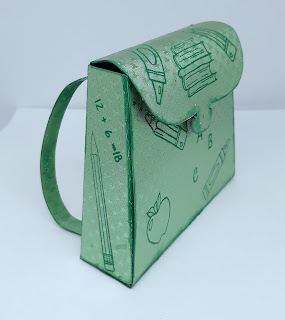

The Backpack
This perfect to add a little notebook, a mini mechanical pencil, and some fun erasers.

 The back view

Side views
  

Materials Used:
Imagine Crafts Tsukineko StazOn Pigment Ink: Shamrock Green
Rinea Jade/Jade Starstruck Foil Paper
Recollections Brand Cardstock: White
Hero Arts Just A Note Stamp Set CL404
Woodware Craft Collection School Tots Stamp Set
Kleurplaat Rugzakjes maken - Blanco - Kleurplaten.nl

Let's get started

I started by downloading and printing the template. Next, I trimmed the template and adhered it onto the Rinea Jade/Jade Starstruck Foil Paper. I also trimmed an extra panel for the inside of the backpack flap and the straps.


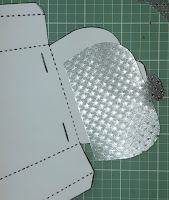
Next, I used a craft knife and cut the slits into the backpack. These will be for the straps.

 Then, I used my scoreboard to score all the dotted lines (score lines).
 

Next, I used Imagine Crafts Tsukineko StazOn Pigment Ink: Shamrock Green, Hero Arts Just A Note Stamp Set CL404 and Woodware Craft Collection School Tots Stamp Set to decorate the backpack. I even stamped on the straps.


Now, to attach the straps to the backpack. I insert the strap notch into the slit and add some adhesive to the tab and pressed into place.


Next, I adhered the side tab to the press into place. I repeat the process on the other side. Cleaning up any adhesive along the way if needed.

Next, I add a bit of velcro to the front of the backpack for a closer. I use a small velcro tab that I cut in half. I stack the velcro tabs the hook and loop part onto the felty part. Then, I  place the velcro onto the backpack flap first. Next, I close the flap and press the bottom part of the backpack.
 

Now, the mini backpack is complete!


Mini Pencil Box
This fun little pencil box is perfect for a few treats, stickers or some fun erasers.

Materials Used:
Rinea Clear Round Stamp Block
Recollections Brand Cardstock: White & Cream
Hero Arts Just A Note Stamp Set CL404

Pencil box Template
pencil box
Now, just like my last post - I didn't make a tutorial for this project. 
I will, however, link the template I used to make this mini pencil box.


Thank you for stopping by the blog today. I hope you found some inspiration!
Be sure to stop by the Rinea Store to pick some of the wonderful Rinea Products.

Sunday, August 25, 2019

Thank You for Being So Amazing Card - Vintage Rose Kit - White Rose Crafts LLC

Hello Crafty Friends - I am here with a  card using the New Release

The September Vintage Rose Kit is available for purchase now!

This gorgeous kit, with its rich color palette, is so evocative of the rose garden at the very end of summer... Deep, sultry reds and greens, with hints of pink and white. This bumper, jam-packed kit is a cardmaker's treasure trove!

TWENTY Double-Sided 6"x6" sheets Couture Creations "Vintage Rose" Collection papers
Kaisercraft 12" x 12" cardstock sticker sheet - "Romantique"
Tim Holtz Distress Oxide Ink Pad - Tattered Rose
Woodware Perfectly Clear Photopolymer Stamp Set - Sweet Sentiments
Ultimate Crafts Cutting Die - "Watercolor Bloom"
Bubble-pack of 4 Bronze-Colored Elegant Metal Roses from Enchanted UK
Selection of Dovecraft "In Bloom" Collection buttons
Pack of Kaisercraft soft pink floral adhesive rhinestones
Mid-Green Vine Style Leaf-Shaped Ribbon
Pack of Shaker Card Sparkles to coordinate with Kit colors
Selection of cards and envelopes from American Crafts, Kaisercraft and Jillibean Soup

Thank You for Being So Amazing Card

Let's Get started!

I start by gathering the components for the card. I trimmed the green gingham pattern paper to 3", the rose pattern to 1-1/4", I also trimmed a piece of Aspire Petallics Autumn Hay cardstock to 1". I die cut flowers from watercolor paper 5x, (I cut some of the leaves off for extra layering) and a card front panel from white cardstock. I pulled a few embellishments as well- washi, rhinestone flowers, puffy hearts and more (note - I didn't use all the embellishments I pulled - Yes, I am an overpuller 😉)

I used the Tim Holtz Distress Oxide Ink in Tattered Rose (from the Kit), Tim Holtz Distress Oxide Ink Worn Lipstick, Tim Holtz Distress Oxide Ink Bundled Sage & Tim Holtz Distress Oxide Ink Peeled Paint. I added a bit of water to the ink I smudged on my craft mat. I then used a paintbrush and colored the flowers and stems. On 2 of the flowers, I took out the little pieces, but on one of the flowers, I left all the pieces in - that is where I used the Worn Lipstick & Peeled paint to create some contrast and dimension. I set them aside to dry. 


Next, I start to assemble the card. I adhered the green pattern paper first, then the rose pattern paper. Then, I put a strip of gold washi onto the Aspire Autumn Hay Petallics cardstock.  Next, I placed the Aspire Autumn Hay Petallics cardstock on top of the seam of the two pattern papers.
 

Then, I gathered the dried flowers and adhere them to the front of the card. I place the two flowers that I removed the bits from down first. I then add a bit of foam adhesive to the flower with all the bit in and place it on top of the other flowers. arranging them to the left of the card. I tucked the extra leaves in under the flowers.


Next, I decide on the rhinestone flowers (from the kit) and some puffy hearts for embellishments. I added 3 of the rhinestone flowers on the watercolored flowers. I then added 2 tiny puffy gold hearts by the flowers.


Finally, I adhered the sentiment (from the kit) using a bit of foam. I add a tiny gold puffy heart onto the sentiment.

That's it the card is complete. 

Materials Used:
Couture Creations "Vintage Rose" Collection papers:
Green Gingham Pattern paper and Rose Pattern Paper
Kaisercraft 12" x 12" cardstock sticker sheet - "Romantique"
Thank you for being so Amazing
Tim Holtz Distress Oxide Ink Pad - Tattered Rose
Ultimate Crafts Cutting Die - "Watercolor Bloom"
Pack of Kaisercraft soft pink floral adhesive rhinestones

Other:
Canson Watercolor paper
Recollections Brand Cardstock: Heavy Weight White 110lb
Recollections Brand Washi: Gold Petite Bloom
Recollections Brand: Tiny Puffy Hearts 

Thank you for stopping by the blog today - I hope you found some inspiration!


Be sure to tag us White Rose Crafts LLC on social media 
if you create a project with products or kits purchased on the 

Friday, August 23, 2019

Warm Winter Wish with Maker's Movement

Hello Crafty Friends - I am here with a video tutorial for the Maker's Movement.

I am honored to have the opportunity to create a few projects for the Maker's Movement and to try out the Die Cutting Machine the Crafter's Edge Crossover II. Along with a Stamp and Die Set and some other dies. 


The front of both cards.


Card # 1 - Warm Winter Wish -- Alpaca Your Bags


Card #2 -- Warm Winter Wishes


Inside of both cards


Here's the Video Tutorial


Materials Used for both cards:

MMT206 - 3.5" Round Awesome Acrylic Block Product Image


MSD202 - Alpaca Your Bags Stamp & Die Set Packaging

MOD220 - Pull and Reveal Circle Packaging

Xyron Mega Runner Adhesive
Tombow Multi-liquid Adhesive
Tsukeniko Memento Tuxedo Black Ink
Tsukeniko Versafine Onyx Black Ink
Tsukeniko VersaMagic Aegean Blue
Tim Holtz Distress Oxide Ink: Evergreen Bough
Sakura Gelly Roll Pens: Black, White & Sparkle
Neenah Solar White Cardstock
Recollections Brand Cardstock: Heavy Weight White, Light Blue, 
Green, Medium Blue
Martha Stewart Brand: Pattern Paper - Green Plaid

Thank you for stopping by the blog today, I hope you found some inspiration.

School Cards With White Rose Crafts LLC

Hello Crafty Friends - I am here with some School Cards.

Most of our children have started or will be starting school soon. I thought it would fun to create a few cards to inspire them to back into school.

Card # 1 Learn Full Tutorial


Let's get started.

I gathered the components for the card. 
I stamped and colored the Ruler, & Pencil. I also stamped the Notebook paper 3x and added a few of the mini sentiments, math problem and letter grade to the paper. I trimmed the pattern paper and card front panel. I die cut a File Folder from yellow cardstock for some finishing touches I used some Gold stars, paper clip & chipboard tag.

 Next, I start layering the blue star pattern paper and a red cardstock onto the card front panel. Then, I layered the Ruler to cover the seams of the other papers.


I tucked two of the notebook papers into the little file folder. I added a bit of adhesive to make sure they don't move. Then, I added a paper clip. Place some foam adhesive to the back of the folder and placed it onto the card front. Next, I added the chipboard tag.


Then, I added a bit of foam adhesive onto the notebook paper with all the stamped mini sentiments and layered on the file folder. Next, I adhered the pencil toward the bottom of the notebook paper. For finishing touches, I added 3 gold stars.


Materials Used:
Woodware Collections: School Tots Stamp Set (math, ABC, school days, letter grades)
Hero Arts: Just A Note Stamp Set (Ruler & Notebook paper)
Tsukineko Memento Ink: Tuxedo Black
Recollections Brand Cardstock:  White, Red, & Yellow 
Sizzix Die: File Folder
Walmart Brand: Paper Clip
Dollar Tree Brand: Gold Stars
Spectrum Noir Markers: Pencil - MG1, IG1, & FS1
Ruler: RB1 &GY1
Chipboard Tag: Unknown - for my stash


Card # 2 - Hi-Ho- Hi- Ho It's Off To School We Go!

For this card, I basically followed the steps above. I added a scalloped yellow cardstock border under the white cardstock. I stamped and colored the elements (backpack, apples, book stack, & Lunchbox) I fussy cut them and popped them up on some foam tape and placed them on the white cardstock strip. I added a bit of foam tape on the back of the white cardstock strip and added it to the card front.

I cut some fishtail banners from the pattern paper and stapled them together with Tim Holtz mini Stapler. Tuck them just under the white cardstock strip. For the sentiment, I used a sticker that I backed onto white cardstock for a firm piece. I also added a bit of foam behind it. For a finishing touch, I added some Zig Wink of Stella on the apples and some Sakura Gelly Roll White pen.

Materials Used:
Sakura Gelly Roll Pen: White
Recollections Brand Cardstock:  White, Red, & Yellow 
Tim Holtz Idea-ology: Tiny Attacher & Staples
Lawn Fawn Dies: Stitched Scalloped Borders
Spectrum Noir Alcohol Markers: 
Backpack: TB1 & TB2
Apple: DR1, DR7, RB1, LG1 & LG2
Lunch Box: LG2 & LG3
Books: CT4, OR1, LG1, TB1, DR1
Sentiment Sticker: Making Memories (old school - I know)


Thank you for stopping by the blog today - I hope you found some inspiration!

Be sure to tag us White Rose Crafts LLC on social media 
if you create a project with products or kits purchased on the 

Wednesday, August 21, 2019

Every Puppy Needs A Home with Simply Crafty SVGs

Hello Crafty Friends - I am here with a cute dog house box created SVG files from Simply Crafty SVGs.

The file is Dog House  This file like all of Simply Crafty SVGs comes with PDF as well as a video tutorial.

Here's my take on this adorable box. Perfect for give to someone who has just adopted a puppy/dog. Perhaps someone's dog has a birthday. I  am going to put breathe treats in it for my dog Echo.

I added a few more pieces to my dog house like the greenery and the fire hydrant. As well as the extra red paw on the name sign. You can customize your dog house.


Materials Used:
DCWV Pets Pattern Paper 
Heavy Weight Cardstock:
Black, Brown, Blue, Medium Gray, 
Light Gray, Pink & White
Scotch Tacky Glue 
Tim Holtz Distress Oxide inks:
Hickory Smoke & Black Soot 
Tim Holtz Distress Ink: Walnut Stain
Tiny letters 
Echo Park red paw print sticker

Thank you for stopping by the blog today. 
I hope you found some inspiration.