Wednesday, April 1, 2020

Sun Chaser Teardrop Trailer and UTV with Xyron Inc. and DCWV

Hello Crafty Friends - I am here with a fun collaboration between 
Xyron Inc.Die Cut With a View and Joann Craft Stores.

Along with a few cut files from Simply Crafty SVGs.


I created a fun box for the special people in our lives that love camping or just UTVs.

So, this would be a long post if I showed all the steps involved. 
I will link Sandy's of Simply Crafty SVGs videos for the full instructions. 
I am, however, going to show a few things.
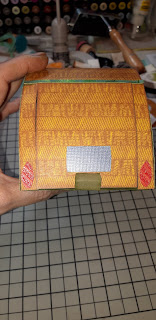
The Trailer

I started by cutting all the pieces with my Brother Scan N Cut machine. I then inked the pieces I wanted ink using a variety of Imagine Crafts Inks.

Then, I ran the pieces that needed to go through my Xyron Creative Station Lite. 

The other pieces I used my Xyron Mega Runner to adhere.

I cover the top of the trail with the same pattern paper. I added the lights and license plate. I used some older DCWV Specialty cardstock for them.
  

For the doors, I ran the inside panel through the Xyron Creative Station Lite and adhered them to the doors to cover up the sloths.
  

The complete Teardrop Trailer.

The UTV

I started by cutting all the pieces with my Brother Scan N Cut machine. I then inked the pieces I wanted ink using a variety of Imagine Crafts Inks. Then, I ran the pieces that needed to go through my Xyron Creative Station Lite

The other pieces I used my Xyron Mega Runner to adhere.
 

Now, I added a bit more support to the chairs since this is going to my son and he will be displaying in his room with an action figure in the chairs. I used a bit of thin craft foam that I cut into 1"x 3" and folded into thirds. Applying some Mega Runner to hold it's shape. I then adhered it to the inside of the chair using the Mega Runner and on the tabs. Closed up the bottom section of the chair and adhered it to the UTV.


I added all the inside panels and steering wheel, the shock suspension, lights, tires,
 flag pole and grills.


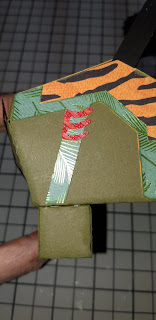
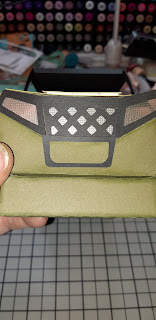
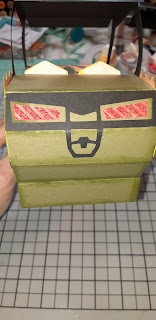
Now, the UTV is complete!

Materials Used:
Imagine Crafts Inks:

I had a blast creating these wonderful projects I hope you will give them or any projects a try. I used the fantastic Sun Chaser Collection from DCWV and Xyron Inc products for these which you can purchase at your local Joann Craft Store

Thank you for stopping by the blog today. I hope you found some inspiration!

Springtime and Happy Easter Cards with A Perfect Time To Craft

Hello Crafty Friends - I am here with some springtime and Easter cards for A Perfect Time To Craft.

This is always an Open Challenge and always "Anything Goes”.
 You're welcome to add unlimited entries per challenge and you may enter any crafting project with any theme. For full details on our rules and on how to enter, please visit our rules page.

Our prizes consist of…
1st Prize: 3 sponsor sets from the collage below, a certificate and a badge.
2nd Prize: 1 sponsor set from the collage below, a certificate and a badge.
3rd Prize: 1 sponsor set from the collage below, a certificate and a badge.
DT Favourites: a certificate and a badge.
Spotlight Winners: a certificate and a badge.

Our awesome sponsor for this month's challenge is The Hungry Jpeg
The Hungry Jpeg has generously supplied the DT with these sets for this challenge.

Here are the cards I created.

Hello Spring Card - I used Spring Flowers - Tulips

Happy Easter Card - I used Spring Meadow Graphic Set

Thank you for stopping by the blog today. I hope you found some inspiration!

Don't forget to join the challenge over on the A Perfect Time To Craft blog!


Fairy Love Shadow Box with Blank Page Muse

Hello Crafty Friends - Annie here I am Guest Designing for Blank Page Muse.

I am incredibly honored to be asked by Blank Page Muse to create a project for them. 
I created a Fairy Shadow Box.


Let's get started!

I printed the template twice onto kraft cardstock and cut it out.
Stamped and colored the Fairies and flowers.
I added some details with the Sakura Gelly Pen: Sparkle. I die cut some grass twice.

I used the Blank Page Muse: Woodgrain Background Stamp and stamped the trimmed template of the shadow box. I put adhesive on one side of the template where indicated.  
I pressed the two sides together. 
 

Next, I used my scoreboard and scored on the indicated lines.
 I then crease the edges so that they are crisp. I set it aside.
 

Then, I used the cloud stencil and Distress ink in tumbled glass to create a background for my shadow box.  I cut the cardstock down to 5"x 5" so that it will fit in the shadow box. I then adhered it to the shadow box.

Next, I adhered the grass onto the background sky panel in the shadow box. I put some adhesive onto the box portion of the box and rolled it up and press it into place. Making sure the grass bottom was completely covered.
 

Then, I repeated the process on the other sides of the box. Tape, roll and press into place. Take your time here the box can be a bit tricky.

I then adhered two of Blank Page Muse: Small Lilly Flower with Stem in the background along with the Blank Page Muse: Fairy Seated Long Dress
 

Next, I added the Blank Page Muse: Fairy Short Hair Standing to the outer edge of the box. 
Along with the die-cut grass border. I then adhered the last
 Blank Page Muse: Small Lilly Flower with Stem to the left outer edge of the box frame. Along with all the Blank Page Muse: Small 6 Petals Flower to the bottom edge of the box frame just overlapping the Blank Page Muse: Fairy Short Hair Standing.
 

Finally, I stamped the sentiment LOVE onto a stitched banner and adhered it to the top left corner along with one of the Blank Page Muse: Small 6 Petals Flower.
Materials Used:
Blank Page Muse: Woodgrain Background Stamp
Lawn Fawn Brand: Meadow Grass Border Die
MFT Brand: Cloud Stencil
Tim Holtz Distress Ink: Tumbles Glass
Memento Ink: Espresso Truffle
VersaFine Ink: Onyx Black
Memento Ink: Tuxedo Black
Sakura Gelly Roll Pens: Sparkle, Black, and White
Spectrum Noir Markers: HB1, HB2, HB3, LV3, CT3,
CT4, GY2, LG1, LG2, LG3, LG4, LG5, CG1, IG1, IG2, 
IG3, IB1, IB2, IB3, LY2, FS1, AND Blender
Copic Markers: B00, B01, E00, E000, E93
Recollections Brand Cardstock: Kraft, Light Purple, and White
Accent Ultra Smooth 80lb Cardstock: White
EK Success Scoreboard
Bone Folder
Imagine Crafts: Tear It Tape
Imagine Crafts: On Point Glue
Shadow Box Template: Download, Print, and Cut Twice


Thank you for stopping by the blog today. I hope you found some inspiration!

Don't forget to stop by Blank Page Muse Shop!

Thursday, March 26, 2020

Happy Easter Shaker Card with Rinea and Creative Embellishments

Hello Crafty Friends - I am here with a fun and easy Shamrock shaker card.

This month Rinea Design Team is collaborating with Creative Embellishments.
I know you will be inspired by all the wonderful projects the Design Team has created.  

If you haven't heard of Creative Embellishments let me tell you a bit about them.
They create laser-cut Chipboard, Wood Veneer, and Stencils. They also have their own brand of Stamps and Flair.

This the card I created using the combined products.
Materials Used:
Evaney's Stamps and Dies: Happy Easter Bunny
Evaney's Stamps and Dies: Dig It
Nuvo Glitter Embossing Powder: Silver MoonLight
Recollections Brand 110lb Cardstock: White (card base)
Ms. Sparkle and Co. Ink: Silver Metallic
3M Tacky Glue

Let's Get Started!

I gathered all of my components. I gathered all the components to the card. 
 Along with my Xyron Creative Station LiteMs. Sparkle and Co. Silver ink, 

I then ran Rinea Silver/Silver Starstruck Foil PaperRinea Blush/Blush Starstruck Foil Paper, my sentiment which is die-cut from Evaney's Stamps and Dies: Happy Easter Bunny
using Rinea Jade/Jade Starstruck Foil Paper and white cardstock twice.

Then, I inked all the edges of the Creative Embellishments: Bunny Shaker Set using 
Ms. Sparkle and Co. Ink: Silver Metallic - this is optional but I think it gives the bunny a finished touch. Next, I inked one of the open pieces from the Creative Embellishments: Bunny Shaker Set  with the Ms. Sparkle and Co. Ink: Silver Metallic and then I put some
Nuvo Glitter Embossing Powder: Silver MoonLight and heat set it.


Next, I pressed the Rinea Silver/Silver Starstruck Foil Paper onto the base of the 
Creative Embellishments: Bunny Shaker Set and trimmed away the extra paper.
 

Then, I adhered the other open pieces to the base of the
and set aside to dry with a stamping block on top.

Next, I adhered the Rinea Blush/Blush Starstruck Foil Paper to the card base. Then, I adhered the sentiment word Easter to the bottom left corner and the Bunny base to the right top corner of the card.
 

Then, I filled the shaker with a mixer of Doodles Paper Playground Sparkle Blends. I then adhered the acetate to the base along with the embossing top.
  

Next, I adhered the little bunny face to the shaker. I die-cut them from 
Evaney's Stamps and Dies: Happy Easter Bunny. I then die-cut a carrot and butterfly from the Evaney's Stamps and Dies: Dig It using Rinea Turquoise/ Turquoise Foil Paper,
I adhered the butterfly to the top left corner and the carrot by the Easter sentiment. I adhered the sentiment Happy just overlapping the bunny using a bit of foam adhesive.
 

For some finishing touches, I added a few Sparkle Blends 
to the butterfly, to the bunny's ear and a few tiny ones by the sentiment.
Now the Happy Easter shaker card is complete!

Thank you for stopping by the blog today. I hope you found some inspiration!

Please tag us on social media if you create any project using any of our wonderful Foil Papers!
Don't forget to stop by the shop Rinea.com

Happy Easter Card with Dies R Us

Hello Crafty Friends - I am here with a simple Easter card.

I am sad that this will be my last card for Dies R Us. My term has come to an end. It's has been a great pleasure creating projects for Dies R Us. I hope that we can work together again in the future.


Let's get started!

I die cut all the components, stamped and colored the bunny.

I adhered the grass border to the bottom of my card base.


Next, I adhered the sentiment and eggs to the card base.
 
Then, I adhered the bunny using a bit of foam tape to the center of the grass. I added a bit of detail to the sentiment with the Sakura Gelly Roll pen in Sparkle as well as to the bunny's heart. For finishing touches, I added a puffy heart and two jewels by the sentiment.


Materials Used:

Lawn Fawn - My Silly Valentine Stamps

Lawn Fawn - Meadow Borders Dies

Frantic Stamper - Dies - Mixed Font Happy Birthday

Frantic Stamper - Dies - Script Spring & Easter Greetings
Paper Rose - Dies - Balloon Trio
Various small dies from my stash
Memento Ink: Tuxedo Black
Brilliance Ink: Sky Blue and Pearlescent Purple
VersaMagic Ink: Pretty Petunia and Turquoise
Spectrum Noir Markers: IG1, IG2, IG3, and CR3
Sakura Gelly Roll Pens: White, Black, and Glitter
EK Success Brand: Puffy Heart
Elle Tru Brand: Jewels
Recollections Brand 110lb Cardstock: White
Recollections Brand 65lb Cardstock: Green, Blue, Yellow, Pink, and Purple
Accent 80lb Ultra Smooth Cardstock

Thank you for stopping by the blog today. I hope you found some inspiration!

Before I write the list of the supplies I used, I wanted to share some exciting news with you. Dies R Us now has a sister store called Didi Crafts, which has warehouses located in the USA and Canada. Didi Crafts carries some of the same products as Dies R Us, but most are different and you will be able to purchase a huge variety of crafty supplies for a variety of crafts. Having this sister store means that our Canadian crafting friends won't have to worry about huge taxes or shipping fees. Isn't that great?! Go take a peek and be pleasantly surprised!


Don't forget to come and join in the fun at the Dies R Us Challenge Blog. There's a new challenge theme offered on the 1st and 15th of each month and one lucky randomly drawn winner will receive a gift voucher prize to the Dies R Us Store. For your convenience, all the important Dies R Us links are provided below.


click below for: