Friday, October 16, 2020

Slimline Pumpkin Trio Autumn Card with The Maker's Movement

Hello Crafty Friends - Annie here with a fun slimline shaker card 
featuring products from The Maker's Movement.


Video Tutorial 
https://youtu.be/T3nvvmpeT5M

Supplies Used: 
Versafine Ink: Onyx Black 
Cousin Brand Jute Cord: Golden Yellow 
Martha Stewart Brand Pattern Paper: Fall Collection
Recollections Brand 110# Cardstock: White 
Recollections Brand 65# Cardstock: Cream, Brown, & Medium Orange 
Bazzil Brand Cardstock: Golden Yellow 
Aspire Metallic Shimmer Cardstock: Copper 
Recollections Brand Glitter: Copper 
Recollections Brand Tiny Hearts & Stars Sequins: Gold, Copper & Blue

Thursday, October 15, 2020

Fall Give Thanks Card with Doodles Paper Playground

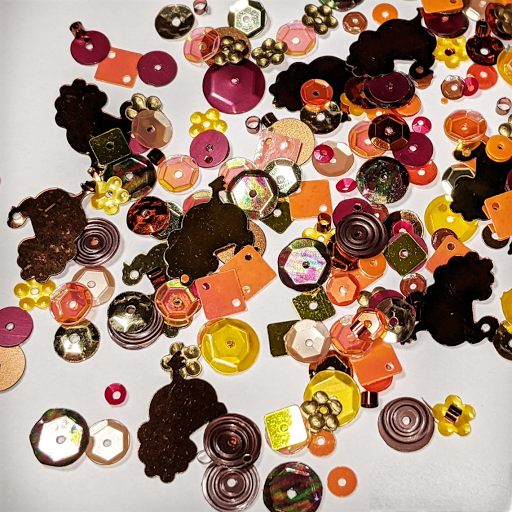
Hello Crafty Friends - I am here with a fun Fall shaker card featuring the Give Thanks Sparkle Blend.

This autumnal blend reminds me of fall foliage in warm, rich shades of gold, chocolate, orange, burgundy & champagne. Teaming with metallic, patterned and matte sequins in flat, 
cupped, square, spiral & floral shapes, the real star of this mix is the large turkey confetti shapes in metallic gold & bronze shades.

Here's the card I created.

Supplies Used:
Doodles Paper Playground: Give Thanks Sparkle Blend
Stamps by Chloe: Fancy Foliage
Memento Ink: Espresso Truffle
Memento Ink: Tanglo
Memento Ink: Pistachio
VersaMagic Ink: Pumpkin Spice
VersaMagic Ink: Gingerbread
Brilliance Ink: Coffee Bean
Versamark Ink
Copic Markers: YG25, YG63, YR02, E33, & E13
MFT Die: Fishtail Stitched Sentiment Banner
Ranger Detail Embossing Powder: Gold
Heidi Swapp Colorshine: Gold
Bazzil Cardstock: Yellow Ochre
Recollections Brand 110# Cardstock: White, Brown & Kraft
Recollections Brand 65# Cardstock: Cream
Art Glitter Glue
Maker's Movement Double-sided Adhesive Foam
Maker's Movement Clear Acetate
Sakura Gelly Roll Pen: Metallic Gold

Thank you for stopping by the blog today. I hope you found some inspiration!

Doodles Paper Playground Resident Designing Diva

Be sure to tag us Doodles Paper Playground on social media -
if you create a project with our Sparkle Blends. 

There is also a new Facebook group where you can share the
creations you have made with Sparkle Blends!
Come check it out, share some inspiration!

Secrets are Hidden Card with Lavinia World

Hello Crafty Friends - Annie here with a fun interactive card featuring products


Video Tutorial


Supplies Used: 

Other Supplies:
Bazzil Cardstock: Yellow Ochre 
Recollections 110# Cardstock: White 
Recollections 65# Cardstock: Cream, & Brown 

Thank you for stopping by the blog today. I hope you found some inspiration!

Lavinia Resident Artist Annie Collins
IG: @anniec09 

Wednesday, October 14, 2020

Sunday, October 11, 2020

Tiny Witch Hat with Rinea and Joy Clair Designs

Hello Crafty Friends - I am here with a fun and easy Halloween craft. All month long we are collaborating with Joy Clair Designs to bring you loads of inspiring projects.

I am creating a tiny witch hat prefect for your table-scape or Mantel.

Ad Tech: Multi-temp  Glue Tool
Ad Tech: Glue Sticks
Jot Brand: Foam Adhesive
EkSuccess Embossing Tool
Sizzix 4" Circle Die
Chipboard 

Let's get Started.

I die 3 - 4" circles from the Rinea Foil Paper: Starstruck Ebony/Ebony and 2 - 4" circles from thin chipboard. I also trimmed a 1/4" strip of Rinea Foil Paper: Glossy Voilet/Gold. I then insert the 3 - 4" circles of the Rinea Foil Paper: Starstruck Ebony/Ebony into my Xyron Creative Station Lite.

I apply the 3 - 4" circles of the Rinea Foil Paper: Starstruck Ebony/Ebony onto the 2 chipboard pieces. One of the chipboard pieces will be covered on both sides.

Next, I take the chipboard piece that has Rinea Foil Paper: Starstruck Ebony/Ebony only on one side and cut it in half at 2". Then, I apply a bit of hot glue to the straight end and press it on the other side; creating a cone shape.

I then, apply no hot glue to the bottom of the cone shape and adhere it to
the other 3" Rinea Foil Paper: Starstruck Ebony/Ebony circle. Making sure to center it.
 Now we have a tiny witch hat.

Then, I curl up the brim a bit to give it some fun texture. As you know a good witch hat is a bit worn and torn. Next, I apply a bit of adhesive to the strip of Rinea Foil Paper: Glossy Voilet/Gold and press it into place around the hat. Making sure to crumple it a bit.

Next, I stamped and embossing the pumpkins. I then colored them with Memento Makers. I added the sentiment and little bat cluster to the pumpkins. I fussy cut them out and gave them a bit of a curl so they would sit nicely onto the hat. I put some foam adhesive on the back of the pumpkin and placed them onto the hat. Making sure that the tall pumpkin covers the back seam of the hat.

Now, the Tiny Witch Hat is complete!


Thank you for stopping by the blog today. I hope you found some inspiration!

Don't forget to stop by the Rinea Shop to pick up some of our wonderful Foiled Paper.

Thursday, October 1, 2020

Halloween Not Scary Party with Joy Clair Designs

 Hello Crafty Friends - I am here with a few goody holders and a fun drink sign for your next Halloween party using the If You Dare Set from Joy Clair Designs.


The Couple Skull Take Out Box Treat Holder

The Zombie Reaching for a Snack Treat Holder.

The Classic Witches Brew Drink Sign.

Materials Used:
Joy Clair Designs: If You Dare Stamp Set
Simply Crafty SVG: Take Out Box
Simply Crafty SVG: 
Gina Marie Designs Dies: Circles
Gina Marie Designs Die: Stitched Labels
Recollections Brand Cardstock: Blue, Green, Yellow and White
DCWV Pattern Paper: Fall & Halloween Stack

Thank you for stopping by the blog today. I hope you found some inspiration!

Happy Halloween to The Moon with Die Cut Divas

Hello Crafty Friends - Annie here with a fun Halloween card featuring 

This Month's Theme: Autumnal projects.
 
 In the United States, we celebrate Halloween with dress-up and 
trick-or-treating so I expect to see some ghoulish, scary cards too.
Bugaboo Stamps
The prize is a $12 gift code to The Bugaboo Digi Stamps store for your digital stamps.

 Bugaboo Stamps ia leading company in digital images and we so appreciate their sponsorship and creativity.  Remember that every Friday is a Freebie Friday at Bugaboo Stamps.  

Here's my card with Skelekinz Moon


Materials Used:
Distress Oxide Ink: Wilted Violet
Distress Oxide Ink: Mermaid Lagoon
Saukura Gelly Roll Pens: Black, White & Sparkle
Memento Marker: Tuxedo Black
Recollections Brand Cardstock: Black, Yellow, Gray and White
Accent 80# Ultra Smooth Cardstock: Bright White
Copic Markers:
Moon: C2, C3, C4 & 0
Dress and Bow: BV00, BV01, & BV02
Top: YR12, YR04, YG143, & G07
Leggings: C7 & C5
Skulls: C1
Skin: E41, E30 & R30
Heart: YR12 & YR02
Stars: Y11 & Y08
Sentiment Banner: Y08
Art Glitter Glue
Jot Brand: Low profile foam adhesive

Thank you for stopping by the blog today. I hope you found some inspoiration!