Wednesday, October 17, 2018

Halloween Cards with A2Z Scrapbooking


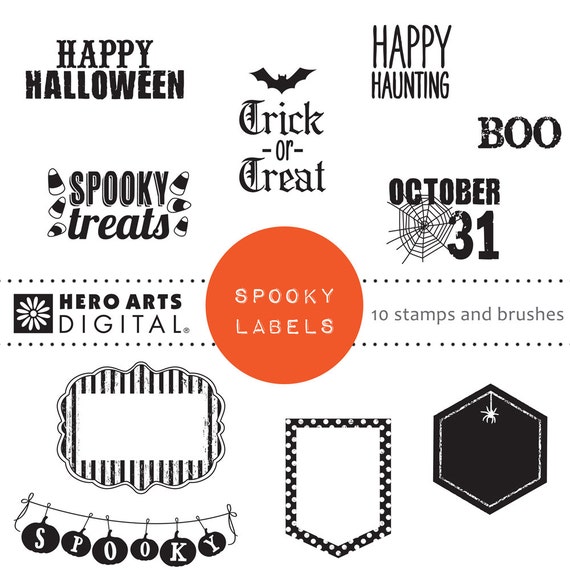
Hello Friends today I want show you I made two quick Halloween cards. They came together really quickly. I am using the Hero Arts Spooky Labels - Halloween Digital Kit . 
image 0


Now let's get started on how I created these cards.


I started by downloading and sizing the Hero Arts Spooky Labels to the size I needed for my cards. Next, I printed them onto Orange Cardstock.

Card #1 - I trimmed the banner label and ink the edges with Hero Arts Black Ink. Then, I trimmed the Trick or Treat Sentiment & the little bat also inking the edges. Next, I trimmed my card panel from green cardstock adhered it to my black cardbase.

Then, I punched a small circle at the top of the banner label and tied some black & white Baker's Twine through it. Next, I trimmed the purple cardstock just a hair smaller than the inner part of the banner label. adhered it to the banner label - then adhered the sentiment with foam adhesive on top of the purple cardstock. I added some foam adhesive to the top and regular adhesive to the rest of the of the banner label place it onto the cardbase. Now, for some finishing touches - I adhered the little bat to the banner centered at the bottom. I popped up his wings with foam adhesive for some added interest. I then place 3 enamel dots in an angle on the corners of the card.


Card #2 - I trimmed the Boo from the printed sheet. I matted it onto the holographic paper. set it aside. Next, I trimmed a card front panel from the Purple cardstock and stamped the triangles and circles onto the panel with Wilted Violet Distress ink. Then, I adhered the purple panel onto some of the holographic orange paper. I then adhered the card panel onto the dark gray cardbase. Next, Die cut the word Happy from green cardstock 3x - next I stacked and adhered each layer so I ended up with a nice thick die cut word. Then, I stamped the -for you- onto a small pieces of lime-green cardstock - I trimmed it down and fishtailed both ends.

Now, that I have all the components ready I put together my card. I adhered the matted Boo onto the purple toward the top of the panel. Next, I adhered the die cut Happy above the boo. added the for you banner underneath using a bit of foam tape. For some finishing touches I add a few enamel dots

I hope you give the Hero Arts Spooky Labels - Halloween Digital Kit .   a try. It's perfect for your quick Halloween cards.

Annie

Supplies:
  • Hero Arts Spooky Labels at A2Z Scrapbooking
  • Hero Arts Black Ink
  • Hero Arts Happy Stamp & Cut Set
  • Distress Oxide Ink - Wilted Violet
  • Recollections Brand Cardstock - Black, Dark Gray, Orange, Green, Lime-green & Purple
  • Jot Brand Holographic Paper - Orange
  • Studio G Brand Baker's Twine in Black & White
  • Gina Marie Designs Flat Mat Enamel Dots - Black, Orange & Purple
  • Scotch Brand 3M Foam  & ATG Adhesive

Kindred Stamps October Release - Christmas Kid

Hello and welcome to the Kindred Stamps October Release Hop. I am so excited to share with you the stamp called Christmas Kid.

I created two fun cards using this set.


For my first card I created the iconic shipping crate. When opened it has the Leg Lamp - This is a fun shaker card. The packing materials are made from kraft cardstock and shredded Tinsel gift filler.  


For my second card I created the stair scene with the Christmas kid. He is coming down the stairs wearing his bunny Pajamas; his Present from the aunt.  

Side view showing a close up of the Christmas Kid and the stairs. 


The entire Kindred Stamps October release will be available Friday, October 19 at 8am PST/11am EST. Be sure to check out the Kindred Stamps blog on Friday for the full product release as well as the complete line up of all the Kindred Stamps Design Team projects from release week! If you visit and comment on all of the designers' blogs this week, you could win $15 in Kindred Stamps shop credit! So join the Fan Club and release event, show the design team some love, and get ready to empty those wallets this Friday!

Friday, October 12, 2018

Doodle Paper Playground October Sparkle Blends Release

Welcome to the Sparkle Blends October Release Blog Hop for Doodles Paper Playground! This month is full of Blends that are perfect for the upcoming holiday season and beyond! The Designing Divas will be sharing projects featuring these new Sparkle Blends on their blogs and you can check out a close-up look at each of the Blends on the Doodles Paper Playground Blog.

For my card I used the New Release Boughs of Holly Sparkle Blend.


Thank you so much for hoping along with us today! Be sure to stop by the Doodles Paper Playground Blog to see the entire New Sparkle Blends release. 

Annie

GIVEAWAY: For one of 2 chances to win a full set of all 6 sample packs from this release,
 please leave comments on each leg of the hop,
including one idea of how you would use
 the Sparkle Blend used in that Designing Diva's inspiration card!


Thursday, October 11, 2018

Space Ranger with Rinea Foil Paper

Hello Friends - I am  here with another quick project for you to try out. Today, I am making a layout. I kept this one simple. Just let the photo and paper shine.

I used the Haunted Variety Crafter's Pack to create this layout. I also pulled Violet/Gold Glossy Foiled Paper to accent my photo.


Let's get started by gathering the Supplies:
Heavy Weight Cardstock - White - Recollections Brand
Thickers Alphabets - Daiquiri - in the color Leaf
Tools: Trimmer - Fiskars
Scissors - Fiskars
Die cutting Machine - Cricut - Cuttlebug
Die Cuts & More Double Stitched Stars
Momenta Dies - Single Cut Stars & Shooting Star
Scotch 3M ATG & Quick Dry Craft Glue

To create this layout I cut the Starstruck Ebony Black and the Violet/Gold Glossy Foiled Paper into 2" wide strips. I then trimmed the Starstruck Ebony to 7-1/2" long and the Violet/Gold Glossy Foil Paper to 6-1/2" long. I trimmed the Starstruck Emerald Green to 3-1/4" X 4-1/4" to mat my photo. 

Next, I used several dies from Momenta and Die Cuts & More to cut out various sized stars from Startsruck Marigold Orange,  Glossy Marigold/Gold Violet/Gold Glossy Foiled Paper. I then used Rinea Ghost InkRinea Starburst Sentiments Stamp Set and Rinea Clear Round Stamp Block to add some details to some of the stars.


The Ghost Ink lifts the color from the Foil Paper creating a two tone look. If you haven't given it a try you really should it's amazing!!

To assemble the layout - I used a 8-1/2" x 10" Heavy Weight White Carstock and  I layered the strips Starstruck Ebony Black and the Violet/Gold Glossy Foil paper and adhered them toward the bottom of my cardstock. Then, I layered my photo onto the Starstruck Emerald Green Foil Paper adhered into place. Next, I adhered the photo on top of the layered strips. I then adhered the stars around and above the photo - Creating clusters. Making sure to have the three colors of the stars spread out evenly throughout. To finish the layout I used some Thickers in Daiquiri-Leaf.

I hope you give Rinea Foil Paper a try on your next layout. It's so easy to use and it provides the prefect touch to any layout!!

Thank you for stopping by today!
 I you share your Rinea Foil Paper creations with us on Social Media!


Monday, October 8, 2018

A Girl and her Alien Go Trick or Treating with Kindred Stamps


Hello Friends today I am sharing a card with you for the New Challenge happening over on the Kindred Stamps Fan Club on Facebook. The Challenge calls for you to use a NON-holiday stamp and making a holiday project. 

This is such a cute set featuring a little Hawaiian girl and her favorite Blue alien. 

This fun duo decided to go trick or treating dressed as each other. If you know these two then you will know they are always up to something silly. 

Supplies used: Kindred Stamps -Family is Forever stamp set, Markers - Spectrum Noir, Sakura Gelly Roll White Pen 08, Zig Wink of Stella Clear Glittter Pen,  Ink - Memento Tuxedo Black, Distress Oxide: Blueprint Sketch, Cardstock - Recollections Brand: White & Black Heavy Weight and Pattern Paper - Pebbles Inc.

I add a bit of my own drawings and some trimming to create this card. I think it so silly.
 I think I want an ALIEN onesie now. 

I hope you will join us at the Kindred Fan Club Facebook page and enter your project for this challenge. We're always having some fun!

Thank you for stopping by today - Have a creative day!!

Sunday, October 7, 2018

Happy Fall with Dies R Us

Hello Friends - Today I  have a cute fall card. This card is a fun dimensional card - creating a full scene with a pull up raccoon from the pile of leaves. 


Now in the pile leaves is our friend Mr. Raccoon.

How I created this dimensional fun card. I started with a card panel - A2 size, I applied Distress Oxide Ink in Blueprint Sketch and Shaded Lilac moving from the base of the panel. Next, I sprinkled with some water and set aside to dry. I also have ready to go 2 more A2 Panels in kraft and Brown cardstock.

I then stamped the animals (Squirrel, Porcupine and Raccoon), Apple and Acorn and Leaves (from my stash - I have linked a stamp that you can use to create a leaf pile) using Memento Tuxedo black ink. i then colored the images using my Spectrum Noir Alcohol Markers. Next, I fussy cut them out - the coordinating dies are available I do not own them. Set them aside.

Then, I die cut the clouds 3x, hillsides 2x and frame from pattern paper. Next, I decided where I wanted my leaf pile and raccoon to be on the panel. I then die cut the slider from the Distress inked panel. I also cut 2 pieces of cardstock measuring 2" wide by 4-1/4" long from brown cardstock - I scored them at every 1/2"  these are for side panels. This creates 2 accordion panels.

 Now, that I have all my components it's time to put the card together. I start by cutting a simple rectangle into a card panel from kraft cardstock a bit larger than the scallop frame. I then adhered the frame to the kraft cardstock. Next, I layered  two of the clouds and adhered them to the top of the Distress inked panel. I also adhered one leaf to the panel. I flip the panel over and add foam tape to panel creating a channel for the pull slider to move freely.  I glue the piece of the slider (the part that is positive) to a thin piece of brown cardstock measuring 1/4" by 3" - this is what I glued my raccoon to - this creates a more finished look. Next, I placed it into place from the back of the Distress panel. 

Now, I adhered the accordion side panels to the distress panel. Then, I removed the foam adhesive liners and placed the Brown cardstock panel onto the back of the distress panel making sure the slider is in the channel and moving freely up and down. Next, I attached the raccoon onto the slider I just used a bit of foam tape. I then adhered a leaf on the raccoon's head. Set aside.

Then, adhere the leaf pile to one of the hillside and then adhere the hillside to one side of the accordion panel. I repeat to the other side. Again, making sure that the raccoon can move freely up and down. Next, I adhere to the back of the frame one of the cloud and the hillside. I then flipped over the frame and adhered the squirrel and porcupine to the front of the hillside. Then, gave them a acorn and apple to give to one another as a happy fall gift.  Next, I adhered the frame to the card side accordion panels I used clips to hold in place until the glue sets. I then, stamped the sentiment onto kraft cardstock adhered it to the banner die cut and added a few leaves to each side. Finishing touches- I added some sequins to 2 of the corners of the card. 


Now you have a finished dimensional Happy Fall Card.
Thank you so very much for stopping by today be sure to share your creations with us!!  


Products Used:

Lawn Fawn Forest Feast 


Inks:


Don't forget to come join in the fun at the Dies R Us Challenge Blog.

Saturday, October 6, 2018

Around The World Cardmaking Day - My Creative Space with Joy Clair

Hello Friends - Thanks for stopping by today. I am sharing with you a bit of my crafty space. This is the view of my craft table. I am very fortunate to have an entire room to craft in but, unfortunately we had to do some repairs to our home to fix our AC unit which has a adjoining wall to my room. so I won't to able to share the rest of my room because it's a hot mess.

This is the table were I do all my cards and layouts. It's a 6 foot long table. which gives me plenty of room to spread out. Sometimes I do just that. I am only showing you a 3' area because I have other Design Team work on the other side.

My inks are stored in an recycled cassette tape holder. Alcohol markers are stored in a marker tower by Crafter's Companion. My other markers and pens are stored in a Recollections marker storage. I have over the sink self - I painted turquoise to raise things of my desk. I have plenty of baskets to hold my Nuvo Drops, Liquid Pearls and mini ink pads. I have plenty of light throughout my room. A few cute stamps to inspire me.

I have a desk with my computer and printer to the left of this table. Also behind my chair I have another table with my Brother Scan n Cut & Silhouette Cameo. A wall of storage behind that not pictured. Strange things I have in my craftroom - a collection of Sugar Skulls. Fun things I have in my craftroom - Funko Pop Figures - All the Animanics (Yakko, Wakko and Dot), Bob Ross, Groot & Rocket Raccoon and a Minion. Also a collection of cameras.

I hope you enjoyed this quick peek into my creative space. Thanks for stopping by!!