Wednesday, February 26, 2020

Leprechaun Hat with Rinea

Hello Crafty Friends - Annie here with a fun decoration for St. Patrick's Day!

This cute Leprechaun Hat is perfect for your table decore or mantle.  It's small enough for a child to wear while watching your local parade.

I used a cut file from Simply Crafty SVGs for the hat called you guessed it Leprechaun Hat. Along with some of our wonderful Rinea Foil Paper.

Materials Used
Recollection Brand 65lb Cardstock: Emerald Green & White
Xyron Creative Station Lite
Scotch 3M Craft Glue
Brother Scan N Cut Electronic Machine

Let's get started!

I start by downloading and cutting all the pieces of the Leprechaun hat using the Brother Scan N Cut.
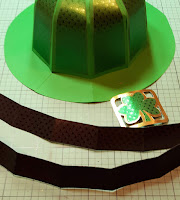
I then ran the Rinea Emerald/Emerald Starstruck Foil Paper hat panels and Shamrock,
Rinea Gold/Gold Glossy Foil Paper hat buckle through the Xyron Creative Station Lite. 

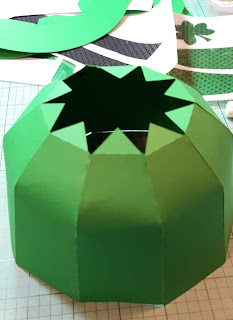
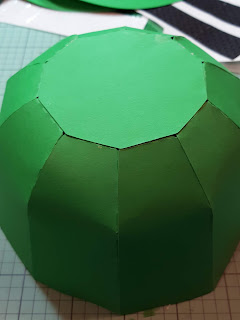
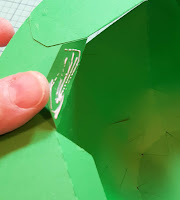
I then start adhering the hat base panels together. I apply a bit of adhesive to the tabs and then press the next panel onto the tabs. I continue this for all ten panels. Until I form the crown of the hat.
 

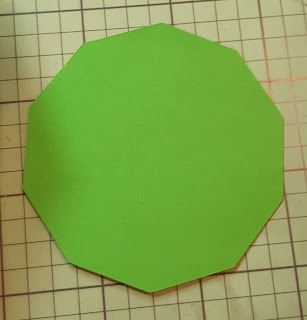
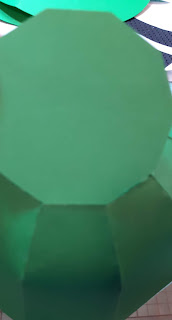
Next, I adhered the top panel of the crown to close it off.  I add some adhesive to one of the tabs and attach the top panel. Once, attached I continue to add adhesive to the rest of the tabs and pressing the top panel into place. I flip the hat over and press the tabs from the inside against the table to make sure they are secure.
  

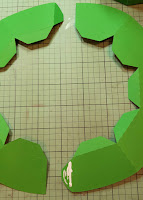
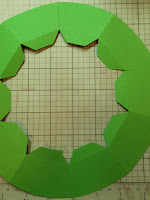
Then, I form the brim of the hat.  I add a bit of adhesive to one of the tabs. I press the two panels together. You will have a ring.
  
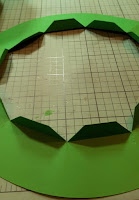
I then flip the crown upside down and attach the brim to it. I add a bit of adhesive to one of the tabs and press onto the inside of the crown. I then move to an opposite tab to repeat the process. I continue all around the brim until it's completely attached to the crown. 
  

Next, I flip the hat right side up and start attaching the Rinea Emerald/Emerald Starstruck Foil Paper hat panels. I take my time to center each panel on the hat. You should have a nice border all around each  Rinea Emerald/Emerald Starstruck Foil Paper hat panels.


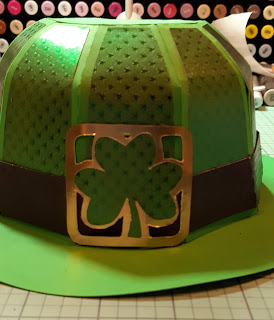
Then, I attach the two pieces of the hatband which I have cut from Rinea Ebony/Ebony Starstruck Foil Paper and plain white cardstock*(you don't have to do this I just wanted it to have more firmness). I then add some adhesive to the back of the hatband in a few sections and press onto the hat. Making sure to leave a bit of space at the base of the brim. Next, I layer the Shamrock which I have cut from Rinea Ebony/Ebony Starstruck Foil Paper onto the buckle which I have cut from Rinea Gold/Gold Glossy Foil Paper. I attached the buckle onto the hatband using some tiny Zot Dots. 


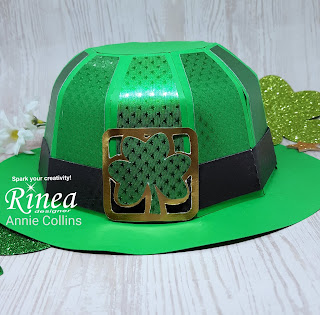
Now, the little Leprechaun Hat is complete! 
Ready to be displayed in your home or office. 
 

Thank you for stopping by the blog today. I hope you found some inspiration!

Please tag us on social media if you create any project using any of our wonderful Foil Papers! Don't forget to stop by the shop Rinea.com

Saturday, February 22, 2020

Yarn Ball Shaker Card with Doodles Paper Playgroung

Hello Crafty Friends - I am here with a fun shaker card featuring the New Release
 Sparkle Blend from Doodles Paper Playground called Grandma's Sweater

this bold blend may seem like a cacophony of color, 
but the rich jewel tones of this blend makes 
it a perfect choice for winter, spring, summer & fall projects alike.
 A simple blend of mostly cupped sequins in assorted sizes and finishes, 
its the hidden gems like flat red sequins printed with stars, 
dark red bugle beads and iridescent seed beads that really lend interest to this unique blend.

Here's the card I created

Materials Used:
Dare to be Artzy Stamp: Spit Happens
Maker's Movement: Circle Versa Dies Set
Fiskars Embossing Plate: Basket Weave
Tsukineko/Imagine Crafts Memento Ink: Tuxedo Black
Tsukineko/Imagine Crafts Memento Ink: VersaFine Clair: Nocturne
Imagine Crafts: Tear It Tape
Maker's Movement: Double-sided Adhesive Foam
Recollections Brand 110lb Cardstock: Kraft
Recollections Brand 65lb Cardstock: Blue Turquoise  
Recollections Brand 65lb Specialty Cardstock: Kraft Dot
Accent Brand 80lb Ultra Smooth Cardstock: Bright White
Acetate

Thank you for stopping by the blog today. I hope you found some inspiration!

Be sure to tag us Doodles Paper Playground on social media -
if you create a project with our Sparkle Blends. 

There is also a new Facebook group where you can share 
creations you have made with Sparkle Blends!
Come check it out, share some inspiration!

Friday, February 21, 2020

Springtime Vardo with Simply Crafty SVGs

Hello Crafty Friends - I am here with a fun Springtime Vardo.

I used Simply Crafty SVGs cut file called you guest it Vardo
Followed the YT video created by the owner of Simply Crafty SVGs 
She gives you super easy to follow instructions. If you prefer and written version of the instruction you can always refer to the PDF that is provided with the purchase of the file. 

What is a Vardo:
A vardo (also wag(g)on, living wagon, van, and caravan) is a traditional horse-drawn wagon used by British Romani people as their home. Possessing a chimney, it is commonly thought of as being highly decorated, intricately carved, brightly painted, and even gilded. The British Romani tradition of the vardo is seen as a high cultural point of both artistic design and a masterpiece of woodcrafters art. The heyday of the living wagon lasted for roughly 70 years, from the mid-1800s through the first two decades of the twentieth century. Not used for year-around living today, they are shown at the Romanichal horse fairs held throughout the year, the best known of which is Appleby Horse Fair.

This is my take of the Vardo.


Materials Used:
Craft Smart Embossed Cardstock: Bright Blue and Pastel Green
Rinea Foil Paper: Silver/Silver Starstruck
Recollections Brand 80lb Cardstock: Kraft, Light Pink, Dark Pink,
 Light Purple, Dark Purple, Light Green, Dark Green, and Light Blue
Recollections Brand: Vellum
Recollections Brand: Today, Tomorrow and Forever Collection
Tim Holtz Distress Oxide Inks: Gathered Twigs, Broken China, 
Cracked Pistachio, and Fossilized Amber 
Heidi Swapp Stamp: Woodgrain
Maker's Movement Brand Die: Petite Posies Set
Evaney Stamps and Dies Brand: Dig It set
Recollections Brand: Brads
Aleene's Tacky Glue
Brother Scan N Cut Machine

Thank you for stopping by the blog today. I hope you found some inspiration!

Be sure to join the Simply Crafty SVGs Creators FB Group and share your creations with us.

Thursday, February 20, 2020

A Little Kindness Card With Dies R Us

Hello Crafty Friends - I am here with a cute and easy card featuring Poppy Stamps and Dies.


Let's get started!

I gathered all the materials for the card. 


I die cut all the components and trimmed my cardstock and pattern paper. I die cut the trees twice.
I stamped my sentiment onto white cardstock. I matted the light blue cardstock onto the yellow pattern paper. 
 
Then, I adhered the green hill to the panel. Next, I adhered the light green trees onto the dark green trees. I wanted a lighter feel to the tree.
  

Next, I put the little sheep together. I used foam adhesive on the back of the sheep's body. I inlayed the head of the sheep. Then, I attached the legs with a bit of liquid and foam adhesive. Next, I adhered the hair and ears. 
  

Then, I used the Gelly Roll Pen in glitter to make small u shapes and dots on the sheep's body. I used a white Gelly Roll pen for the eyes.

I removed the backing from the adhesive and pressed the sheep into place. 
I adhered the card front panel to the card base.
 
Next, I adhered the flowers and the sentiment to the card panel. Then, I added a drop in each flower center of Nuvo Crystal Drops in pale gold.

Now, the card is complete!

Materials Used:
Poppystamps -Dies - Simple Sheep

Poppystamps - Dies - Sloping Hillside

VersaFine Clair Ink Pad - Nocturne
See the source image
Gelly Roll Pens - Clear Glitter - Set of 2

Gelly Roll Pens - White - Set of 3
DCWV Pattern Paper
Recollections Brand 110lb Cardstock: White and Black
Recollections Brand 65lb Cardstock: Dark Green, Light Green, and Light Blue


Thank you for stopping by the blog today. I hope you found some inspiration!


Before I write the list of the supplies I used, I wanted to share some exciting news with you. Dies R Us now has a sister store called Didi Crafts, which has warehouses located in the USA and Canada. Didi Crafts carries some of the same products as Dies R Us, but most are different and you will be able to purchase a huge variety of crafty supplies for a variety of crafts. Having this sister store means that our Canadian crafting friends won't have to worry about huge taxes or shipping fees. Isn't that great?! Go take a peek and be pleasantly surprised!

Don't forget to come and join in the fun at the Dies R Us Challenge Blog. There's a new challenge theme offered on the 1st and 15th of each month and one lucky randomly drawn winner will receive a gift voucher prize to the Dies R Us Store. For your convenience, all the important Dies R Us links are provided below.


click below for:


Mini Card and Envelope with the Maker's Movement

Hello Crafty Friends - I am here with a cute and easy mini-card with a matching envelope.

I am using products from the Maker's Movement the Special Delivery Die Set.

This die set creates the most adorable mini card and envelope. 
You can make them for any occasion. Just change your paper and cardstock.

I have a full tutorial video linked below.

YT Video

Materials Used:
Imagine Crafts Memento Dew Drop Ink: Rose Bud
Imagine Crafts Dew Drop Ink: London Fog
Imagine Crafts: Tear It Tape
Imagine Crafts: On Point Glue
G.C.D. Design: Cloisonne Pattern Paper
Recollections Brand 65lb Cardstock: Fushcia, Light Pink, Light Gray, White 
Bone Folder
Jewels: Elle Tru: Medium Pink, Light Pink, and White

Thank you for stopping by the blog today I hope you found some inspiration!