Showing posts with label Imagine Crafts. Show all posts

Friday, February 11, 2022

Love Ya Man Card with Imagine Crafts

Hello Crafty Friends - Annie here with a masculine valentine's day card
 featuring some Imagine Crafts products.

Video Tutorial


Supplies Used:
Recollections Brand 110# Cardstock: White
Recollections Brand 65# Cardstock: Teal
Strathmore Bristol Smooth Cardstock
Heidi Swapp Stencil: Heart
Amazon Brand Stencil: Tye Dye Heart
Heart Faceted Heart Teal
Tiny Gold Hearts

Thursday, December 16, 2021

Merry Christmas Card with Imagine Crafts

Hello Crafty Friends - Annie here with a quick and easy stenciled Christmas Card 
featuring a variety of Imagine Crafts Products.

Video Tutorial

Supplies Used:
Simon Hurley Stencil: Jumbo Poinsettia Maker
Memory Box Dies: Merry Christmas
Accent 80# Ultra Smooth Cardstock: Opaque White
Recollections Brand 110# Cardstock: White
Aspire Shimmer Petallic 100# Cardstock: Gold
Recollections Brand: Autumn Breeze Collections (green plaid paper)
Jewels: Red, Green & Gold
Post It Tape
Pixie Spray

Thank you for stopping by the blog today. I hope you found some inspiration!

Saturday, November 13, 2021

Thanks Card with Imagine Crafts

Hello Crafty Friends - Annie here with a simple thanks card perfect for

the Thanksgiving holiday or for any occasion.


Supplies Used
Stampendous Stamp: Shapely Vase
Maker's Movement Thanks Die
Gel Press 6x6
Accent 80# Ultra Smooth cardstock: Opaque White
Recollections Brand Cardstock: 110# White, 65# Cream and 80# Dark Green
Recollections Brand Rhinestones: Gold and Violet

Imagine Crafts Resident Guest Artist
Annie Collins

Monday, June 1, 2020

Hope Your Day is Fun - Interactive Card with Maker's Movement

Hello Crafty Friends - I am here with this cute and fun card
using a variety of Maker's Movement Products.


Here is the card I created.
You can see the tutorial linked below on how I created this fun card.


Materials Used:
Lawn Fawn Pattern Paper: Spring Fling 
Lawn Fawn Stitched Hillside Border Dies 
MFT Brand: Stitched Fishtail Sentiment Die 
Doodles Paper Playground Sparkle Blends: Hey Chickie 
Xyron Creative Station Lite 
Tsukineko/Imagine Crafts Inks: Memento Tuxedo Black, 
Versa Magic: Turquoise Gem, Versa Magic: Mango Madness,
and Versafine Ink: Onyx Black 
Sakura Gelly Roll Pens: Metallic Gold and Sparkle 
Copic Markers: Y04, Y11, Y13, Y17, C1, C2, B23, B32, BG13, 
BG15, RV11, RV13, BV01, BV02, and YG17 
Accent Ultra Smooth 80lb Cardstock: Bright White 
Recollections Brand 110lb Cardstock: White

Video Tutorial - Be sure to follow me on YouTube.


Thank you for stopping by the blog today. I hope you found some inspiration!

Wednesday, March 11, 2020

Shamrock Shaker Card with Rinea and Creative Embellishments

Hello Crafty Friends - I am here with a fun and easy Shamrock shaker card.

This month Rinea Design Team is collaborating with Creative Embellishments.
I know you will be inspired by all the wonderful projects the Design Team has created.  

If you haven't heard of Creative Embellishments let me tell you a bit about them.
They create laser-cut Chipboard, Wood Veneer, and Stencils. They also have their own brand of Stamps and Flair.

This the card I created using the combined products.
Materials Used:
Recollections Brand 110lb Cardstock: White (card base)
Recollections Brand 65lb Cardstock: Green
Darice Brand Twine: Green and White

Let's Get Started!

I gathered all the components to the card. 
 Along with my Xyron Creative Station Lite and

I start by inking* all the edges of my Creative Embellishments: Shamrock Shaker Set.
I set them aside to dry.
  

Then, I inked the words good luck from the
 I then set them aside to dry.
  

the sentiment, and the open shaker components through the Xyron Creative Station Lite
  

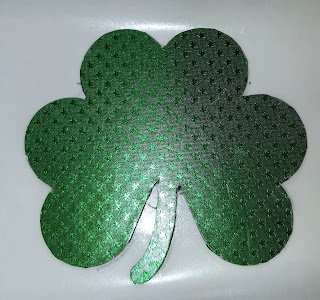
Then, I pressed the Rinea Emerald/Emerald Starstruck Foil Paper onto the solid part of the 
Creative Embellishments: Shamrock Shaker Set which is the bottom of the shaker. I then trimmed the extra Rinea Emerald/Emerald Starstruck Foil Paper away leaving the base covered. I did the same thing with one of the open shamrock pieces creating the top of the shamrock.
 

Next, I pressed the Rinea Gold/Gold Starstruck Foil Paper onto the green cardstock which is 
cut to 4-1/4" x 5-1/2. Then, I adhered the shamrock base onto the card front panel. 
I slid the twin under the stem of the shamrock. Next, I stacked the open shamrock pieces onto 
 

I filled the Creative Embellishments: Shamrock Shaker Set with a mix of
Doodles Paper Playground Sparkle Blend: Gold Rush. Then, I adhered the acetate piece to the shaker. Followed by the top piece of the shamrock. I then tied a bow on the stem and adhered the sentiment in place. Adhered the card front panel to my card base and the card is complete.

Thank you for stopping by the blog today. I hope you found some inspiration!

Please tag us on social media if you create any project using any of our wonderful Foil Papers!
Don't forget to stop by the shop Rinea.com

Wednesday, February 26, 2020

The Sweetest Card with White Rose Crafts LLC

Hello Crafty Friends - I am here with a cute card featuring Lawn Fawn's Sweet Flavor Stamp Set.


Let's get started!

I gathered all the materials I needed for the card. I stamped and colored the ice creams 5 times. I stamped and color one little heart. I stamped the sentiment along with a cherry. I trimmed them all out. Then, I trimmed my pattern paper and layering cardstock. 

I adhered the Kraft cardstock to my card base then, the mint green cardstock followed by the sprinkle pattern paper. 

Next, I adhered the ice cream cones. I pop up the Mint Chocolate Chip Cone because it's my hubby's favorite flavor and this card is for him. I adhered the little heart to the cone and I also stamped a little face on the ice cream.
 

I colored the cherry and matted the sentiment with some mint cardstock. I used some foam adhesive on it and pressed it into place.

Now, the card is complete!
Materials Used:
DCWV: Good Eats Collection- Sprinkle Paper
Recollection Brand 110lb Cardstock: White
Recollections Brand 65lb Cardstock: Mint Green and Kraft
Accent Ultra Smooth 80lb Cardstock
Paper Studios Brand: Paper Trimmer
Tim Holtz Stamping Platform
Spectrum Noir Markers: MG1, DR1, DR6, 
AG1, EB1, EB3, TYN1, TN3, Blender

Thank you for stopping by the blog today. I hope you found some inspiration!

I hope you will join us over at the White Rose Crafts Gallery FB Group.

Be sure to tag us White Rose Crafts LLC on social media 
if you create a project with products or kits purchased on the 

Saturday, February 22, 2020

Yarn Ball Shaker Card with Doodles Paper Playgroung

Hello Crafty Friends - I am here with a fun shaker card featuring the New Release
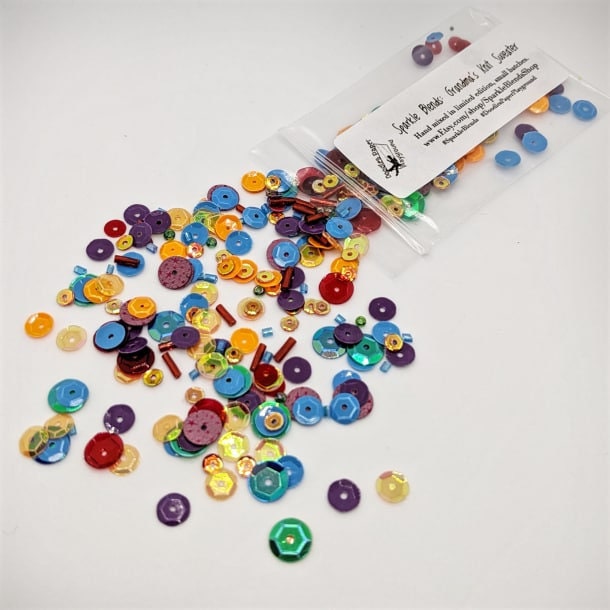
 Sparkle Blend from Doodles Paper Playground called Grandma's Sweater

this bold blend may seem like a cacophony of color, 
but the rich jewel tones of this blend makes 
it a perfect choice for winter, spring, summer & fall projects alike.
 A simple blend of mostly cupped sequins in assorted sizes and finishes, 
its the hidden gems like flat red sequins printed with stars, 
dark red bugle beads and iridescent seed beads that really lend interest to this unique blend.

Here's the card I created

Materials Used:
Dare to be Artzy Stamp: Spit Happens
Maker's Movement: Circle Versa Dies Set
Fiskars Embossing Plate: Basket Weave
Tsukineko/Imagine Crafts Memento Ink: Tuxedo Black
Tsukineko/Imagine Crafts Memento Ink: VersaFine Clair: Nocturne
Imagine Crafts: Tear It Tape
Maker's Movement: Double-sided Adhesive Foam
Recollections Brand 110lb Cardstock: Kraft
Recollections Brand 65lb Cardstock: Blue Turquoise  
Recollections Brand 65lb Specialty Cardstock: Kraft Dot
Accent Brand 80lb Ultra Smooth Cardstock: Bright White
Acetate

Thank you for stopping by the blog today. I hope you found some inspiration!

Be sure to tag us Doodles Paper Playground on social media -
if you create a project with our Sparkle Blends. 

There is also a new Facebook group where you can share 
creations you have made with Sparkle Blends!
Come check it out, share some inspiration!

Thursday, February 20, 2020

A Little Kindness Card With Dies R Us

Hello Crafty Friends - I am here with a cute and easy card featuring Poppy Stamps and Dies.


Let's get started!

I gathered all the materials for the card. 


I die cut all the components and trimmed my cardstock and pattern paper. I die cut the trees twice.
I stamped my sentiment onto white cardstock. I matted the light blue cardstock onto the yellow pattern paper. 
 
Then, I adhered the green hill to the panel. Next, I adhered the light green trees onto the dark green trees. I wanted a lighter feel to the tree.
  

Next, I put the little sheep together. I used foam adhesive on the back of the sheep's body. I inlayed the head of the sheep. Then, I attached the legs with a bit of liquid and foam adhesive. Next, I adhered the hair and ears. 
  

Then, I used the Gelly Roll Pen in glitter to make small u shapes and dots on the sheep's body. I used a white Gelly Roll pen for the eyes.

I removed the backing from the adhesive and pressed the sheep into place. 
I adhered the card front panel to the card base.
 
Next, I adhered the flowers and the sentiment to the card panel. Then, I added a drop in each flower center of Nuvo Crystal Drops in pale gold.

Now, the card is complete!

Materials Used:
Poppystamps -Dies - Simple Sheep

Poppystamps - Dies - Sloping Hillside

VersaFine Clair Ink Pad - Nocturne
See the source image
Gelly Roll Pens - Clear Glitter - Set of 2

Gelly Roll Pens - White - Set of 3
DCWV Pattern Paper
Recollections Brand 110lb Cardstock: White and Black
Recollections Brand 65lb Cardstock: Dark Green, Light Green, and Light Blue


Thank you for stopping by the blog today. I hope you found some inspiration!


Before I write the list of the supplies I used, I wanted to share some exciting news with you. Dies R Us now has a sister store called Didi Crafts, which has warehouses located in the USA and Canada. Didi Crafts carries some of the same products as Dies R Us, but most are different and you will be able to purchase a huge variety of crafty supplies for a variety of crafts. Having this sister store means that our Canadian crafting friends won't have to worry about huge taxes or shipping fees. Isn't that great?! Go take a peek and be pleasantly surprised!

Don't forget to come and join in the fun at the Dies R Us Challenge Blog. There's a new challenge theme offered on the 1st and 15th of each month and one lucky randomly drawn winner will receive a gift voucher prize to the Dies R Us Store. For your convenience, all the important Dies R Us links are provided below.


click below for: