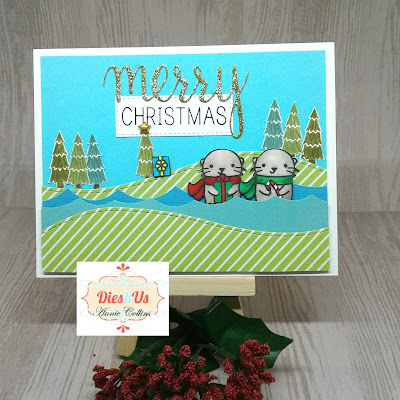
Hello Crafty Friends - Annie here with a cute Christmas card. Featuring Lawn Fawn stamps. I combine two set to create this card.
Don't be afraid to combine stamp sets to create your next card.
* Please Note - that in the images below the finished card is shown next to the supplies and the pattern paper is different. I did an update on my laptop and it died. My system crashed and I lost a lot of the images I was needing for this tutorial. I didn't want to re-create the card so I just cut other paper and have images from a previous coloring. Thank you for understanding.
I started by gathering my supplies. Then stamping and coloring the images of the Otters, gifts and candy cane. I only 2 gifts. I also stamped several trees in 3 different colors of Distress Oxide inks.
I then fuzzy cut the images. Next, I tucked in the otters arms a gift and candy cane.
and set them aside.
Next, I die cut 2 stitched hillsides from green pattern paper and 2 waves from two shades of blue cardstock. I also trimmed light blue cardstock for the card front panel as well as a A2 card base.
Then, on the stamped trees I add some details - small flicks of the Peel Paint marker on the pine trees and colored in the trucks with Vintage Photo.
Next, I adhered the medium blue wave. Then, the otters were adhered using low profile foam tape. Next, the light blue wave was adhered using low profile foam tape. Finally, the other hillside as adhered to the wave.
Then, I die cut the word Merry and stamped the word Christmas onto a stitched rectangle piece of white cardstock. Next, I adhered the rectangle sentiment to the top center of the panel. Then, the Merry just overlapping the rectangle.
Next, I adhered the front panel to the card base leaving about an 1/8" around. Now your card is complete.
Supplies Used:
Stamps
Lawn Fawn - Winter Otter Stamp


Dies


Inks
Tim Holtz - Distress Oxide


Markers
Tim Holtz Distress Markers


Spectrum Noir Alcohol Markers
Papers
American Crafts Pattern Paper - Green & White Strip
Recollections Brand Heavy Weight Card Stock
White, Light Blue, Medium Blue & Gold Glitter
Embellishments
Ms. Sparkle & Co. Brand Gold Star
Don't forget to come join in the fun at the Dies R Us Challenge Blog. There's a new challenge theme offered on the 1st and 15th of each month and one lucky randomly drawn winner will receive a gift voucher prize to the Dies R Us Store. For your convenience, all the important Dies R Us links are provided below.

Thanks for stopping by!


No comments:
Post a Comment