Hello Crafty Friends - I am here with a fun interactive Halloween card.
I cute way to send a little Halloween love to a loved one.


Let's get started

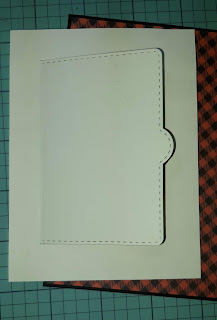
I start by stamping, coloring and cutting the images. I then trimmed my cardstock the black to 4-1/4" x 5-1/2" the cream to 3-1/4" x 5". I trimmed the pattern paper to 4" x 5-1/4". Next, I die cut the flap into the cream cardstock. I also die cut the letters for the word BOO.
I wanted to show you how I made the leaves. I stamped the image onto white cardstock. I then used Distress Oxide ink to color the leaves. I then did a few water droplets onto the leaves. I went over all my images with an EK Success Pen for a bolder black outline.


Then, I adhered the pattern paper onto the black cardstock. I then placed foam adhesive on the black of the cream flip cardstock. I centered it onto the pattern paper. (make sure not to get any adhesive near your flip-up panel)
 .
. 
Next, I ran my images and letters through the Xyron 3" sticker maker. I then placed the leaves on the inside of the flap. Then the pumpkin and followed by the ghost. Creating a little tower.


I closed the flap over and placed the word BOO on the flap. I also stamped onto a strip of cream cardstock the sentiment YOU MORE and fishtailed the ends. I adhered the strip onto some pattern paper and fishtailed the ends. I adhered the sentiment strip with some low profile foam tape.

For finishing touches, I added an enamel dot and stars to the top right and bottom left corners.
I also added a bit of Nuvo Glitter Drops onto the ghost, pumpkin, and leaves.

Now the card is complete!


Materials Used:
Spectrum Noir Markers:
Pumpkin: BO1, BO2, BO3, JG3 & DG4
Ghost: BT1 and Blender
Memento Ink: Tuxedo Black
Pebbles Inc: Black and Orange Pattern Paper
Recollections Brand Cardstock: Black, Cream and White
Fiskars/Cloud 9: Rain Dots Halloween
Nuvo Glitter Drops: White Blizzard
Xyron 3" Sticker Maker
Xyron Mega Runner
Thank you for stopping by the blog today I hope you found some inspiration!
Don't forget to come and join in the fun at the Dies R Us Challenge Blog. There's a new challenge theme offered on the 1st and 15th of each month and one lucky randomly drawn winner will receive a gift voucher prize to the Dies R Us Store. For your convenience, all the important Dies R Us links are provided below.


1 comment:
Post a Comment