Showing posts with label Brutus Monroe. Show all posts

Friday, February 24, 2023

You're My Cup Of Tea Mini Slimline Card with Brutus Monroe

 Hello Crafty Friends - I am here with a mini slimline card featuring 
the Mixed Media Stencil Best China and the Tea Party stamp set.

Supplies Used:
Copic Markers

First, I die cut the card front panel 2-3/4" x 5-3/4". Then I masked the upper portion of the panel. Next, I placed the panel onto my Stick & Stamp Mat and place the Mixed Media Stencil Best China on top of the panel. I then spread some Peach Bellini Velveteen Glaze over the stencil. I removed the stencil and the panel for the Stick & Stamp Mat.  Next, I removed the mask, washed the stencil and set the panel to dry.

While, The panel was drying I stamped the teapot and teacup images from 
the Tea Party stamp set using Raven Detail Ink. I colored the images with some Copic markers. I also stamped the sentiment. Once, the panel was dry I adhered it to the mat and the card base. Next, I adhered the teapot and teacups using some foam adhesive and matted the sentiment and adhered it with foam adhesive to the top left corner. As a finishing touch I added a few pearls and gems.


Thank you for stopping by the blog today. I hope you found some inspiration!


Wednesday, January 18, 2023

Sweet Donut Card with Brutus Monroe

Hello Crafty Friends - Annie here with a fun donut themed card to let someone special how Sweet they are!


I started by gathering up all the supplies for my card. 

1. I ink up the first layer of the donut with Distress Oxide Ink: Vintage Photo
Brutus Monroe: Chroma Glaze - Copper through the stencil next layer I chose the swirl design of the stencil.

2. Then, I set the donuts as side to let Chroma Glaze dry- about 3 minutes. Once dry I trimmed the donuts from the cream cardstock. Even the centers of the donuts.

3. Next, I stamped the sentiment onto the pink cardstock layer. I used the
 Brutus Monroe: Sprinkled With Love 6x8 Stamp Set the eclair icing and sweet sentiment with Brutus Monroe: Detail Ink Raven. I then adhered all the layers onto the cardbase which is made from Brutus Monroe: Not Your Mama's Cardstock. Next, I adhered the donuts the purple and coral donuts directly onto the card front and the Copper- aka - chocolate donut I popped up using foam dots in the center just overlapping the other donuts.

I finished the card with a bit of white gel pen as a highlight to the sentiment. A few of silver and pink sequins.

Now, The card is complete!

Thank you for stopping by the blog today. I hope you found some inspiration!

Monday, January 2, 2023

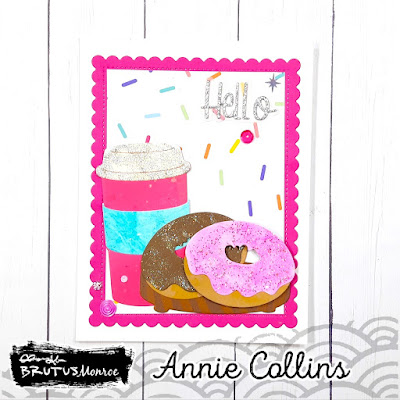
Hello Donut Card with Brutus Monroe

Hello Crafty Friends - Annie here with a fun donut themed card to bring a bit of joy into anyone's life.


I started by gathering up all the supplies for my card. 

1. I sprayed the Chroma Mist onto some Not Your Mama's cardstock in Coral, Pink and Turquoise. I sprayed some Chroma Mist in Bumble Bee Yellow onto a piece of Kraft cardstock. Set aside to dry.

2. Then, once all my pieces were dry I die cut all my piece using the Breakfast Buddies die set. I die cut the sentiment from our Glitter Silver Cardstock and Vellum.

3. Next, I added some Glitter Glaze-Silver to the Lid of the coffee cup. I added Glitter Glaze - Fallen Snow to the chocolate part of the donut die cut piece, and Glitter Glaze -Emma's Pink onto the Pink die cut piece. 

4. Then, I cut a panel from one of the pattern paper from The Sprinkled With Love 6x6 Pad to layer onto a die cut a panel of dark pink cardstock from my stash. I adhered those together then onto the card base. I adhered all the die pieces to create the coffee cup and donuts. I then adhered the coffee cup, donuts and a litter tray I die cut from the Tier Tray die set. I used Bearly Art Glue and Foam dots to adhere all the pieces and the sentiment.

Now, The card is complete!

Thank you for stopping by the blog today. I hope you found some inspiration!

Saturday, February 19, 2022

Easter Blessing Card with Brutus Monroe

Hello Crafty Friends - Annie here with an Easter card featuring 
the Mixed Media Stencil Blanket of Blooms.

Video Tutorial


Supplies Used:
Foam tape
 Recollections Brand 110# Cardstock: White 
Recollections brand 65# Cardstock: Light Green and Medium Blue 

Brutus Monroe Inspiration Team Member 
Annie Collins

Friday, February 4, 2022

Chick, Chick Hooray Card with Brutus Monroe

Hello Crafty Friends - Annie here with a quick and easy Easter card featuring
the Stamp of the Month - Called Chick, Chick Hooray.


Video Tutorial


Supplies Used:
 Gina K Designs Dies: Master Layout Layout #4 
TLC Designs Die: Grass 
Recollections Brand 110# Cardstock: White 
Recollections Brand 65# Glitter Cardstock: Purple 


Brutus Monroe Inspiration Team
 Annie Collins

Monday, January 10, 2022

Love Card with Brutus Monroe

Hello Crafty Friends - I am here with a Love card for you today featuring Heart Petals die set and some Sterling embossing powder from Brutus Monroe.

Video Tutorial
Supplies Used:
Recollections Brand 110# Cardstock: White 
Recollections Brand 65# Cardstock: Medium Pink 
Tiny Pearl Pink Heart and Pinks and Gray Sequins
 Bearly Art Glue 
Foam Dots 

Brutus Monroe Design Team Member 
Annie Collins

Friday, January 7, 2022

Be Mine Shaker card with Brutus Monroe

 Hello Craft Friends - I am so honored and excited to be a part of the Brutus Monroe Design Team.

I created this fun Valentine's Day card featuring the Sweet Valentine Stamp and Die Sets


Let's get started.

I start by putting some Glitter Glaze in Periwinkle onto a piece of white cardstock that measures 4.25"x5.50"  using a palette knife. I only put it on the edges of the cardstock. 
I then put some onto a 3"x 4" piece of white cardstock - this will be for the back of the shaker. I set them aside to dry.


Next, I stamp my image onto the Brutus Monro Perfect Blend Cardstock using the Raven Ink. Then, I color my image using some Copic Markers (see below for list). I then die cut the window using the coordinating Sweet Valentine Die set . I trimmed of about an 1/8" from the sides of the panel. Next, I stamp the sentiment Be Mine in the little frame area above the cute couple.


Next, I put some clear acetate and foam adhesive on the back of the window. This will be the shaker of the card. I fill the area with some leftover sequins from the 
Brutus Monroe Mother's Day Inspiration Box using only the purple and cream colored sequins. 
Then, I adhered the 3"x 4" piece of cardstock that has the Glitter Glaze in Periwinkle.

Then, I adhered the front panel onto a black piece of cardstock that is 1/8" larger than the panel.


Next, I adhere the matted panel onto the Glitter Glaze in Periwinkle panel.  Finally, Adhere the card front panel onto the my 110# cardbase. I add some Pearl Pink heart next to my sentiment for a finishing touch.

Now the card is complete.

Supplies Used:
Brutus Monroe Sequins
Recollections Brand 110# Cardstock: White
Accent 80# Ultra Smooth Cardstock: Opaque White
Bearly Art Glue
Acetate
Tiny Pearl Pink Hearts
Copic Markers:
Stools: R20, R21 & R22, C1 & C2
Cabinets/Containers: Y21, R22, BV000, E33, C2, C1
Candies: B41,Y38, G43, BV04, R27,  & BG000
Girl Dress/Shoes: BV000, BV01, BV02, C6, & C7 
Girl Hair: Y21, YR24, & E15
Girl Skin: E00, E11, &  E95
Boy Clothes/Shoes: B93, B95, C4, C6 & C7
Boy Hair: E33, E15, &E37
Boy Skin: E00, E11, &  E95

Thank you for stopping by the blog today. I hope you found some inspiration!