Saturday, October 27, 2018

Treats for All with Hero Arts and A2Z Scrapbooking

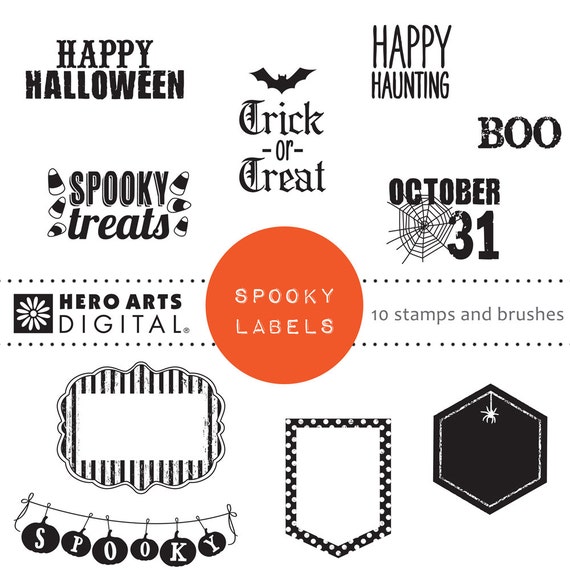
Hello Crafty Friends - Annie here with a fun project. Today we're creating some treat holders using the Hero Arts Spooky Labels Halloween Digital Kit.

image 0


I created two quick treat holders. Using store bought library pocket and goodie bags.

So, let's get started.

Treat Holder One:

I printed the Spooky Labels onto Orange colored cardstock. I then trimmed out the ornate label(bottom left corner). I then cut a slit in to middle of the label - so I can insert the goodie bag into it. I added a bit of adhesive to the goodie bag tab and pressed into place. 

Next, I added a treat and seal it with a bit of re-positional adhesive. Then, I decorated the label with October 31st label. I cut the label in half added a bit of purple cardstock behind the October portion and some foam adhesive. I added a bit of lime green cardstock behind the other half of the label. I layered the October portion on top of the rest of the label and adhered it to the ornate label.

Treat Holder Two:

From the printed the  Hero Arts Spooky Labels Halloween Digital Kit on Orange cardstock. I then trimmed out the spooky treats label(top left). I fishtiled one end of the label. I also trimmed a piece of purple cardstock to mat the label also fishtailing it. I punched the straight end to create a tag. I tied a bit of bakers twine to the label.

Next, I adhered the label tag to the library pocket front. Then, I added my treat to the pocket and seal it with a bit of Halloween washi tape. 

       
Quick and Simple! The  Hero Arts Spooky Labels Halloween Digital Kit does all the work for you! I hope you give them a try! 


Thank you for joining us today!!  


Annie
Supplies:
  • Hero Arts Spooky Labels at A2Z Scrapbooking
  • Recollections Brand Cardstock - Orange, Lime-green & Purple
  • Doodlebug Brand: Goodie Bag
  • Dollar Tree Brand: Library Pocket
  • Studio G Brand Baker's Twine in Black & White
  • Scotch Brand 3M Foam  & ATG Adhesive


Friday, October 26, 2018

Sugar Skull Fun with Rinea

Hello Friends - Annie here with a fun project just in time for Halloween. Today, I am making a sugar skull using the Haunted Variety Crafter's Pack This is a pretty easy and quick project.


Let's gather our supplies and get started on our project:
Plastic Skull - Dollar Tree
Plaid Mutli-Surface Paint - White
Aleene's Clear Tacky Glue
Various Dies - Spellbinders, Momenta, Sizzix, Memory Box
Tools: Paint brush, Die Cutting Machine, Scissors

I started by painting my grayish skull white. Then I set it aside to dry. 


While the skull was drying I die cut various hearts, flowers, leaves and swirls from the Haunted Variety Crafter's PackViolet/Gold Glossy Foil PaperTurquoise/Gold Glossy Foil Paper


Next, I played around with my arrangement. I pulled out a few pieces of the New Foil Paper Shreds in Starstruck Fuchsia/Fuchsia Foil Paper I used it to right down the front of the head to the tip of the nose. I just adhered the shapes to the skull with the Aleene's Clear Tacky Glue. The liquid glue gives you a bit of wiggle room to adjust the shapes as needed. What I do love about Rinea Foil Paper is that it holds it's shape. Which is perfect for those heart shapes around the eyes and the flowers inside of the eyes. Below are various photos showing all the shapes adhered to the skull. 


You can make this as colorful as you would like or monochromatic. It's totally up to you. That's it you have now created a sugar skull for your Halloween decorations.

Thank you for stopping by today - I hope you create a project or two with the wonderful Rinea Foil Paper and share them with us on Social Media!!

Thursday, October 25, 2018

Beth Duff Designs Collaboration with Unity Stamps Hop


Hello Crafty Friends - Welcome to the Unity Stamps and Beth Duff Designs Hop. I am so glad you are here today. This hop is to feature the New stamps from Unity Stamps - These wonderful stamps are designed by Beth Duff.  Together they have created 6 New Stamp Sets.


For card One and Two: I used Serenity is Peace Stamp set. 


For cards Three and Four: I used Peppermint Mocha Stamp Set


We have TWO amazing Unity filled prize packages to give away. Leave a comment on EACH design team member’s blog in the hop for your chance to win. {We will announce the winners on the Unity blog TUESDAY night.}


Thank you for stopping by.

Warm Wishes with Doodles Paper Playground

Hello Crafty Friends - Annie here today I have another fun card for you.

This blend features
sparkly reds, opaque whites, shimmery clear and mini stars sequins
 as well a few candy cane Fimo pieces.


I used the Polar Bear and his winter sweater and cap from Winter Warmer by Hunkydory Stamps. 

You can purchase this and all the Doodles Paper Playground Sparkle Blends from

Thank you for stopping by today!


Wednesday, October 24, 2018

Magical Collaboration with Witt & Sass Stamps and Kindred Stamps

Hello Crafty Friends - Today I am bring you a few cards using stamps from both Witt & Sass and Kindred Stamps for Magical Friendship Week!

These stamp sets are so magical - they feature some of our favorite Magical Students and their dorm Mascots.

From Witt & Sass: Magical Creatures Stamp Set, Stencil Wands & Magical Accessories

From Kindred Stamps: Students of Magic


  Stencil Wands   Image may contain: text   Students of Magic


Card one: The Potions Classroom -
I used the Students of Magic set and Magical Creatures -
 Snake as my Professor. I also used the Magical Accessories set for the background. 


Card Two: These two can't decide if they are enemies or friends - 
in the end they are Best Frenemies. The background was created using the 


Card Three: These twins are always up to something. 
I used the Students of Magic set and
 the sentiment from Magical Accessories Set.


Card Four: Three out the four Dorm Mascots are featured in this card.
The other one is busy teaching the potions class. I used the Magical Creatures 


Thank you so much for stopping by I hope you enjoyed this magical adventure.
I hope you join us all week long on both the Kindred Stamps Fan Club and the Witt & Sass Facebook Groups to see all the wonderful cards the other design team members have created. 
 Be sure to stop by both shops - Witt & Sass and Kindred Stamps to pick up your very own Magic!! 

Monday, October 22, 2018

Be Happy with Beth Duff Designs

Hello Unicorn Friends - Annie here with a happy rainbow panda card.

I figured even pandas want to be unicorns right!?
 I made this pandacorn by combining Cuddle like a Panda set and Unicorn Farts set

Cuddle Like Panda Stamp Set Unicorn Farts


I started by stamping both the panda and unicorn with Memento Tuxedo Black Ink onto Marker Paper. I colored the images with my Spectrum Noir alcohol markers. I only colored the Horn, Mane and tail of the unicorn in a rainbow of course. A bit of IG2 for the panda. Next, I cut away the mane and tail from the unicorn and toss out the rest. I then adhered them to the panda.
 Now, I have a Pandacorn!

I then die cut some clouds, grass and rainbow - set them aside. Next, I cut a card front panel - (A2 size 4-1/4" x 5-1/2") and added a bit of Distress ink in Salty Ocean for my sky. Then, I adhered the grass, rainbow and clouds to the front panel. Next, I stamped the sentiment from the Cuddle like a Panda set to the panel on the left side. I also stamped an additional sentiment from the Unicorn Farts set - cut it into a strip, added foam adhesive and adhered it to the front panel. Then, I added some foam adhesive to the pandacorn and placed it on the rainbow. For some finishing touches I added a bit of Silver gel pen to the horn. Also some Wink of Stella to the mane and tail.

Thank you for stopping by today!

Friday, October 19, 2018

Double Double Toil and Trouble with Simply Crafty SVG


Hello Friends - Today, I am bringing you a fun project using the New Witch's Cauldron from Simply Crafty SVG. 

This is a quick and simple little cauldron perfect for your desk or mantel to decorate for the up coming Halloween season. Sandy does an incredible job explaining how to put the cauldron together in her video.

This is my version of the Witch's Caudron. I used some black glitter cardstock to create my cauldron as well as glow in the dark web cardstock. a bit of pattern paper. 

 Showing the candle and orange lights and glowing in the dark

 Showing it again a bit darker room - you can still see a bit of the glow in the dark. 

Thank you for stopping by today - I hope you give the Witch's Cauldron a try this Halloween Season!