Wednesday, July 10, 2019

Two Cards One Kit with White Rose Crafts LLC

Hello Crafty Friends - I am here with 2 very different cards from one kit. This post is a bit long but, I hope you will enjoy it.

I am using the July Mediterranean Dreams Kit from White Rose Crafts LLC

 Image may contain: food No photo description available. No photo description available. No photo description available. No photo description available. No photo description available.
This fabulous Subscription Kit brings together sparkling, azure Mediterranean seas, sun-bleached shores and the rich colors of vibrant Mediterranean cultures in a carefully curated kit. Just gorgeous!

 Card #1 - Fresh 
 This is a simple card. Using one of the cut apart topper sheet for the sentiment and image.


Let's get started.


I used one of the card bases that comes in the kit. I pulled some MFT Gumdrop Green cardstock
 from my stash to accent the image and pattern paper.

First, I trimmed my topper and layered it onto the green cardstock. Then, I did the same to the pattern paper. I adhered the pattern paper and cardstock layer onto the yellow card base.

Next, I adhered the topper to the pattern paper with some foam adhesive.

Then, I pulled out the Doodles Paper Playground Sparkle Blend from the kit along with some Nuvo Drops for embellishing the card. I added two clusters of sparkle blends to the corners of the card and a butterfly to the topper. I added a bit of Dandelion Yellow to the center of the butterfly and some White Blizzard to the sentiment and as an accent to the lemons.

Now, the card is complete. Quick and easy.
Materials Used:
From the Kit: 

Other:
My Favorite Things Cardstock: Gumdrop Green


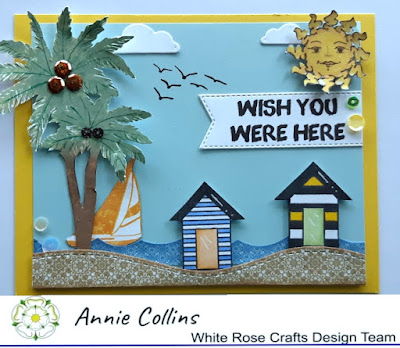
Card # 2 - Wish You Were Here

This card is a bit more detailed. I used the stamp set from the kit, pattern papers and sparkle blend.

Let's get started.

I started by cutting two strips from the pattern paper. I used the blue pattern strip and the cream and tan pattern paper. Then, I die cut the blue pattern paper into waves and the cream pattern paper into a sand hill. Then, I stamped the 2 little beach cottages and colored them. I also stamped the palm trees and boat. I used some Distress Oxide Ink for the boat and palm tree. I fussy cut the sun from the other cut apart Topper sheet 2. I pulled some yellow and light blue cardstock from my stash.

Next, I inked the edges of the waves and sand hill with some Distress Oxide inks. This will give them more definition. Then, I adhered the blue waves onto the light blue cardstock. Next, I layered the sand using some foam adhesive onto the waves. Then, I adhered the blue panel on to the yellow cardstock.
   

Next,, I adhered the palm tree and boat. Tucking the palm tree just behind the sand. I tucked the boat behind the palm tree. Then, I added the little cottages. I tucked in some clouds - one behind the palm tree and one just behind the sun which I popped up on foam adhesive. Finally, I added the sentiment and some Sparkle Blends. I used 6 Sparkle Blends from the past kit (Barista) for coconuts for the palm trees. I also added 2 small clusters to the left corner of the card and to the sentiment. I added a few seagulls to the sky - because we all know the Beach would not be the same without them.

Now, the card is complete!
Materials Used:
From the Kit: 
Kaiser Crafts Summer Splash Stamp Set (Cottages & Sentiment)

Other
Apple Blossom Stamps: Summer Holiday Set (Seagulls)
Fiskars Stamps: Tropical Getaway Set (Palm Trees & Boat)
Lawn Fawn Dies:
Spring Showers Dies (Clouds)
Stitched Hillside Border Dies
Ocean Waves Border Dies
My Favorite Things: Stitched Sentiment Strips Dies
Spectrum Noir Markers: CT4, TB4, LG3, BO2

Thank you for stopping by the blog today - I hope you found some inspiration!

Be sure to tag us White Rose Crafts LLC on social media 
if you create a project with products or kits purchased on the 

Monday, July 8, 2019

Wear Your Crown Shaker Card with Doodles Paper Playground

Hello Crafty Friends- I am here with a quick shaker card.

Shaker cards are just fun no matter how big or small the shaker part of the card is, it's the noise and shiny elements that make it so much fun!


No photo description available.
A bright, cheerful blend of lemony yellows, 
chartreuse, white and transparent, iridescent butter shades—
you’ll want to use this blend on all of your happiest projects.

No photo description available.
Summertime screams bright, happy colors and tropical themes. 
What says Tropical better than Flamingos, Palm Trees and Pineapples? 
You will find all three, along with some gorgeous lime green and
 hot pink sequins and confetti in this blend, 
plus some tropical flowers to bring it all together.


Here is my shaker card.

I created this card by first die cutting the pineapple in the center of the card front panel and then, stamping the pineapples throughout the panel. Finished it off with a sentiment on a fishtail banner and a few of the Sparkle Blends.

Materials Used:
Craftsmart Stamp and Die Set Hey Sweet Stuff
Tim Holtz Distress Oxide Inks: Squeezed Lemonade and Cracked Pistachio
Versa Fine Ink: Onyx Black
Foam  and Tape Adhesive 
Recollections Brand: Heavy Weight Cardstock
White, Lemon Yellow, and Lime Green 

Thank you for stopping by the blog today. I hope you found some inspiration! 

Be sure to tag us Doodles Paper Playground on social media -
if you create a project with our Sparkle Blends. 

There is also a new Facebook group where you can share 
creations you have made with Sparkle Blends!
Come check it out, share some inspiration!

All of our Sparkle Blends can be purchased only at the 

Sunday, July 7, 2019

Ahoy, Matey Card with Dies R Us

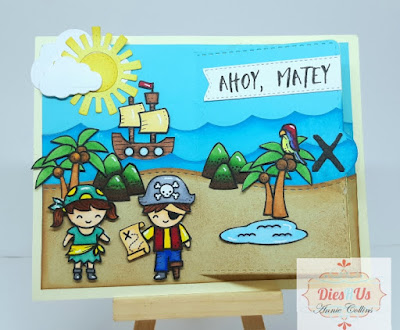
Hello Crafty Friends - I am here with a fun interactive birthday card.

Today's card is mostly Lawn Fawn Products. I wanted to create a fun child's birthday card. I used the Ahoy, Matey stamp set along with a few dies.


Lift the Flap -  by the X that marks the spot - to see the rest of the
 sentiment and of course the treasure!

Let's get started.

I stamped, colored, and fussy cut the images. I also die cut some waves into light blue cardstock and a stitched hill into tan cardstock. I die cut some clouds and sun as well.

Next, I added a bit of Distress Oxide ink in Mermaid Lagoon to the waves. The top of the light blue cardstock will become the sky. I add more ink to the wave caps the fade out toward the bottom.

Then, I add some Distress Oxide Ink in Vintage Photo to the sand hill. I used the sponge applicator for the top and sides. I then used a stencil brush and stippled the ink on to create the effect of sand.

Now, for the assembly of the card.  I puzzle piece the section back together using the card front panel as my base (the cream cardstock) for proper placement.  I use some washi tape to hold everything together so that I can die cut the flap. 


I place the Lift the Flap die in place, secure with some washi and run it through my die cutting machine. 

I die cut a second flap from light yellow cardstock for the inside. This will hide all the layers. I trim away the extra cardstock.


Next, I turn over the front panel and run adhesive down the back. 
I also adhered the yellow cardstock to the backside of the flap.

I put a bit more really close to the opening area. 

I then center the front panel onto the cream cardstock.

Then, I add some Distress Oxide in Vintage Photo with the stencil brush to the inside of the flap area.

Next, I start adding the images.
 First, I run most of the images through the Xyron 150 Sticker Maker.

I start with the inside of the flap area. I add the treasure chest, extra gold pieces, and jewels.

Then, I close the flap and start placing the other images to the front of the card. I tuck the little ship into the waves. layer the clouds and sun (so the sun is peeking out of the clouds) and the little mountains and palm trees. I added the parrot to one of the trees. As well as the small oasis. I then used some low profile foam tape to adhere the little boy and girl into place. Finally, I added the sentiment on the flap and inside the flap area over the treasure.


Materials Used:
Lawn Fawn - Ahoy, Matey Stamps

Lawn Fawn - Lift The Flap Dies

Lawn Fawn - Ocean Wave Borders Dies

Lawn Fawn - Simple Puffy Clouds Dies

Lawn Fawn - Spring Showers Dies

Lawn Fawn - Stitched Hillside Borders Dies

Distress Oxide Ink Pad - Fossilized Amber

Distress Oxide Ink Pad - Mermaid Lagoon

Distress Oxide Ink Pad - Vintage Photo


VersaFine Clair Ink Pad - Nocturne
Tsukineko Memento Ink: Tuxedo Black
Sakura Gelly Roll Pens: White, Black & Metallic Gold
Xyron Mega Runner Adhesive
Xyron 150 Sticker Maker
Tim Holtz Stamping Platform
Recollections Brand Cardstock: Cream, Light Blue, Light Yellow & Tan

Thank you for stopping by the blog, I hope you found some inspiration!