Thursday, February 13, 2020

Will You Be My First Mate Card with The Coffee Beans

Hello Crafty Friends - I am here with Valentine's Day Card using the
 All at Sea with Love digital stamp set. 
This cute little rowboat was designed by Anne Ingram.

The All at Sea with Love digital stamp set can be purchase via 
The Coffee Bean Stamping Machine located in 
the Facebook group Multi Crafters Craft Cafe
Click photos, albums. Coffee Bean Stamping Machine

All at Sea with Love digital stamp set.

This is the card I created using the All at Sea with Love digital stamp set.
Materials Used:
The Coffee Bean Stamping Machine: All at Sea with Love digital stamp set
Distress Ink: Seedless Preserves
Distress Ink: Tumbles Glass
Distress Ink: Salty Ocean
Distress Ink: Fossilized Amber
Lawn Fawn Dies: Stitched Heart, Cross Stitched Rectangle,
Sun, Cloud, and Ocean Waves
MFT: Cloud Stencil
Spectrum Noir Markers: DP1, DP2, and DP3
Imagine Crafts: Tear It Tape
Foam adhesive
Recollections Brand 110lb Cardstock: White 
Recollections Brand 65lb Cardstock: Purple, Medium Blue, and Yellow
Recollections Brand: Vellum
Accent Ultra Smooth 80lb Cardstock: White

I printed my image and sentiment onto white cardstock. I colored the image with my Spectrum Noir markers. I then used the could stencil with Tumbled Glass ink on the white cardstock. Next, I die cut the panel, add the stitched heart to the background.

Then, I die cut the waves from the blue cardstock and the vellum. 
along with the sun and cloud from yellow and white cardstock. I adhered the waves to the card front panel, the image of the boat. I used foam adhesive on the boat and sentiment.

I colored the heart in with Seedless Preserves ink and adhered the sun and cloud. Next, I adhered the front panel to the purple cardstock and then the card base.

Thank you for stopping by the blog today, I hope you found some inspiration!

Please join in on the fun at The Coffee Bean Challenge Blog and in the
 Facebook group Multi Crafters Craft Cafe

Tuesday, February 11, 2020

Love Card with Imagine Crafts

Hello Crafty Friends - I am here with a fun and easy Valentine's Day card.

Using a variety of Imagine Crafts products.
I created a YT video on the process you can view it below.


Materials Used:
Imagine Crafts/Tsukeniko
Stamps
Maker's Movement: Notes of Love Set
Kennedy Grace: Grace's Happy Heart Set
 Stencil
Heidi Swapp: Heart 3-1/4x 4-1/4
Jewels
Elle Tru
Cardstock
Strathmore Bristol Smooth 100lb: White
Recollections Brand 110lb: White
Recollections Brand 65lb: Medium Pink
Tools
Acrylic Blocks
Jewel picker up
Post-It notes 3x3
Masking Tape
Trimmer
Nikon DSLR Camera
MacBook Pro
Yeti Microphone

YouTube Video


All You Need is Love Card and Envelope with Rinea

Hello Crafty Friends - I am here with a quick and easy mini card and envelope perfect for a gift card or two for those special people in your life.

This project features the New Ghost Ink 2.0 and our beautiful Rinea Foil Papers.


Materials Used
Maker's Movement Die Set: Special Delivery
Maker's Movement Die Set: Petite Posies
Maker's Movement Die Set: Stitched Rectangle
Maker's Movement Stamp Set: Notes of Love
Imagine Crafts: Tear It Tape
Scotch 3M Craft Glue
Therm-O-Web Zots: Tiny Dots
Crafter's Edge Crossover II Die Cutting Machine
Recollections Brand 110lb Cardstock: White 3"x4"

Let's get started!

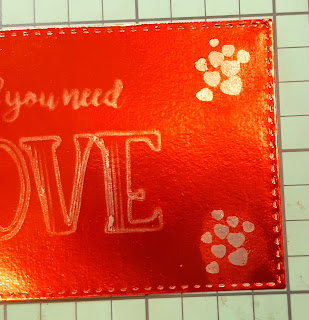
I then stamped the sentiment and tiny heart clusters in each of the corners
 with the Rinea Ghost Ink 2.0  onto Rinea Glossy Ruby/Gold Foil Paper which I used a stitched rectangle die to trim just under 3" x 4"  so I would have a nice border around the card.
I let the Rinea Ghost Ink 2.0 set for a few seconds then I wipe away the extra ink with a dry tissue.
 
The more you rub the lighter the sentiment and images become.
 
I then matted the stamped Rinea Glossy Ruby/Gold Foil Paper onto a piece of 110lb white cardstock that I used the die to cut it measures 3" x 4". 

Next, I added some adhesive to the side flaps of the envelope. I then gathered the decoration for the envelope.
 
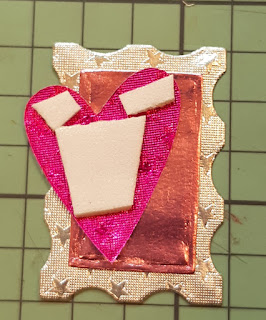
I adhered the Rinea Glossy Blush/Gold Foil Paper onto the 
Rinea Starstruck Silver/Silver Foil Paper to create the base of the postage stamp. 
Next, I added some foam tape to the back the heart shape which is
 cut from the Rinea Starstruck Fuschia/Fuschia Foil Paper and layered it onto the postage stamp.
 
I then adhered the cancellation lines which I die cut from Rinea Starstruck Silver/Silver Foil Paper to the top right-hand corner of the front of the envelope. Next, I adhered the postage stamp just overlapped the cancellation line on the right-hand corner of the envelope.
 
I turned the envelope over and remove the adhesive backing and press the bottom half of the envelope onto the sides.
 
I then turn over the envelope and add the die-cut leaves which 
I cut from Rinea Starstruck Jade/Jade Foil Paper to the left side bottom corner.
 
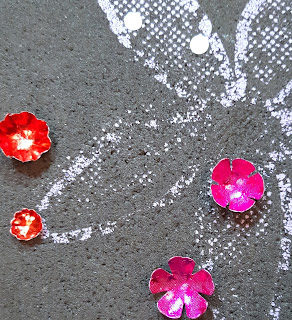
Next, I form the flowers which are cut from Rinea Starstruck Fuschia/Fuschia Foil Paper and Rinea Glossy Ruby/Gold Foil Paper and the centers from Rinea Starstruck Silver/Silver Foil Paper. I gently press the centers of the flowers to curve them and I add a bit of adhesive to the centers and layer the flowers. I add a bit more adhesive tot he center of the flowers and press 
  
For a finishing touch, I added a few tiny sequin hearts to the heart stamped clusters on the card.
Now the project is complete! 
You can write your message on the back of the card and tuck a gift card or two into the envelope along with the card.
 

Thank you for stopping by the blog today. I hope you found some inspiration!

Please tag us on social media if you create any project using any of our wonderful Foil Papers!
Don't forget to stop by the shop Rinea.com

Monday, February 10, 2020

Hugs Card with The Gray Muse

Hello Crafty Friends - I am so honored to be Guest Designing for The Gray Muse

If you haven't heard of The Gray Muse you are truly missing out.
 Rubeena is an extremely talented artist. She creates Enamel pins and Clear Stamps. She is so inspiring to so many including me.

I created this card using the stamp set called Hugs.
Materials Used:
Tsukineko Mememto Ink: Tuxedo Black
TsukinekoVersaMaker Pen
Ranger Embossing Powder: Detail Gold
Sakura Gelly Roll Pen: Gold
Spectrum Noir Markers: Leaves: CG1, LG3 & LG5
Pink Flowers: MG1, CR2, & PV1
Orange Flowers: BO1, CR1 & CR10
Berries: HB1
Hugs underneath: GY4
Sharpie Ultra Fine Point Pen: Light Pink, Dark Pink & Light Orange 
EK Sucess Powder Tool
Elle Tru Embellishments: Pearl Heart Droplets, Gold Jewels & Tiny Gold Hearts

Thank you for stopping by the blog today. I hope you found some inspiration!

Friday, February 7, 2020

You're Stinkin' Cute Card with Imagine Crafts

Hello Crafty Friends - I am here with a cute card featuring a variety of Imagine Crafts products.

There's a process video I will link it below.  

Here's the Video

Materials Used:
Imagine Crafts/Tsukeniko
Stencil:
Jot Brand: Little Friends - Raccoon
Stamp:
Lawn Fawn: You're Stinkin' Cute
Jewels:
Cardstock:
Strathmore Bristol Smooth 100lb: White
Recollections Brand 110lb: White
Recollections Brand 65lb: Light Pink
Tools
Acrylic Blocks
Jewel picker up
Post-It notes 3x3
Masking Tape
Trimmer
Nikon DSLR Camera
MacBook Pro
Yeti Microphone

Thank you for stopping by the blog today. I hope you found some inspiration!

Wednesday, February 5, 2020

With Love Card with White Rose Crafts LLC

Hello Crafty Friends - I am here with a card inspired by the February Moodboard over at the 

February's Moodboard
No photo description available.

This is the card I created.


Let's get started.

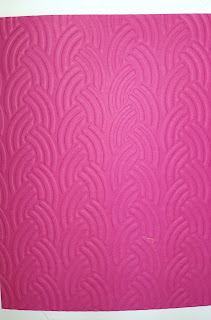
I trimmed a piece of medium pink cardstock to 4" x5-1/4" and
 ran it through my die cut machine along with Fiskars Embossing plate.


Next, I stamped the sentiment and a heart onto orange cardstock using Versafin Clair ink: Nocturne


I stamped the image of the rose onto yellow cardstock using Memento Ink: Tuxedo Black. Then, I adhered the images and sentiment to white cardstock. I trimmed out the images and sentiment. I also adhered the pink panel onto white cardstock. I used some foam tape on the flower, heart, and sentiment and adhered it to the card front panel.
 

I added a few embellishments of gold puffy hearts.

The card is now complete!

Materials Used:
Fiskars Embossing Plate: Braid
Prismacolor Pencils: Yellow Ochre: PC942, 
Canary Yellow: PC916, Orange: PC918,
Parrot Green: PC1006, and Spring Green: PC913
Sakura Gelly Roll Pen: Gold Metallic
Recollection Brand 110lb Cardstock: White
Recollections Brand 65lb Cardstock: Medium Pink, Orange, and Yellow

Thank you for stopping by the blog today. I hope you found some inspiration!

Be sure to tag us White Rose Crafts LLC on social media 
if you create a project with products or kits purchased on the 

Saturday, February 1, 2020

Be My Tweet Heart with A Perfect Time To Craft

Hello Crafty Friends - I have a new card for our challenge over at the A Perfect Time to Craft Blog.

This is always an Open Challenge and always "Anything Goes”. You're welcome to add unlimited entries per challenge and you may enter any crafting project with any theme.
For full details on our rules and on how to enter, please visit our rules page.

Our prizes consist of…
1st Prize: 3 sponsor kits, a certificate and a badge.
2nd Prize: 1 sponsor kit, a certificate and a badge.
3rd Prize:1 sponsor kit, a certificate and a badge.
DT Favourites: a certificate and a badge.
Spotlight Winners: a certificate and a badge.

Our sponsor for this month's challenge is
CraftsÃœprint

 I created this card using CraftsÃœprint My Tweet Heart Printable.

Thank you for stopping by the blog today. I hope you found some inspiration!